Creating the Container Report
The objective of a container report is to take one or more saved reports or layouts for existing reports and combine them together on a single PDF as the output.
Saved reports are placed directly into the Container report. Layouts for existing reports are used to embellish a saved report before placing these within the Container report. For most purposes, placing the report directly within the Container provides clear and consistent presentation. The layouts allow the addition of styling information, enhanced headers and the ability to combine the output of dissimilar summary reports into a single layout.
When you select the Create new container for existing reports option from the Report screen, you will see a screen similar to the following:
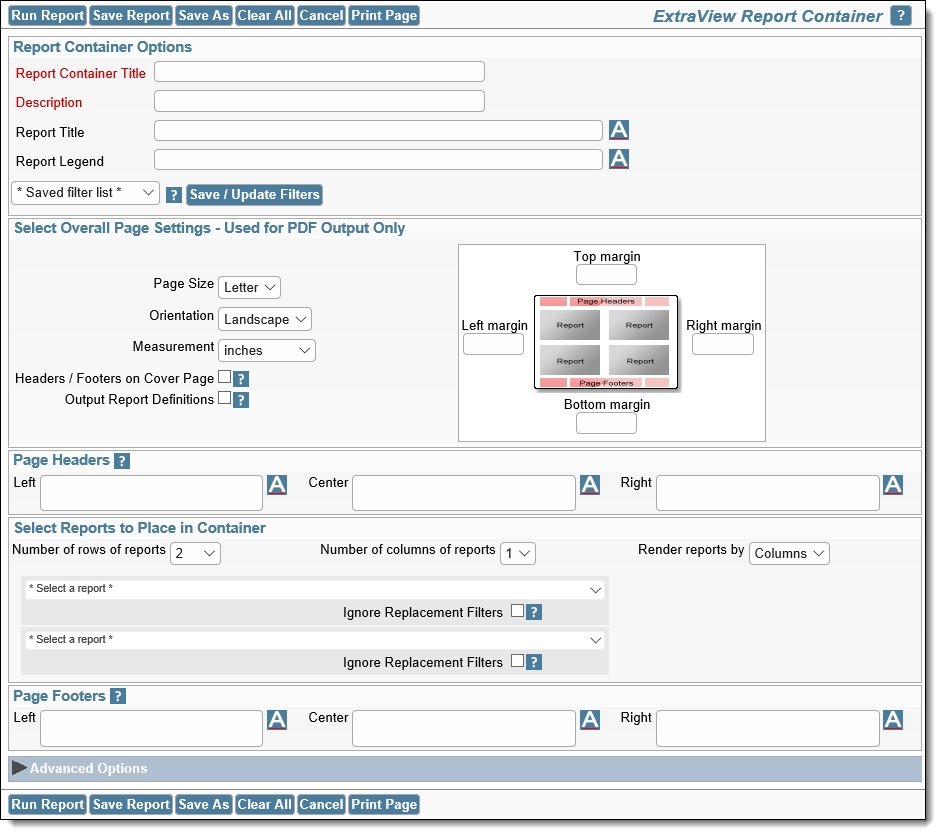
Report Container Screen
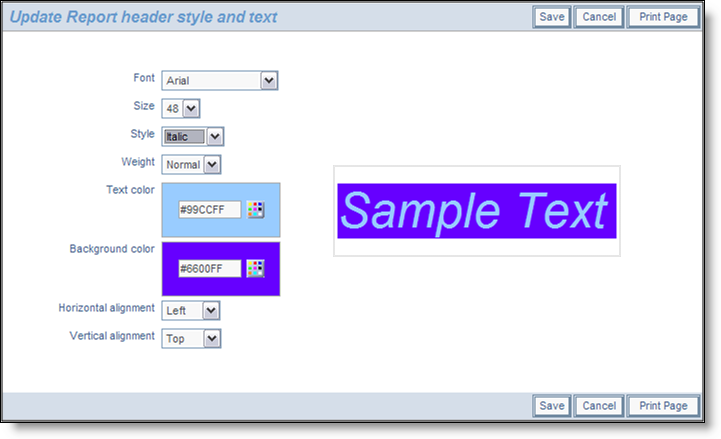
Setting the style of an element on a PDF report
- There is a button to the right of the Report Container Title that appears when you are editing an existing report. When you place your mouse over this button, you will see who created the report, who last updated the report and the dates when these actions occured. This is most useful for managing shared reports
- The * Saved filter list * allows for the selection of filters to modify the replacement filters beneath the Advanced Options fold towards the bottom of the screen
- Within the Overall Page Settings, you can select the paper size, the orientation and the select from inches or centimeters as the measurement. Using this measurement, you may also set top, left, right and bottom margins of the PDF you will create. This section also allows you to place the Headers / Footers on the Cover Page as opposed to only showing these on the reports and allows you to output the report definitions at the end of the reports
- The Page Headers and the Page Footers allow you to set text and styles for the PDF headers and footers
- If you want to place the page number on a header or footer, use the tag $$PAGE_NUM$$. The full list of tags you can include within your titles, headers and footers is explained in the section Substitutable Field Values later on this page
- You can insert a line break into a header or footer with a <br> tag
- In the section Select Reports to Place in Container, you first set how many reports across and how many reports down the page you want to render. These may be rendered by column or by row, giving a different layout on the PDF. Most of the individual reports within a Container use filters. At this time, it is important that all the individual reports use either standard or advanced filters only. You may not mix these within a single Container report
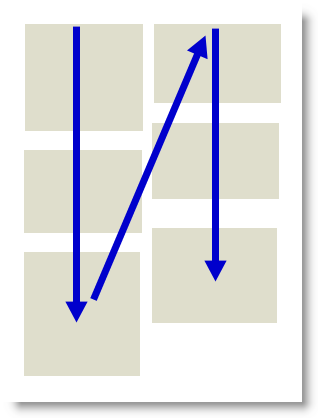 Rendering by column
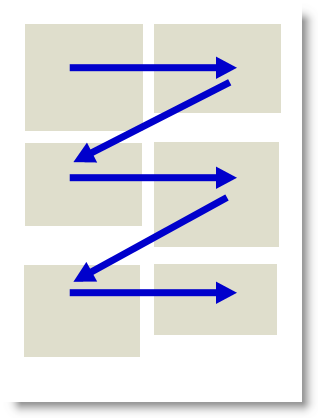 Rendering by row
Note how the top of each report in the container is aligned according to whether you are rendering by column or by row. The number of selection boxes will change according to how many rows and columns of reports you will include in the container. Simply select the report you want to place at the appropriate place in the container
- You may place up to 100 reports within columns within the report, with a maximum of 3 columns being displayed
- An example of the Container report output may look something like this:
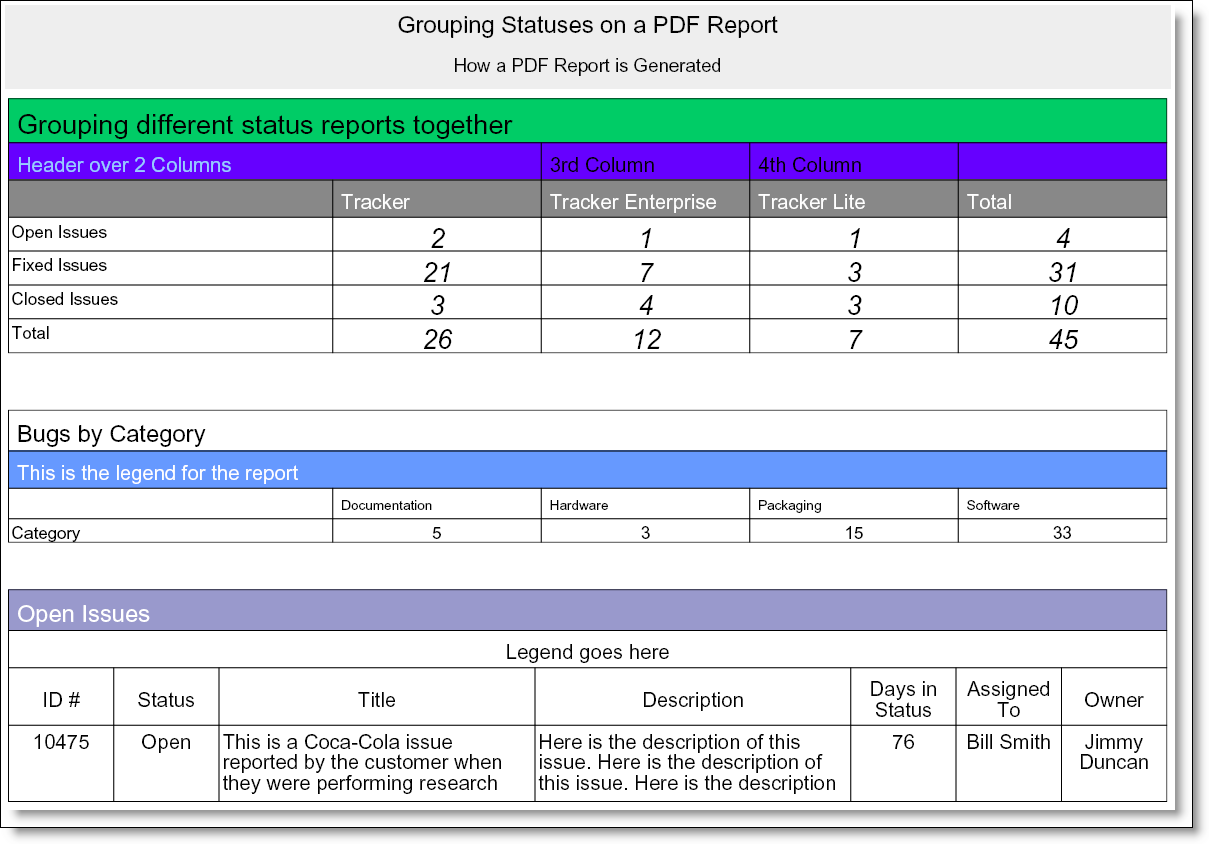
Sample Container report output as a PDF
Note: When you output a report to a PDF, and you see the message “ERROR:Infinite table loop”, this indicates that there is too much data to fit horizontally on the output page. The most likely solution is to reduce the number of columns you are trying to place on the output page, or to reduce the font size of the output.
Substitutable Field Values
It is often useful to be able to substitute a value in the header, footer or legend of a Container report with the current value from the report. For example, you might prepare a report for a Product that is chosen at runtime, or you might want to put the current date onto the report metadata. To achieve this, you can use tokens, of the form $$FIELD_NAME$$ within the container report legend, footer or headers. There are several built-in tokens that you may use, as follows:
| $$field_name$$ | The value of the filter with the field name of field_name. Only fields that are filters are eligible to be included in the headers and footers |
| $$SYSDAY$$ | The current date |
| $$SYSDATE$$ | The current date and time |
| $$PAGE_NUM$$ | The current page number of the report |
| $$NUM_PAGES$$ | The total number of pages in the report |
| $$HTML:<img src=”http://www.site.com/image.png” width=xx height=yy>$$ | This inserts an image that exists at the URL you specify into the output, with a width of xx and a height of yy |
| $$REPORT_ID$$ | The unique report ID of the report being output within the Container, as stored in the database |
| $$CONTAINER_ID$$ | The unique ID of the Container report from the database |
| $$CONFIDENTIALITY_MESSAGE$$ | The text within the behavior setting named CONFIDENTIALITY_MESSAGE |
| $$USER$$ | The name of the user creating the report |
Advanced Options
When you click on this fold, you will see the following:

Advanced Options
The Select Summary Report to Group Container Report Output option allows you to choose a saved summary report for a special purpose. ExtraView will take each row of this report and use it as input to the Container report as a runtime replacement filter, generating a copy of the container report for the list value returned in each row of the Summary report.
For example, you might want to prepare a container report which contains the same report numerous times, but using a different Product for each iteration of the report. If the Summary report returns 10 rows for 10 different products, then the Container report output will contain 10 sub-reports, each one filtered by a different Product.
The number of reports that can be produced by this iteration may be limited by your system administrator. If the report you produce is limited, there will be a message at the end of the report providing this indication.
Runtime Replacement Filters
Setting runtime replacement query filters on Container reports allow you to apply these filters to all the individual reports configured within the Container report. For example, you might want to apply the same date range to all the reports, or to select a single report as a filter for all the reports. Note that if any of the reports contain a filter on a field used as a runtime replacement filter, then the filter at the individual report level is dropped completely and replaced with the runtime replacement filter for the field.
For example, you might want to apply a runtime replacement filter that applies the same date range to all the output, or apply a filter that provides only results from a specific product within the output.
When you specify runtime replacement filters within a Container report, they will replace filters for the same field within the individual reports that they contain. If a filter on a field specified at the Container level does not appear within the contained report, it will have no effect. Further, it is not possible to specify conjunctions for the runtime replacement filters – they simply replace filters for the same field within the contained reports. The runtime replacement filters are always displayed in expanded mode, allowing you to make multiple selections within a field.
Tip: A typical use case might be to create a Container report that contains several reports about all your products, but you want to filter on the report output by a single product. You cannot select a runtime replacement filter with a value similar to Product = Any, but you can select all the product values in the list and store that as your filter. Then, after viewing the Container report, you can select a new filter value that is either just one, or a selection of products.
For each report you select to display within the Container, there is a checkbox option, Ignore Replacement Filters. When selected, the replacement filters will not be used to prepare this report. This allows some reports to use, and some not to use, the replacement filters.
Conditional Formatting
This is not supported within Container Reports for this release.
