Navigation Bar
The ExtraView main navigation bar appears at the top of most screens throughout the application. It allows instant access to the main functions of ExtraView. The navigation bar may be customized to any one of a large number of themes, so the following screenshots are representative of the functions as opposed to the color, size and location of the elements. Not all of the elements may be present in your installation as they depend on permissions and the configuration that your administrator has created.

Navigation Buttons
This list shows the standard buttons within the horizontal navigation bar. Your administrator may have configured different buttons, with different purposes and different titles on the navigation bar. This includes the presentation of a navigation bar that has “drop-down” selections.
- Home: The user’s personal Home page
- Add: Allows users to enter new issues into the database
- Query: Allows users to search the database
- Report: Allows users to create and run reports
- Workspace: Opens a workspace window where you can perform many ExtraView tasks in a single window
- Admin or Administration: Allows Administrative users to configure ExtraView for the entire organization. As a user you may not have access to this area of ExtraView Help: Allows users to access ExtraView’s online help system
- Sign Off: Click the Sign Off button to log out and return ExtraView to the Sign On screen.
Other Elements
Drilldown Box: This is a Search box that allows you to enter either keywords or issue ID’s to retrieve matches. The following rules apply:
- You may enter a single issue ID, or multiple issue ID’s. Separate multiple issue ID’s with a semi-colon character. If there are no results, ExtraView will attempt to treat the issue ID’s as words and look for these as text
- You may enter any single word or multiple words. ExtraView treats these as Quickfind queries and fetches the results
- If you start your entry with a # character, then the search can be complex. Please see the Quickfind documentation for full instructions
Account: Your name that you are signed on with appears on the navigation bar. This is also a link to your personal options. Clicking on your name accesses your personal options
Roles: Provided you have access to more than one user role, you will see a select list which contains all the roles you may adopt. When you select a new role, you are taken to the Home Page, and your role is reset
Business Areas / Projects: Provided you have access to more than one Business Area and/or Project, you will see a select list which contains all the Business Areas and Projects you may adopt. When you select a new Business Area and/or Project, you are taken to the Home Page, and your current Business Area and/or Project is reset
Report List: If your administrator has turned this feature on, you will see a list of public and personal reports that you may run. Simply select the report you want to run from the list and a new window will open with the results of the report
Menubar: This is a set of buttons that will alter as you alter the page you are viewing in ExtraView. It will offer a range of options that is relevant to the screen you are looking at.
Note: Button names and the name of the ID within the ExtraView Menu frame may be altered to reflect your company’s terminology. Your Administrator can also choose to display the ExtraView Menu as a horizontal screen menu, if this is preferred.
Personal Options
Click on your name in the navigation bar to access your personal options on the Change a user’s details screen. See this page for details on how you manage your personal options.
Roles
On the navigation bar, you may also have a list of roles that are available for you to adopt. This list of roles is the ones that the administrator allows you to adopt for different purposes. For example, you might have several roles, each corresponding to the use of a different Business Area. Simply click on the role you wish to adopt. If you have only been enabled for a single role, you will not find any links on this list, and you will not be able to change your role.
Business Areas and Projects
If this is enabled as an option on your navigation bar, then this list offers you the ability to move into a new Business Area and a corresponding Project. Depending on the configuration, you may or may not see this select list, or you may only see Business Areas and not Projects. The only Business Areas and Projects which will be visible will be those to which the Administrator has granted you access.
Reports
There may also be a list of reports that you can run from the navigation bar. If this is present, simply select a report from the list and this will be run immediately.
Gateway Navigation
 |
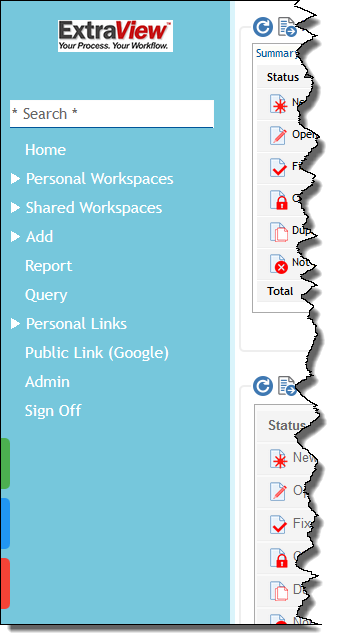
Your administrator will need to have configured this option for it to be available. It offers an alternative style of navigation, and with some additional capabilities.The Gateway navigation may contain the same selections as the horizontal interface. In addition, it may contain links to your personal and shared Home Pages, if more than one has been configured. There may also be links to your personal and shared Workspaces, if these have been configured.The Gateway interface allows you to define links to other applications and Internet sites. These are controlled via one of the buttons at the bottom left of the navigation bar. There are also buttons to access your personal options and to access Help.The Gateway interface may be configured with some or all of the following:
|
 |
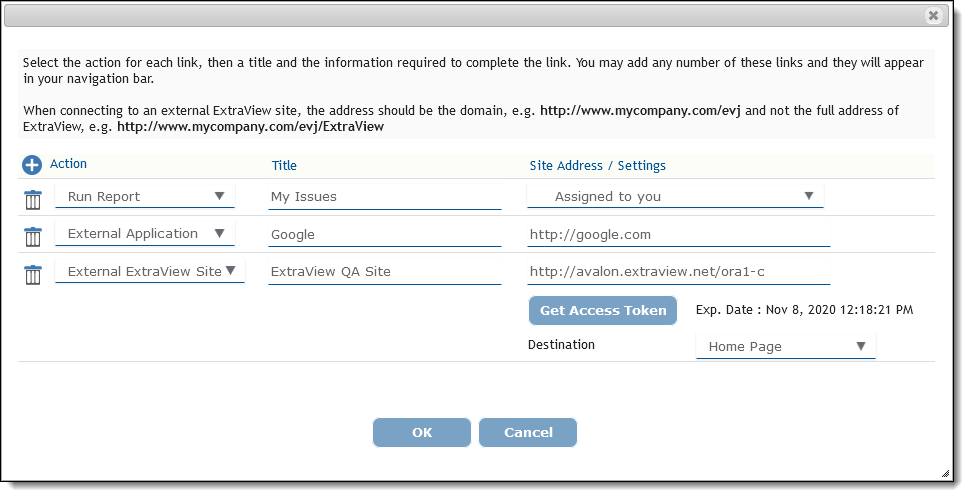
This option allows you to define personal links that appear within the navigation of the Gateway. These are shortcuts that allow you to place a link to a report, or a link to a second ExtraView installation, or a link to a third-party application on your Gateway menu.When this is clicked, you will see a dialog similar to the following: The different actions are: The different actions are:
|
 |
This option allows you to access your personal account details |
 |
This option brings up the ExtraView Help screen |
Click here for administrative documentation
