Navigation Bar
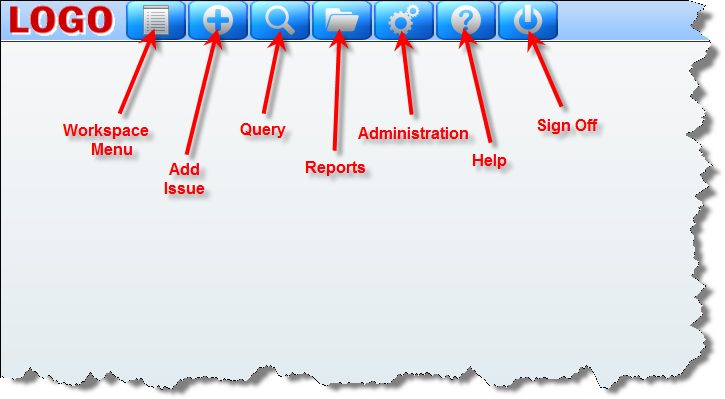
A typical workspace navigation menu looks like the following screenshot. Observe the icons on the navigation bar and the workspace canvas beneath. As you open new workspace panels, an icon for each is added to the navigation menu and a panel with the function is opened on the canvas. You may click on any of the icons to bring the panel represented to the top of your workspace. The workspace may occupy a space wider and higher than both your browser window and your computer screen. Scrolling across the virtual space is permitted. You may drag a panel off the visible portion of the workspace and leave it there. Clicking the panel’s icon in the navigation bar results in the panel becoming visible, wherever it is on the canvas, and coming to the front of all other panels.

Note that your administrator may have configured different navigation buttons to appear on your site. This includes the presentation of navigation bars that might include “drop-down” list selections.
The Workspace Menu
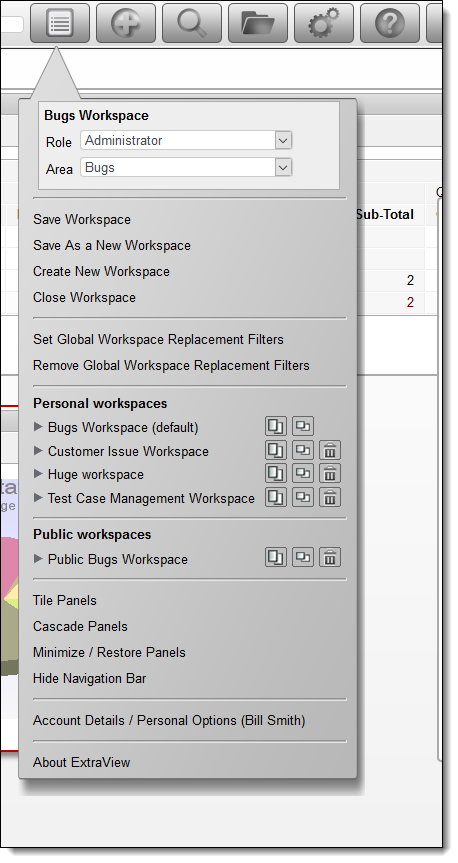
When you access the Workspace Menu by clicking on the first button on the navigation bar, you are shown a panel that allows the following to take place. Not all the options will be available, if your administrator has not granted you access.

- Drilldown Box: This is a Search box that allows you to enter either keywords or issue ID’s to retrieve matches. The following rules apply:
- You may enter a single issue ID, or multiple issue ID’s. Separate multiple issue ID’s with a semi-colon character. If there are no results, ExtraView will attempt to treat the issue ID’s as words and look for these as text
- You may enter any single word or multiple words. ExtraView treats these as Quickfind queries and fetches the results
- If you start your entry with a # character, then the search can be complex. Please see the Quickfind documentation for full instructions
- A select list that allows you to change your current role
- A select list that allows you to change your current business area and current project
- A link which allows you to save the current workspace. Open panels and their positions are saved. You must provide a title to your saved workspace. If you check the prompt by Set as your current workspace then the workspace becomes the one first opened when you enter ExtraView
- A link which allows you to Save Workspace under a different name. Open panels and their positions within the current workspace are saved. You must provide a title to your saved workspace. In addition, you may select a different role and/or a different Business Area and Project for the new workspace. If you check the prompt by Set as your current workspace then the workspace becomes the one first opened when you enter ExtraView. You may save the workspace for your own personal use, or save it to be shared as a public workspace. Shared public workspaces are displayed grouped together beneath your personal workspaces. Note that you should not save Quicklist and Detailed reports as part of your workspaces. Their contents are only generated when you drilldown from a query or report. They will result in an empty panel when you load a saved workspace with either a Quicklist or Detailed report
- A link to close your workspace. If you have more than one workspace open, then the browser window containing the workspace is closed for all the secondary workspaces opened after the first one (known as the primary workspace). If you close the primary workspace, you are returned to the standard interface
- Links titled Set Global Workspace Replacement Filters and Remove Global Workspace Replacement Filters. These allow the user to set up filters across all the reports within the workspace that can be changed without altering the underlying reports, and to remove these filters
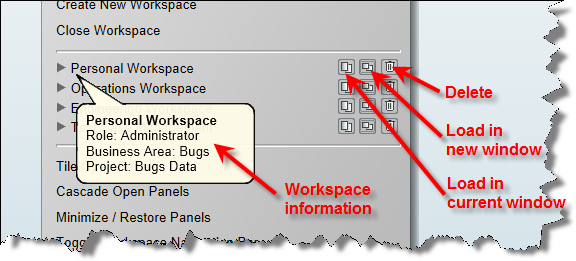
- A list of all workspaces that you have saved. Each workspace entry has an informative link and three buttons:
 Note that if you have set a workspace as the default, its title will appear in bold, and there will not be a delete button. If you want to delete a workspace that has been set as the default, save another workspace as the default once, then delete the original one.
- If you place your mouse over the arrow at the left of its title, you will see information such as the role, Business Area and Project to which the workspace belongs
- If you click on the title, or the first button, the workspace is loaded into the current window, replacing the current workspace
- The second button loads the workspace into a new browser window or tab
- The third button allows you to delete the workspace
- A link to Tile Open Panels. The open panels will be sized so that they are all visible, and occupy the complete area of the browser window
- A link to Cascade Open Panels. The panels are arranged from the top left-hand corner down towards the bottom right-hand corner
- The Minimize / Restore Panels button will toggle all panels off, and then on again when the link is chosen a second time. When the panels are minimized, you can open any panel from its button on the navigation bar
- A link to Edit Your Account Details. When you choose this, you can modify your details, after entering your password
- A link About ExtraView. This link will show you copyright information, as well as specific information about the version of ExtraView that you are using
Managing Panels
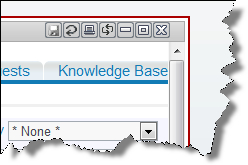
Each panel that opens will have small icons at the top-right hand corner that perform functions specific to that panel when they are pressed. All panels have icons to minimize, maximize and close the panel. The remaining icons are used to perform tasks such as update, delete, run, etc. All icons have a help tip which is seen by holding your mouse over the button.

Each open panel has a corresponding icon placed in the navigation bar, to the right of the main navigation bar icons. At any time, you may click on one of the icons and the panel to which it corresponds will jump to the front of all other panels. If the panel is out of range of the browser window, the workspace is scrolled so that the panel becomes fully visible. Note that if you place your mouse cursor over an icon, you will see the title of the panel to which it corresponds.
![]()
If you double-click on the title bar of a panel, then the panel is maximized, if you double-click again on the title bar, the panel is restored to its original size.
