Actions are rule statements that may be executed within directives. Not all actions may be included within all directives. For example, it is not valid to perform a REAUTHORIZATION rule within a load directive. This action is only valid within an onchange or preupdate directive. Note that the square brackets in the actions on this page refer to optional syntax.
ADD |
{ADD [AS role] [NOWAIT]: AREA = area_1, PROJECT = project_1, field_1 = value_1 [, field_2 = value_2] ... ... [, ATTACHMENT[.{selected}]]} This will add a new item to the ExtraView database, based upon a set of name value pairs, where the fields are the data dictionary names of the fields, and the values are valid for the display type of the field. This action only works within the postupdate directive, as it is essential to perform the underlying update before you initiate actions that are dependent. As an example, the following will add a new record when a button named ADD_SERIAL_BUTTON is pressed: if (ADD_SERIAL_BTN.{changed} && UNIT_SERIAL.{not null}) {
Note: You should always provide the parameters and values for the AREA and PROJECT fields with the ADD command. It is indeterminate as to which Business Area and Project into which the issue will be added without these.
The above example demonstrates the use of an implied assignment. When a field name is used in the rule like this: If the field that provides the values for the ADD operation is of type Log Area (e.g. the COMMENTS field), then only the last entry from the source issue is added to the new issue. The as role optional syntax allows the action to be implemented by altering the user’s current role to the role, purely for the action. The role is the title of the role, not its name. This is useful when you need to add a record to a different Business Area or Project where the current user may not have sufficient permissions. The optional NOWAIT keyword provides the facility to execute the ADD action as a background task, not waiting for the result of the action before returning control back to the user. This may be used if you have many ADD actions to perform, and you do not want the user to wait for these to complete before they may carry on working in the user interface. This keyword should be used with caution, as there are no indications to the user if there is a failure from the action. Any failures are reported in the application server log file. Also, note that if you place the action within an onchange directive, as opposed to within a preupdate or postupdate directive, then the values within the issue as they stand at that moment will be added to the new issue, as opposed to the final values when the user has submitted the issue for insertion or updating. The ADD_UPDATE task must be running for this option to work successfully. The optional ATTACHMENT keyword allows all or selected attachments to be copied from the current issue to the new issue being created. If the ATTACHMENT keyword is further qualified with {selected}, then only attachments that the user has individually selected with the Select? checkbox will be copied. The Select? checkbox is enabled on the user interface with the security permission keys named PR_ADD_PROBLEM.ATTACH_SELECT and PR_RESOLUTION.ATTACH_SELECT. The ADD action is not supported in these directives: load, clone, mail |
ADD ROW |
{ADD ROW: [TO layout_type_name] field_1 = value_1[, field_2 = value_2][, field3 = sourceField] ] } This will add a new row to a repeating record, where the square braces indicate optional elements and the parameter lists are the standard, as in the ADD or UPDATE actions. All the destination fields must be defined in the data dictionary as repeating row fields. The values may not be repeating row fields, as there is no certainty which of many repeating rows the value will refer to. In the same way as with the If the optional TO: layout_type_name is included, then the repeating row with that name is targeted for the addition of the new row. The fields being set must be in the layout that is loaded from the specified layout type, area, project and role of the user that is executing the rule operation. Occasionally you might want to add a number of blank repeating rows to an issue. However, it is not valid to add completely blank rows to a repeating row. You can, however, use an unused field that is not even on the layout in question. For example, to add three blank rows to a layout named MY_RR_LAYOUT, you could use this, utilizing the ALT_ID field which is not used on repeating rows and using a text field on the layout: {ADD ROW: TO MY_RR_LAYOUT MY_TXT_FIELD = ALT_ID}; The ADD_ROW action is not supported in these directives: load, clone, mail |
CLEAR |
{CLEAR} This causes the field to be cleared. As an example, to clear the contents of the field named PRIORITY: PRIORITY.{clear} |
COPY |
{COPY [AS role]: field_1 = value_1 [, field_2 = value_2] ... ... [, ATTACHMENT[.{selected}]]} This action is similar to the ADD action, except it may be used entirely without the field/value list. Thus {COPY} by itself will create a new issue, with all the values from the original issue. Specifying a name and value allows that value to be used for that specific field name. This action only works within the postupdate directive, as it is essential to perform the underlying update before you initiate actions that are dependent. If you do not specify a parameter and value for the AREA and PROJECT fields, then the issue is copied to the AREA and PROJECT of the current issue. You should not specify the PROJECT field without also specifying a value for the AREA field. In the same way as with the The optional NOWAIT keyword provides the facility to execute the COPY action as a background task, not waiting for the result of the action before returning control back to the user. This may be used if you have many COPY actions to perform, and you do not want the user to wait for these to complete before they may carry on working in the user interface. This keyword should be used with caution, as there are no indications to the user if there is a failure from the action. Any failures are reported in the application server log file. Also, note that if you place the action within an onchange directive, as opposed to within a preupdate or postupdate directive, then the values within the issue as they stand at that moment will be copied to the new issue, as opposed to the final values when the user has submitted the issue for insertion or updating. The ADD_UPDATE task must be running for this option to work successfully. The optional ATTACHMENT keyword allows all or selected attachments to be copied from the current issue to the new issue being created. If the ATTACHMENT keyword is further qualified with {selected}, then only attachments that the user has individually selected with the Select? checkbox will be copied. The Select? checkbox is enabled on the user interface with the security permission key named PR_ADD_PROBLEM.ATTACH_SELECT and PR_RESOLUTION.ATTACH_SELECT. The COPY action is not supported in these directives: load, clone, mail |
DEFAULT |
{DEFAULT} This sets the field to its default value. As an example, to set the contents of the field named PRIORITY to its default value: PRIORITY.{default} |
ERROR |
{ERROR: Message} This is only valid in preupdate rules. It will prevent the update from going forward and return an alert to the user with the text Message. Note that several messages may be accumulated and returned in the alert to the user as all the rules are executed without updating the database. Contrast this with the {STOP: Message} action where execution is stopped immediately. You may use the standard escape characters in the error message. The most common requirement is to use n as a linefeed within your message. |
LOG |
{LOG: Message} This writes the Message to the system log. |
|
|
{MAIL: 'template_name’, [INCLUDE:ATTACHMENTS] [user [, user2, user3, ...] | field_name [, field_name2, field_name3, ...]]} The above syntax uses the predefined ad hoc email template named template_name. The email is sent to one or more users specified by The optional It is not valid to use this action within the mail directive. It is most typically used within the preupdate or postupdate directives. Both HTML and text-based email templates may be sent with this action. This is controlled by the format of the template itself, and a simple naming convention for the template. The processing for this action requires either the template_name or the template_title to follow the MAIL: action. If this name or title has a suffix of .txt, then any email generated to a user whose personal email format is full, brief or very brief text will be generated in text. All other mails will be generated as HTML. This implies that if you want email templates where some users will receive HTML mail and others will receive text, you should create two templates. For example, you might have one template named Customer_Response_Template with the HTML and another named Customer_Response_Template.txt with the text. When creating text-based email templates, make sure that you use the WYSIWYG (what-you-see-is-what-you-get) mode of the email template utility and be sure that the template does not contain any HTML tags. In the email rule action, use the HTML template name or title, but without the .txt suffix. If a text template does not exist, all users will receive the HTML template as a result of the action. If a text template exists, users with text email format preferences will receive the text email template. If an HTML template does not exist and a text template does exist, then all users will receive the text template. Examples
The first example emails the |
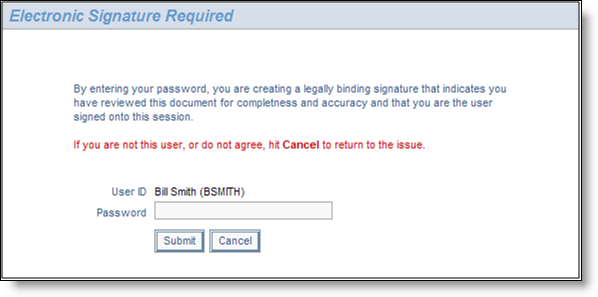
REAUTHORIZE |
{REAUTHORIZE: user_field_name [NODISPLAY] 'message to display'}
The REAUTHORIZE action is only supported in the preupdate directive. As stated above, users have the ability to alter field values within their issues after an onchange directive is processed, and the electronic signature would not reflect the values within the issue at the point in time the user provided their signature. |
SAVE |
This rule is valid within onchange directives only. It provides functionality equivalent to use of the Save and Continue button. When the action is triggered, the issue is saved with its current values, and the user may continue working within the issue to make further changes. |
SAVE POINT |
{SAVE POINT: } This rule is valid within onchange directives only. It provides a temporary "checkpoint" save of an issue for the current user. Issues are only submitted for permanent saving to the database when the user subsequently clicks on the Submit button, or they are idle for a period that amounts to the value stored within the behavior setting named SAVE_CONTINUE_TIMEOUT_SECS. This command is typically used within sites with complex workflow, where users spend a large amount of time processing an issue, and where there is a concern that they may be interrupted by a system failure or that they may leave their computer screen open with unsaved work in progress. Once the The command is typically executed within the rules when the user completes a part of the screen and is about to move to a new section. For example:
When the user clicks on the fold field named During the time that the issue has been saved at a checkpoint, until the issue is Submitted or automatically saved, no other user can edit the issue. |
STOP |
{STOP: Message} This will interrupt the processing of preupdate rules and returns to the user without executing further rules. This action works differently from the ERROR action in that the ERROR action continues execution and may accumulate more than one message. You may use the standard escape characters in the error message. The most common requirement is to use n as a linefeed within your message. |
UPDATE |
{UPDATE [AS role]: linkName field_1 = value_1 [, field_2 = value_2] ... ... [, ATTACHMENT[.{selected}]]} This will update one or more records, based upon the definition of the link specification. If the link points to more than one record, all affected records will be updated. This action only works within the postupdate directive, as it is essential to perform the underlying update before you initiate actions that are dependent. As an example, the following will update all customer contact records, if the contact is changed: <== link custCSRInfo ==> AREA='CSR Calls', CUST_LIST If the field that provides the values for the UPDATE operation is of type Log Area (e.g. the COMMENTS field), then only the last entry from the source issue is added to the new issue. In the same way as with the The as role optional syntax allows the action to be implemented by altering the user’s current role to the role, purely for the action. The role is the title of the role, not its name. This is useful when you need to update a record in a different Business Area or Project where the current user may not have sufficient permissions. The optional ATTACHMENT keyword allows all or selected attachments to be copied from the current issue to the new issue being created. If the ATTACHMENT keyword is further qualified with {selected}, then only attachments that the user has individually selected with the Select? checkbox will be copied. The Select? checkbox is enabled on the user interface with the security permission key named PR_ADD_PROBLEM.ATTACH_SELECT and PR_RESOLUTION.ATTACH_SELECT. The optional NOWAIT keyword provides the facility to execute the UPDATE action as a background task, not waiting for the result of the action before returning control back to the user. This may be used if you have many UPDATE actions to perform, and you do not want the user to wait for these to complete before they may carry on working in the user interface. This keyword should be used with caution, as there are no indications to the user if there is a failure from the action. Any failures are reported in the application server log file. Also, note that if you place the action within an There is a 5,000 issue limit to the number of linked issues which will be updated with this action. The UPDATE action is not supported in these directives: load, clone, mail |