Mass Updates of Issues
Click for end user documentation
It is not recommended that you give end users access to this facility, as it allows the mass update of issues. One wrong update could affect hundreds or thousands of issues and may be very difficult or impossible to undo. This function is most frequently used for tasks such as:
- Reassigning issues from one person to another
- Reassigning open issues from one release to the next
- Setting a field on many issues to a single specific value
Access to this feature is controlled by the security key named PR_RESOLUTION.MASS_UPDATE_ISSUES.
Assuming the permission is set to be able to use this feature, there will be a button labeled Mass Update Issues on Quicklist Reports, Detailed Reports and Custom Reports that you generate. This button allows the batch or mass update of a list of fields available to you.
Not all fields can be updated by this method. Only fields to which you have write access, and fields that are of display type List, Pop-up, Tab, Checkbox, Log Area, Text, HTML Area, Currency, Number, Decimal, Date, Day and User can be updated. The fields that are offered for update are those that exist on the edit layout in the current business area and project. You cannot update any field outside your current business area and project. However, if your query that selected the field to mass update contains records in other business areas and/or projects, then these will be updated, assuming the field is on the edit layout of the specific area / project.
The execution of mass updates is a background process within ExtraView. Once started, the process cannot be interrupted. This provides several advantages, in that ExtraView will prevent several mass update operations happening concurrently (which may lead to data integrity problems, and the corruption of data) and it gives a significant amount of insulation from problems such as a disruption of the communications network or the client computer crashing midway through the process. To use this feature:
- First, prepare a report
- Click on the Mass Update Issues button on the menu bar of the report
-
You may update any number of fields with one pass of the mass update procedure. After you select a field, you can use the
 button to add an additional field to the update process. If you want to remove a field, you can use the
  button that appears on the second and subsequent fields
 - For each field you add you will see a prompt asking for the new value for the field as well as the list of all the issues that are about to be updated. You can uncheck any issue from the list that you want to exempt from the update
- You will see a report with each issue to be updated once you select the fields to be updated. Each issue has a checkbox. You may deselect any issues you want to omit from the mass update operation
-
In addition to the fields you select to be updated, you will see a number of other fields to assist in identifying the issues you are about to update. By default, these fields are:
- ID
- PRODUCT_NAME
- MODULE_ID
- STATUS
- If you want to display different fields to the user, you may create a layout named MASS_UPDATE_REPORT. As with other layouts, you can create multiple versions of this layout for different Business Areas, Projects and User Roles. The layout displayed to the user will be the one for their current Business Area, Project and User Role. See this page for more details
- You must check the button Generate Email button if you want the standard notification sent for each issue being updated. The default for mass update is not to send email, as you may be generating a very large list of updates and hence email notifications
- Click Update all records. Note that if you are updating a large number of issues, the process may take some time to complete, probably around one to three seconds for each issue.
Note the following when using Mass Update:
- If a field you are updating is a multi-valued field or part of a repeating record that can have many values, then the update will add the new value to the existing list of values for the field you are updating
- If you attempt to update a field to a value of * None *, ExtraView will perform a check to ensure this is a valid entry, dependent upon whether the field is required, or whether the field is subject to a FIELD/LAYOUT VISIBLE IF layout cell attribute. If the field is required, then the * None * entry will not appear in the list of values shown. If the field is subject to a FIELD/LAYOUT VISIBLE IF constraint, then an error will be returned if ExtraView attempts to update the field in a way that violates the FIELD/LAYOUT VISIBLE IF rule
- You may not be able to undo this mass update operation, so take care before pressing the Update all records button
- Mass update is not restricted by rules such as Visible If and Required If, etc. Issues will be updated and only enforced if you attempt to interactively update an individual record again. The principal reason for this is that mass update cannot stop during its execution to ask for additional input on an issue-by-issue basis. It is a background task. When you modify an individual record following the mass update, the rule will be enforced
- To conserve database resources, ExtraView limits this feature to updating a maximum of 5,000 issues in a single pass. If you need to update more than this number, simply run the selection multiple times and perform the update over again
- You may update issues across multiple business areas and projects provided the value to be updated does not violate the required and required if layout cell attributes of the current user role, current business area and current project of the user performing the operation. Also, you must not violate the allowed values relationship of the issue, within the current user role, current business area and current project of the user. If any of these conditions are encountered, you will see an error message stating why the issue cannot be updated
- If you include a field with a display type of Log Area in a mass update operation, the existing log area entries are untouched, and a new log area entry is added, corresponding to the text entered into the mass update field
- It is possible that you may update issues across multiple business areas and/or projects, and that in doing so you will attempt to mass update a field that does not exist on the edit layout for one or more areas / projects. When this happens, the value in that area / project will not be updated, and no error occurs
- The mass update function will not update all records if the query used to generate the list for updating used the advanced query interface, and used the or conjunction. There is a simple workaround, to create the list using each part of the filter without the or conjunction in turn, and perform the update
- Any user or administrator may only run one mass update operation at one time.
Example
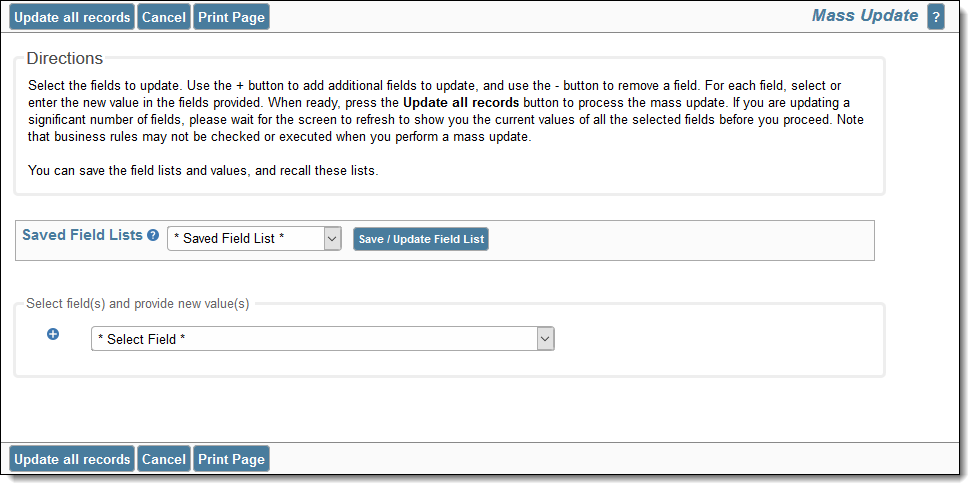
This shows how you can reassign all open issues from one person to another, for a given product: Prepare a Quicklist report that uses Product, Assigned To and Status as filters. From the resulting report output, press the Update button. You will see a screen similar to:

Selecting a field to update
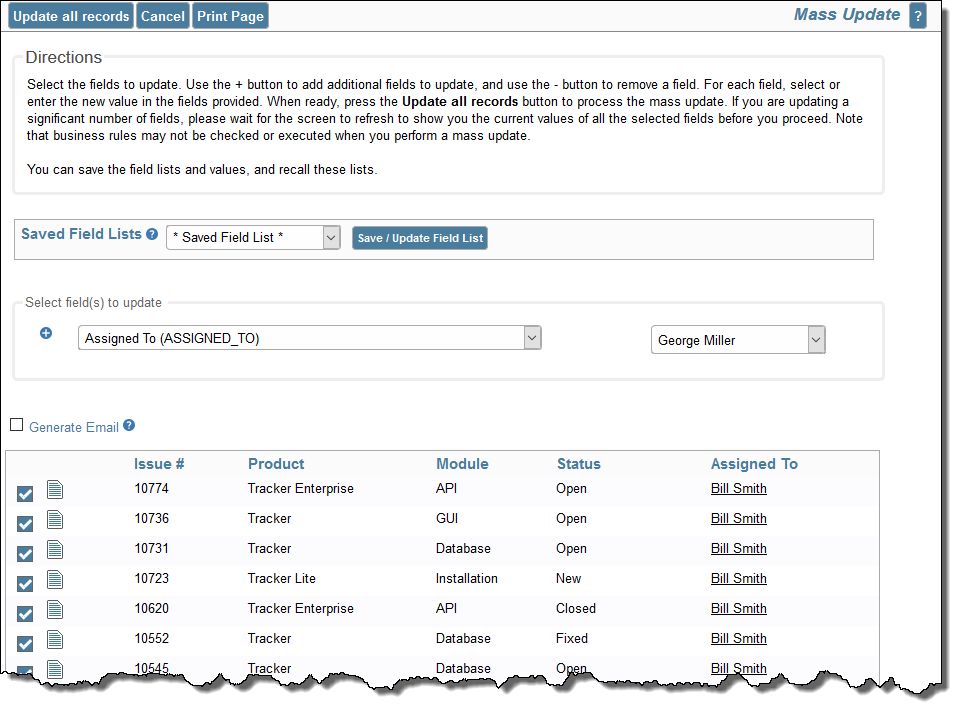
Select the Assigned To field from the list and the screen will redisplay, showing something similar to:

Mass update screen
From the select list labeled for the Assigned To values, select the person you want to reassign the issues to. You can view any of the issues to check whether they should be part of the update, and you can uncheck any of the issues. You can also add one or more fields to the mass update by pressing the  button.
If the field you are trying to update is dependent upon another field (for example a module field may be dependent upon product), then you will be prompted for the parent field, then the child field, to ensure that the relationships between the values are kept intact and only valid combinations are stored.
If you try to update a parent field that would invalidate the child records, for example trying to set the product field to a value that is not appropriate for a given module, you will receive an error for that issue, or issues, and these issues will not be updated.
When ready, you can press the Update all records button.
You will be asked to confirm that you want to update the issues.
The default is that email notification is not sent when performing a mass update of issues. However, you can turn this on, by clicking the Generate Email checkbox to on.
On the screen, there is a checkbox that allows you to alter the mass update capability to a mass clone utility. When you check this, you will see that you can select a new business area and a new project. When you perform the update, the issues are copied to the new project, rather than updated. When you undertake this function, you are asked to confirm the operation before it proceeds. See the next section of this guide for more details.
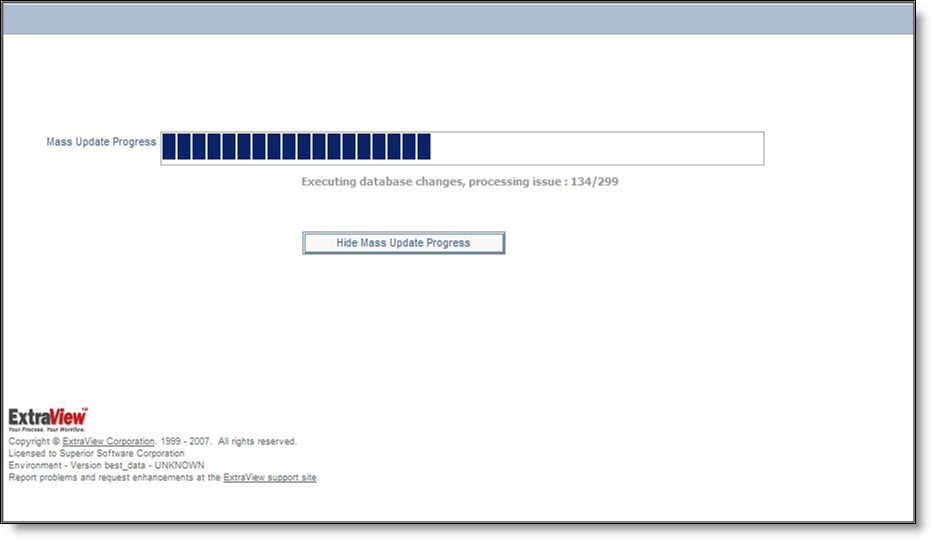
While the mass update is underway, you will see a progress window as follows:

Mass update progress bar
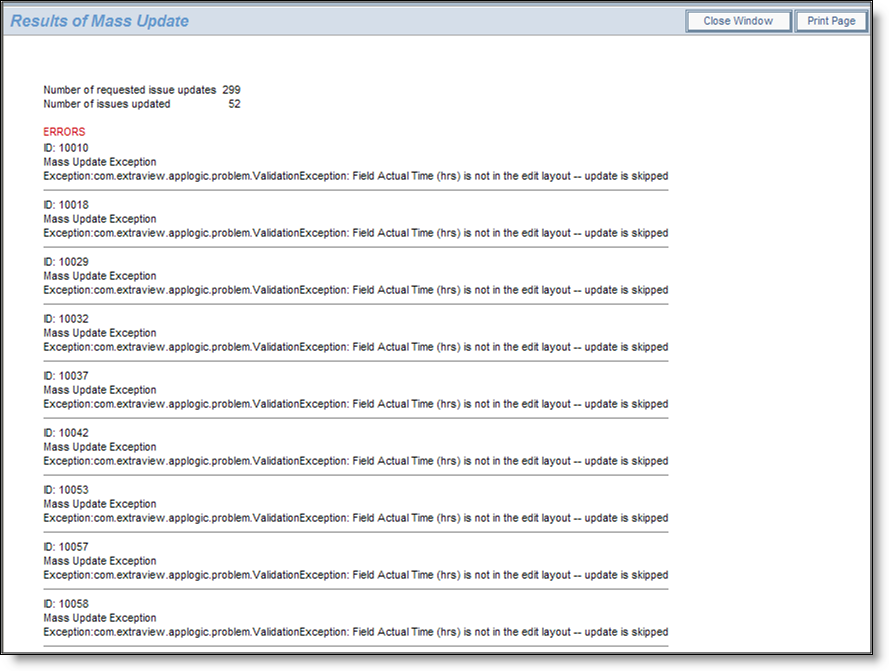
Note: Pressing the button to hide the progress bar, or closing the window has no effect on the execution of the mass update. As a background process, it will continue. The progress bar is purely for informative purposes. Once the mass update is complete, and assuming you have not closed the progress window, you will see a summary of the mass update, including any errors encountered. The most common error is trying to perform a global mass update across several business areas, when the field you are trying to update is not on the edit screen for the business area and project to which the issue belongs.

Results of a mass update, showing errors
Saving the Mass Update Settings for Future Use
Once you have selected the fields to update, you can click the Save / Update Field List button and provide a name for the list. In the future, any fields saved in the list may be selected to populate the screen with them to facilitate another similar mass update.
Special Use Case – Trigger Mass Update Without Updating Specific Fields
There are occasions when you want to be able to trigger mass updates over a range of issues, without updating specific fields selected on the Mass Update screen. This is usually done when you want to trigger some business rules within the PREUPDATE or POSTUPDATE directives, and these rules will make the updates to the issues. To achieve this, select the issues to be updated, then perform the mass update by selecting * None * as the field to update. ExtraView will then update all the selected issues, executing the business rules which will make the updates.
