Creating & Updating Layouts
Layout types can be created from the administration utility named Create and Maintain Layout Types or can be created while editing a layout within the Design Center. Once the layout type exists, you can choose to use it within a combination of Business Area, Project, Role and Display Target, from the prompt Add a new layout for the entire system. The following screenshot shows the initial presentation of the Design Center.
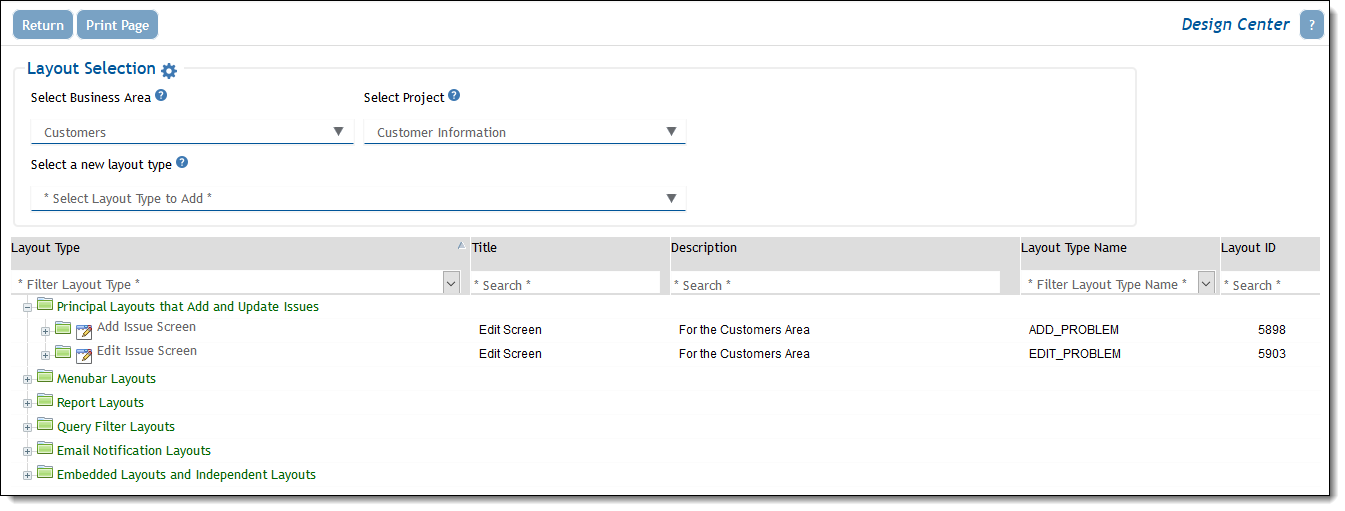
Initial Design Center Screen
The initial layout is designed for simple access to the functionality of the Design Center. You choose the Business Area within which you want to work, and can then use the display to navigate to the layout you want to work with, or you can add a new layout type into the current Business Area. The assumption is that you are always going to work within the default Project for the Business Area, and to use the Desktop browser as the display target for the layout you are working with. The default also assumes the layouts you are wortking with will all use the same user role.
If you want to see the full navigation to all the potential layouts, click on the  icon to the right of the Layout Selection title. The screen then offers additional options to navigate to the layout you want to work with:
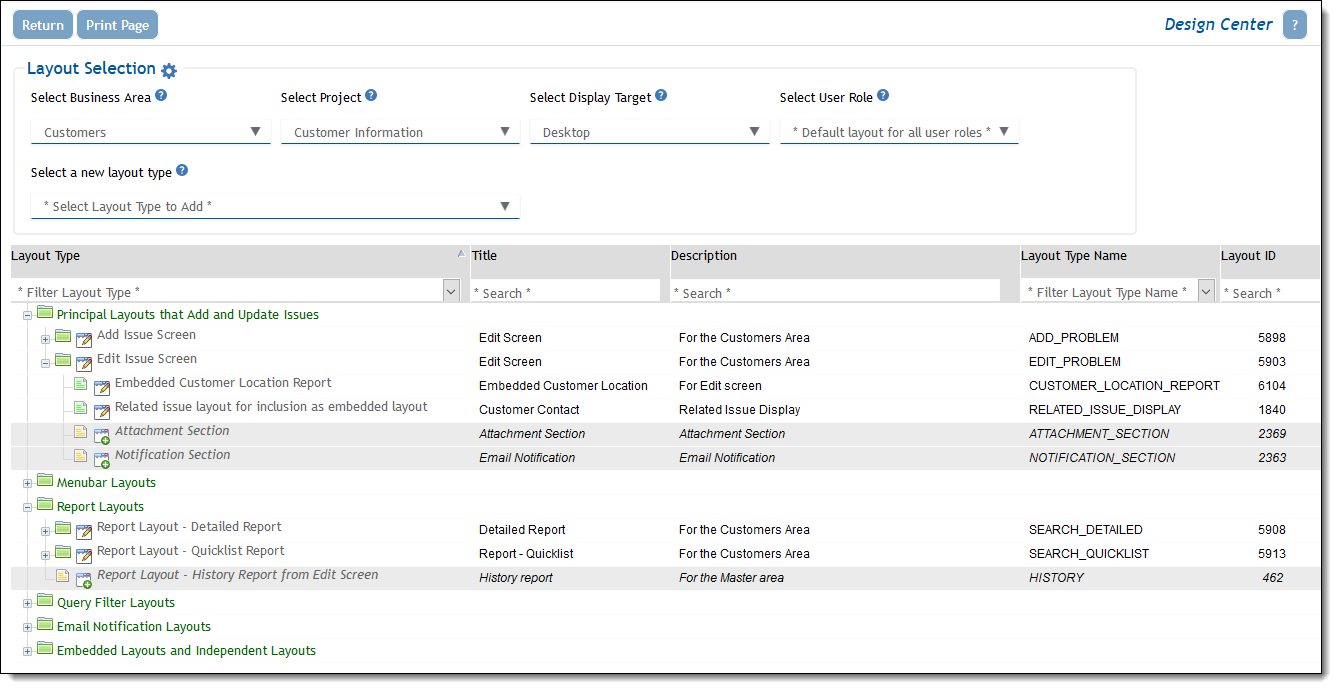
Complete Design Center Screen Options
Note: The rows in the table with a white background show layouts that are defined explicitly within the current selection of Business Area, Project, Desktop Target and User Role. The layouts with the grey shaded background show inherited layouts.. To see the complete layout details, just hold your mouse over the layout type in the table.
| 1 | Use this icon to change between the initial and complete views of the layouts within the Design Center |
| 2 | This select list allows you to navigate to the appropriate Business Area |
| 3 | This select list allows you to navigate to the appropriate Project |
| 4 | This select list allows you to select the Display Target you want to work with. The choices are Desktop, Tablet and Phone |
| 5 | This select list allows you to navigate to the user role you want to work with. The default is that the layout you work with will work across all roles |
| 6 | Use this select list to add a layout type into the current combination set with the Business Area, Project, Display Target and User Role. The layout type must already exist |
| 7 | The select lists within the table can be used as filters when working with large complex sites that contain many layouts |
| 8 |
The layouts for the current selection are split into sections as follows:
|
| 9 | Again, layouts that explicitly exist within the current selection are displayed with a white background |
| 10 | Again, layouts that are inherited from elsewhere are displayed with a grey background. |
Note: The edit function allows you to delete layouts, whether they were created by yourself as an administrator, or created by ExtraView. You should not delete an ExtraView created layout. ExtraView will not function correctly if you do so.
Display Target-Based Layouts
The default is that a layout is defined for use as a Desktop layout and used within a supported browser. You should always define these within your system, as the inheritance will look for a Desktop layout to present to the user if a Tablet or Phone layout does not exist. If the user accesses ExtraView from a Phone, and no Phone layout exists, the Tablet layout will be inherited. If no Tablet layout exists, then the Desktop layout is used. Most users tend to use their phones and their tablets in portrait mode, as opposed to landscape mode. The recommendation is to create phone layouts that have a single column, and tablet layouts that use two columns. Many desktop layouts use four columns.
Role-Based Layouts
Layouts are typically defined first for general use across all the roles within a selection. Field-level permissions can be used to control much of the different behavior needed for different user roles. However, it is sometimes extremely useful to define a completely different layout for a user role. For example, you might have a set of layouts used within your company to add and to update issues, but want to present a much more concise and simpler layouts to your customers so they can add and update issues. You accomplish this by creating role-based layouts.
Editing Operations Within a Layout
- If you are not selecting a layout that will be used as the default across all user roles, select the user role to which the layout will apply from the select list at the top of the screen. Note that you can clone a layout for a different user role by editing an existing layout, altering the user role to which it belongs and saving the layout
- To add a layout where an existing layout of the same type already exists, click the Edit button beside the existing layout type example you would like to use. If no layout of an available type currently exists, select the desired layout type from the Add new layout drop down select list. You can then perform a “save as” operation
-
When you click the Edit button, a screen similar to the following appears:
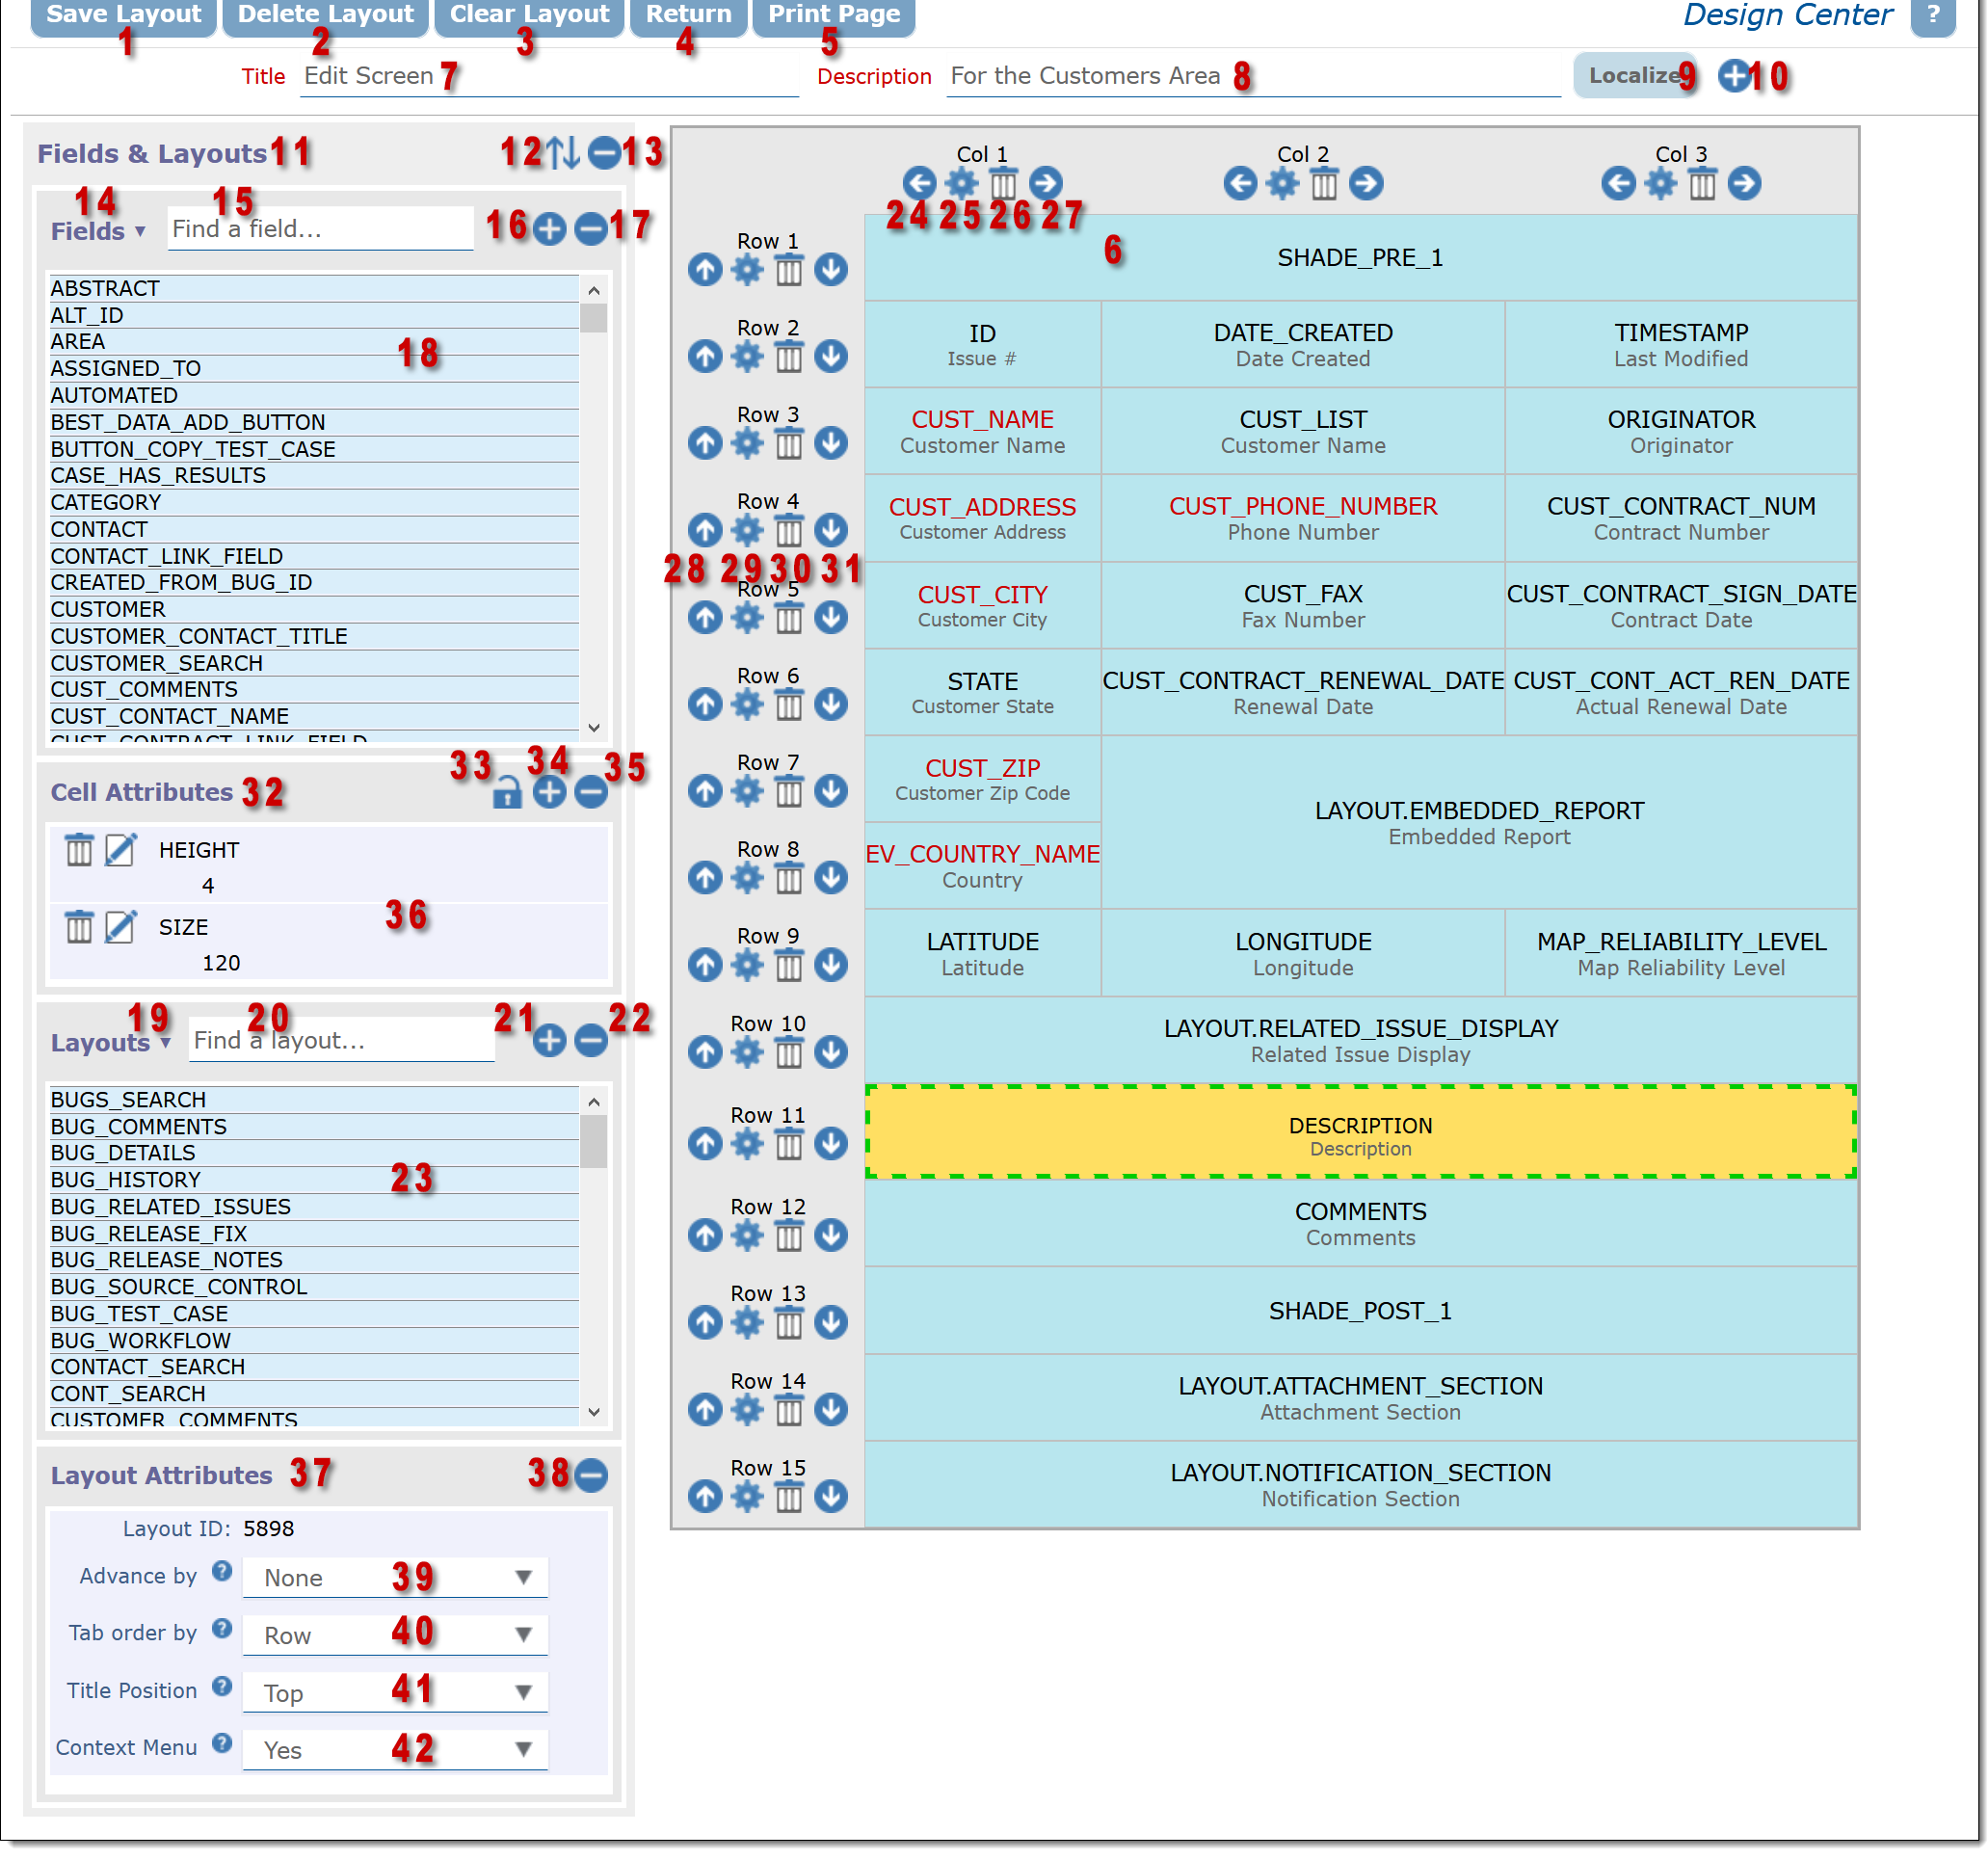
Design Center Screen
- Save Button – Saves the current layout, leaving the administrator within the layout
- Delete Button – Deletes the current layout. You must confirm the operation before the layout is deleted
- Clear Button – Clears the current layout of all fields
- Return Button – Return to the initial Design Center screen with the list of layouts
- Print Page – Print the contents of the current window
- The main grid where selected fields are shown in the position where they will be rendered on the layout. Note the scroll bars around the main grid which allow you to reposition the layout. Selected fields are highlighted. Note that a field may span more than one row and / or column
- The Title for the layout
- The Description of the layout. If the behavior setting named LAYOUT_SCREEN_TITLES has a value of YES, the layout Description of the ADD_PROBLEM and EDIT_PROBLEM layouts are used as the screen title in the top right-hand corner of the rendered screen. This allows different titles to be set for each add and edit screen in each business area and project. If the value of the setting is NO, then the title of the add and edit screens are global and taken from the title to the data dictionary entries for the fields ADD_PROBLEM and EDIT_ISSUE_SUMMARY
- Localize button – this only appears if localization is turned on for the installation, and allows you to localize the Description for the layout
-
Layout Options toggle – when this is clicked, a section similar to this opens:

Use the select lists to alter the role, layout type, business area or project where you want to store the layout, as a “save as” operation
- Fields and Layouts – This section is fixed to the left-hand edge of the screen and provides all the controls to create and place both fields and layouts onto the grid. In addition, you can create and maintain layout cell attributes to control the behavior of the fields, and layout attributes to control the behavior of embedded layouts
- Invert field list button – this button toggles the field list so that field titles are displayed in order, as opposed to displaying their names
- Minimize field/layout lists – this button toggles the field and layout section, reducig itsappearance to a single button on the screen
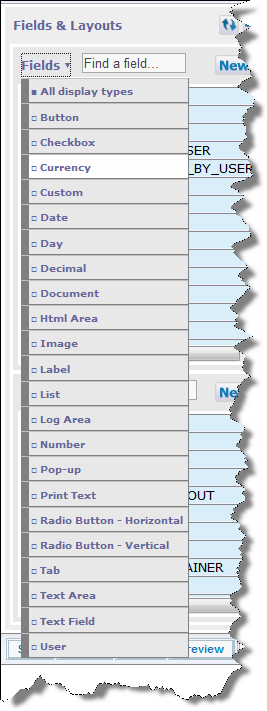
-
Field filter list – selecting this will display allow the filtering of the field list to a single field display type
- Find a field – start typing into this field and all fields in the list that match the pattern will be displayed, and all other fields will be dropped from the list
- New field button – this brings up the data dictionary screen to add a new field. When you first click the button, you are asked if you are creating a new Field, Expression, Label or Screen field
- Minimize field list – this button toggles the field list, to reduce its appearance to a single row on the screen
-
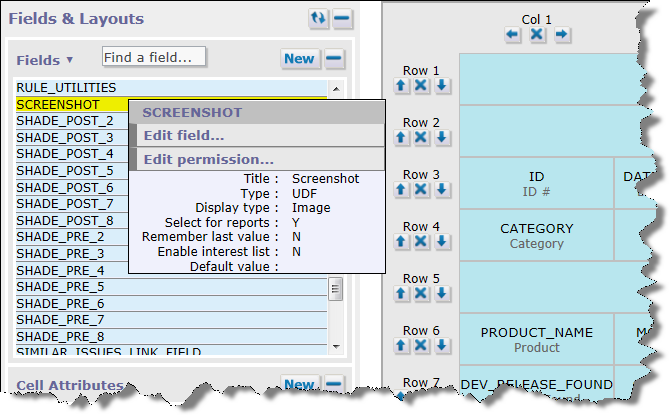
Field list – this scrollable list shows all the available fields that you can drag and then drop on the main grid. Fields may be dropped on any empty location in the main grid. If you right-click on a field name, you will see details of the field. Note the Edit button. When you click this, a window will open showing the field in the data dictionary. You can make any modification you require to the field and its attributes at this point. If the field has a display type of list, popup, tab, or radio button, there is also the ability to Edit field list values. Clicking this pops up a window where you can modify the list values. An option is also available on this list to modify the permissions of the field. This pops up a window within which you can modify the permissions, role-by-role
- Layout section – this allows you to manage your layouts to embed within the main grid, including creating new ones
- Find a layout – start typing into this field and all layouts in the list that match the pattern will be displayed, and all other layouts will be dropped from the list
- New layout type button – this brings up the layout type screen to add a new layout type
- Minimize layout list – this button toggles the layout list, to reduce its appearance to a single row on the screen
-
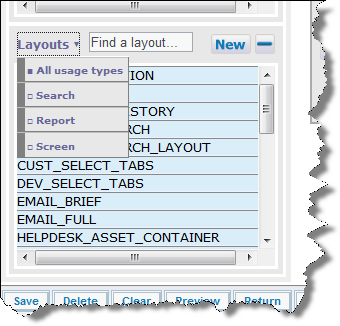
Layout list – this scrollable list shows all the available layouts that you can drag and then drop on the main grid. Layouts may be dropped on any empty location in the main grid. Use the Layouts button to filter the layouts by type
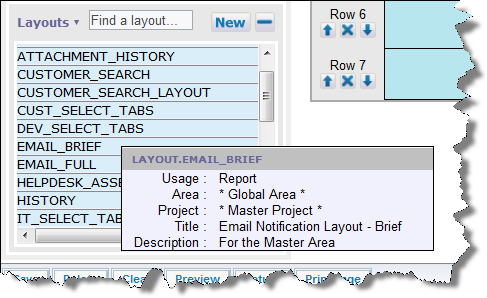
If you right-click on a layout within the list, you will see its details. Note that layouts you have created will have a Permission button. When you click this, a window will open allowing you to modify the permissions to the layout. You can make any modification you require to the field and its attributes at this point.
- Insert column to left button – Insert a new column to the left of the button
- Modify column attributes – Add, modify or delete attributes for this entire column
- Delete column button – Delete the entire column
- Insert column to right button – Insert a new column to the right of the button
- Insert row above button – Insert a new row above the button
- Modify row attributes – Add, modify or delete attributes for this entire row
- Delete row button – Delete the row
- Insert row below button – Insert a new row below the button
- Cell attributes area – This is the area where all the layout cell attributes are managed. Click on a cell in the main grid to select it as shown in the screenshot below, and the cell details panel will display all the information about the cell
- Cell Permissions – modify the field permissions for the cell
- New layout cell attribute button – Click this button to add a new layout cell attribute. See the section on layout cell attributes for information on managing these
- Minimize layout cell attributes button – this button toggles the layout cell attributes information, to reduce its appearance to a single row on the screen
- The layout cell attributes that are configured for the selected field in the main grid. Note the buttons to delete and modify the layout cell attributes
- Layout Attributes area – this area will display information on any selected embedded layout within the main grid
- Minimize Layout Attributes – this button allows you to open and close the layout attributes section
- The Advance By option is a layout attribute that allows you to set a direction to advance the placement of a field as you place these on the layout, to column or row.
- Tab Order By layout attribute allows you to set the order for tab control by end users entering data into the form. This can be by column or by row. The Title Position attribute allows you to place the field labels either to the TOP or to the LEFT of each field value on the rednered layout
- The Title Position option allows you to place the field titles to the left or to the top of the field values when the layout is rendered. Note that the field titles for Related Issue Display layouts and Repeating Row layouts will always be placed at the top of the field values
- Context Menu – When this is set to Yes, a context menu is placed over each field within the layout. When the user clicks the context button, a popup menu allows them to perform various options on the field, according to their permissions. For example they may look at the history for the field. If they have administrative privileges, they can see details of the field and see details of the layout. This attribute may be overridden at the field level on the layout with an attribute also named Context Menu
- Confirmation Screen – this entry only appears when you are editing an ADD_PROBLEM layout. If you set this option to No then the ADD_CONFIRMATION layout will not be displayed when the user inserts the issue from the add screen.
Field Manipulation on the Main Grid
- Selecting a field – click on the background to the cell
- Moving a cell – click on a cell and drag it to a new, empty location on the main grid. Note that any layout cell attributes to the field within the cell will be moved along with the field itself
- Removing a cell from the main grid – click on the background to a cell and drag it back to the field list.
- Layouts – perform similar actions as those above to manipulate layouts
- Extending a cell over multiple columns – click on the right-hand edge of the cell and drag the edge to the right over empty cells. Release the mouse over the rightmost cell to which you want to extend the cell
- Extending a cell over multiple rows – click on the bottom edge of the cell and drag the edge downwards to the bottom row to contain the cell. Release the mouse
-
Selecting the text in a field to copy to the clipboard –
- Click on the cell to highlight the cell
- Either Ctrl-Click or Double-Click on the cell and the text is highlighted
- Ctrl-C to copy the text within the cell to the clipboard
- You may then paste the text anywhere else you require.
Embedded Layout Manipulation on the Main Grid
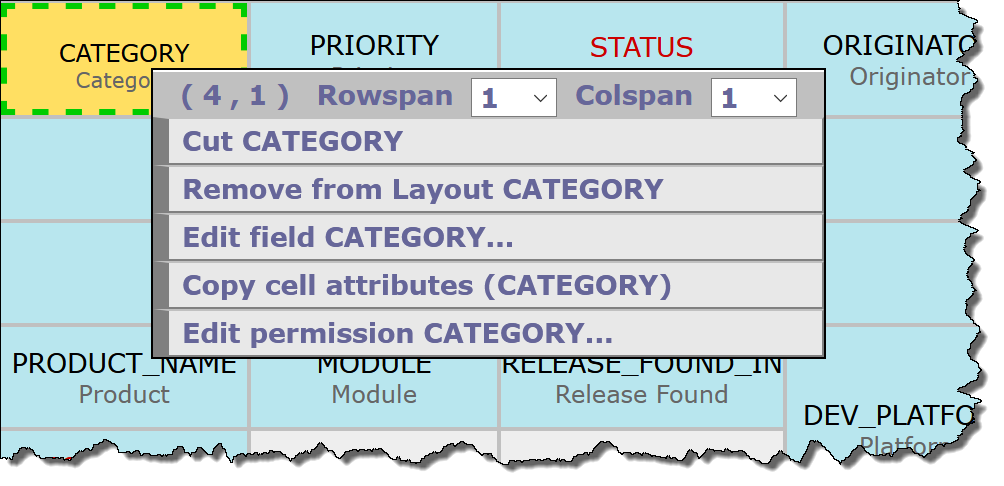
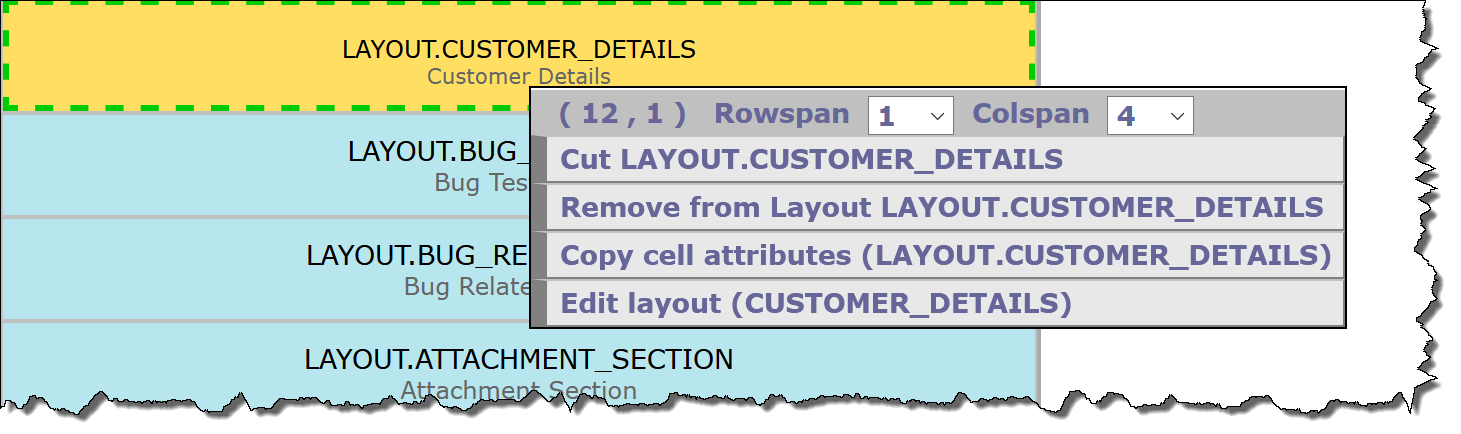
If you right-click on an embedded layout within the Design Center you have options to remove the layout, to copy its cell attributes (and then paste these to another layout) and to edit the embedded layout. Choosing to edit the embedded layout will open a new browser tab where you can edit and save changes to the embedded layout before returning to the current layout.
Duplicate Fields on Layouts
It is not permitted to have the same field included on the same layout or different layouts that are grouped together by embedding one layout within another. ExtraView catches a field duplicated within a single layout within the design center, but the design center cannot catch the situation when a field is duplicated by virtue of being contained in an embedded layout. The reason for this is that when you create an embedded layout, it may be included in any one of a number of other layouts, and each of these may or may not have the field duplicated. The error of duplicated fields can therefore only be caught at runtime. When testing your installation, you may see an alert message similar to the following screenshot:
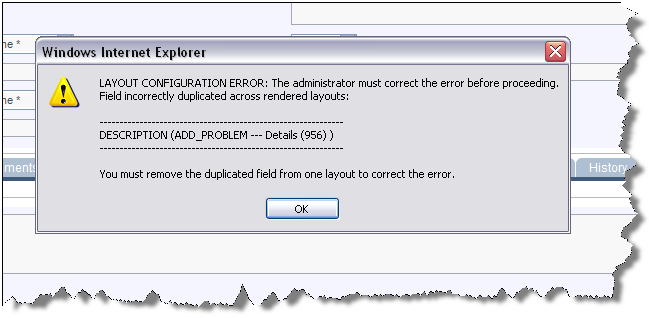
The above example shows that the field named DESCRIPTION is duplicated. First it is included on the ADD_PROBLEM layout, and then on the embedded Details layout. Further, the ID of the Details layout is displayed. You must resolve the duplication by removing one of the fields from one of the layouts before your installation will function correctly.
Using the Layout Description as the Title to Add and Edit Screens
The Description field on Add and Edit layouts has a special property. It may be used as the title to these screens, allowing the administrator to provide different titles for each Add and Edit screen. For example, you might give the Add and Edit screens different titles in different Business Areas. The standard behavior is that the title of the data dictionary field for the screen is used as the screen title. If you give a title of $.TITLE$$ to any of the following fields, then the layout description will be used as the title to the screen as it is rendered.
- ADD_PROBLEM – The Add Issue screen
- ADD_PROBLEM_SUMMARY – The Add Issue Verification screen
- EDIT_ISSUE_SUMMARY – The Edit Issue screen
Layout Rendering and Ajax
The layouts are rendered by the user’s browser when they navigate to the appropriate function for the layout. There are many occasions when ExtraView uses Ajax calls to the server from the browser to handle the updating and refreshing of information on the layout. For example, the layout cell attributes Visible If and Read-Only If use Ajax calls to refresh only the part of the screen that is affected with the logic.
The biggest upside of this is vastly improved performance, compared to refreshing the whole screen, but there are a few consequences that should be understood.
- If ExtraView sees that an entire row of cells on your layout is empty, i.e. there are no values with write permission, and there are no values to render with read-only permissions, then the entire row is suppressed and is not rendered. This is most often the desired effect as there is not “empty” space on the screen
- The fields that are suppressed in this way do not exist within the browser’s memory (what is known as the DOM). This means that the fields are not available to be processed using JavaScript. You might therefore try to manipulate a field within a hidden row, and find that your logic does not work as expected. The solution is to always have a visible field on the row, even if that field is just a placeholder. Alternatively, use a layout cell attribute of STYLE, and place a CSS style on the field of display:none. This places the field into the browser’s DOM, but it is made invisble with the CSS style.