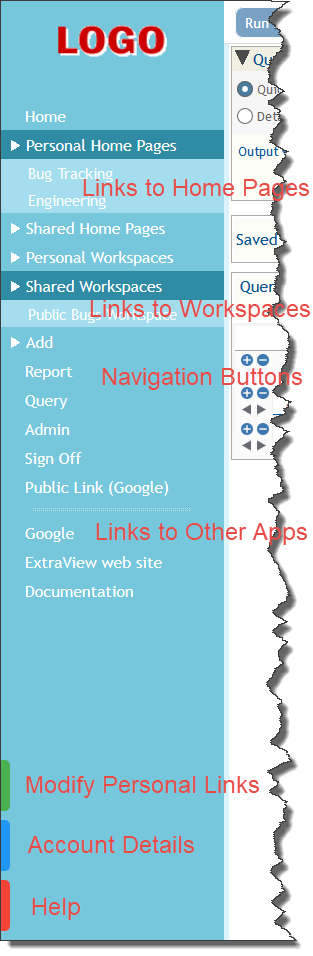
Navigation Bar

The ExtraView main navigation bar appears at the top of most screens throughout the application. It allows instant access to the main functions of ExtraView. The navigation bar may be customized to any one of a large number of themes, so the following screenshots are representative of the functions as opposed to the color, size and location of the elements. Not all of the elements may be present in your installation as they depend on permissions and the configuration that your administrator has created.

Navigation Buttons

Home: The user’s personal Home page

Add: Allows users to enter new issues into the database

Query: Allows users to search the database

Search: Allows users to create and run reports

Workspace: Opens a workspace window where you can perform many ExtraView tasks in a single window

Admin or Administration: Allows Administrative users to configure ExtraView for the entire organization. As a user you may not have access to this area of ExtraView

Help: Allows users to access ExtraView’s online help system

Sign Off: Click the Sign Off button to log out and return ExtraView to the Sign On screen

Other Elements

Drilldown Box: If you know the ID number of the issue you would like to see, you can enter the issue ID into the selection box on the menu and press the Enter key or click on the Go button with your mouse. When you do this, a detailed report for the issue is displayed in the window. Your administrator may not have configured the Go button to be visible on your installation.

Account: Your name that you are signed on with appears on the navigation bar. This is also a link to your personal options. Clicking on your name accesses your personal options

Roles: Provided you have access to more than one user role, you will see a select list which contains all the roles you may adopt. When you select a new role, you are taken to the Home Page, and your role is reset

Business Areas / Projects: Provided you have access to more than one Business Area and/or Project, you will see a select list which contains all the Business Areas and Projects you may adopt. When you select a new Business Area and/or Project, you are taken to the Home Page, and your current Business Area and/or Project is reset

Report List: If your administrator has turned this feature on, you will see a list of public and personal reports that you may run. Simply select the report you want to run from the list and a new window will open with the results of the report

Menubar: This is a set of buttons that will alter as you alter the page you are viewing in ExtraView. It will offer a range of options that is relevant to the screen you are looking at.

Note: Button names and the name of the ID within the ExtraView Menu frame may be altered to reflect your company’s terminology. Your Administrator can also choose to display the ExtraView Menu as a horizontal screen menu, if this is preferred.

Personal Options

Clicking on your name accesses your personal options on the the Change a user’s details screen. Note that you must have been granted permission by the system administrator to see your personal options.

Personal Details

  • User ID - You may not change your User ID. Once this was created it is a permanent entry into the database
  • Alternative User ID - You may change your Alternative User ID and use this to sign on to ExtraView, as opposed to using your User ID
  • Password
  • First name and last name
  • Password
  • Email address
  • Job Title
  • Company name and address
  • Telephone contact numbers


Personal Details input

Personal Options

  • The text size within your browser. You can select small, medium or large fonts for the display. Most users prefer the small option
  • Language. If this prompt is visible, you can alter your language setting to the available languages in the list. When you select a language, this also has the effect of allowing you to select different date formats. For example, if you choose English (United States) as opposed to English (Great Britain), the date formats presented to you will be according to the convention of the country. Also, if the language of the country is not English, all dates will be presented in your local language
  • Time zone to which you belong
  • Date format to use on display of date fields and an optional date mask to further customize the display of the date. See Appendix A for details of how to set the date mask, if one of the inbuilt date formats is insufficient for your needs
  • Selection of 12 or 24 hour format in which to display the time
  • Start Page. If this option has been made available to you, you can set your start page to be one of the following: Home Page, Search / Report screen, Add Issue or Administration. If you select an option to which you do not have permission, you will be directed to the Home Page.
  • File Attachment char set. You can set a default character set for documents you upload. The default for the English language is UTF-8, but you can use other values. For example, in Japan, Shift-JIS is the most likely value for this field
  • Chart font. This font will be used on charts you prepare.


Personal Options input

Report Options

This screen controls the options to access reports for each user.

  • Drilldown Format (Quicklist or Detailed Report). This offers you an alternative when you drill down from a summary report, to reach the Quicklist or the Detailed Report. See the reporting section of this guide for information on the Quicklist and the Detailed Report
  • Choice of up to three reports that are available to you to place on your Home Page. Each report must have been previously saved, and you must have permission to run the report. You may also select these reports directly from the Home Page.

  • Report Options Input

    Notification Options

    This section controls the notification of issues to you.

  • Notification Options. You can turn on and off email notification at your primary email address (entered on the Personal Details tab) and at your alternative email address that you define on this tab. Control of sending notification to each of the addresses is independent.
  • Alternative Email Address - You can enter an alterative email addres and elect to receive emails at this address
  • Notify on Own Updates. If you select no for this option, then email notification to yourself will not take place for changes that you initiate
  • Email format for notification – HTML, plain text (full), plain text (brief), or plain text (very brief). The HTML and plain text (full) options will send a notification of all the key fields; the plain text(brief) option displays a smaller set of the fields that changed and the plain text (very brief) displays only the changed fields
  • Interest Lists. This displays all the interest lists to which you may subscribe. Note that many of these allow you to opt-in or opt-out of the interest list, according to how your administrator defined the interest list. Interest lists are used to notify users when specific values are present in issues, such as notifying an account manager when an issue for one of their customers is updated
  • Escalation Rules – You can opt-in and opt-out of all escalation rules that your administrator has made eligible for you to join and leave. Escalation rules are used to provide automatic notification to you or other users when specific criteria defined in the escalation rule have been exceeded. For example, issues that have not changed in Open status for more than one week may be escalated.

  • Notification Options input

    Editing your personal account options

    • On the navigation bar, click on your name
    • After entering your password you will be able to change your account options
    • Enter or update your data on any of the tabs on the screen
    • To save your information, click the Update User button.
    • Roles

      On the navigation bar, you may also have a list of roles that are available for you to adopt. This list of roles is the ones that the administrator allows you to adopt for different purposes. For example, you might have several roles, each corresponding to the use of a different Business Area. Simply click on the role you wish to adopt.

      If you have only been enabled for a single role, you will not find any links on this list, and you will not be able to change your role.

      Business Areas and Projects

      If this is enabled as an option on your navigation bar, then this list offers you the ability to move into a new Business Area and a corresponding Project. Depending on the configuration, you may or may not see this select list, or you may only see Business Areas and not Projects.

      The only Business Areas and Projects which will be visible will be those to which the Administrator has granted you access.

      Reports

      There may also be a list of reports that you can run from the navigation bar. If this is present, simply select a report from the list and this will be run immediately.