Metadata Export
The export creates a flat file containing the metadata in an XML format that can be read by the Metadata Import administration utility. This file can be moved between different platforms and different instances of ExtraView. The order of objects in the file is defined by the requirements of ExtraView, not by the user. The data export is defined satisfying the requirements of being able to perform an import of the data, to build new objects. In short, all dependent data must follow the data upon which it is dependent.
There are a wide range of options, allowing you to perform exports of all or subsections of the metadata within an ExtraView installation.
Each option that defines a subset of the database is termed a family. This option is available from the Import/Export tab of administration.

Exporting ExtraView Families
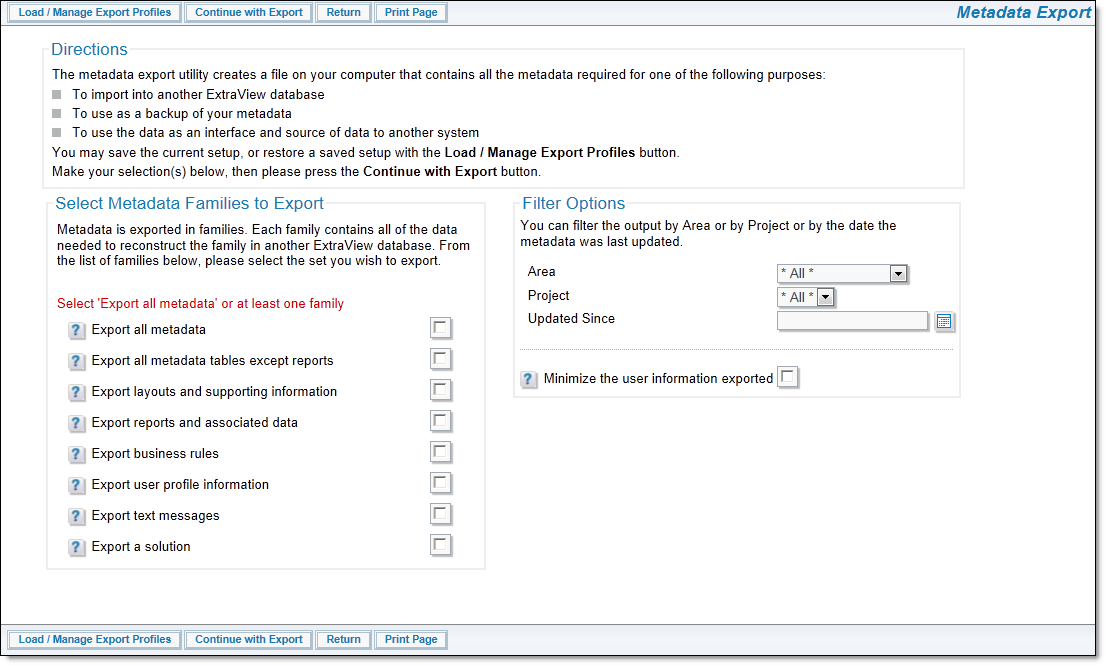
The following are the metadata families that may be exported. Note that any filters you set will also apply to the export file you create:
-
Export all metadata – a complete export is created of all the metadata
-
Export all metadata tables except reports – a complete export less the reports within the source system is created. Your target production system may have reports which differ from your source system, and you may not want to touch the reports on the production system. An exception to this is that reports associated with any navigation bars within your installation are exported as these are likely to be global and required within the target database. These will be imported into the target database unless a new report replaces them
-
Export layouts and supporting information – this will provide the layouts within the filters you apply, along with all supporting information such as the data dictionary fields
-
Export reports and associated data – this option only exports the reports and their supporting information, such as the fields in the source system
-
Export business rules – only the business rules in the souce system will be exported
-
Export user profile information- only the user information in the source system will be exported
-
Export text messages – this will export all the message tables for one or more locales. If you are working within a system with the behavior setting MULTI_LOCALE set to YES, a select list showing all the allowed locales will appear on the administration screen. The default is that all locales will be exported, but you can use the multi-select list to export just one or any selection of the allowed locales. The typical use of this feature allows the administrator to migrate the messages for just a single locale when upgrading a system and several language translations are happening in parallel. Only one or more languages may be ready to ready to migrate so you may control which locales are migrated. Note that the base locale of the system is always exported in addition to the selected locales. Once exported, you can use the generated file to import a new language set into a target system.
Note that when exporting text messages different handling is applied to User Defined Fields which have values flagged with the Do Not Migrate checkbox. This flag is ignored for the export so that all values for all fields are exported. If the User Defined Field and/or the value in the export file does not exist in the target environment, they are then ignored when the import takes place. This allows for the migration of localized values if and only if the value for the base language exists in the target environment.
-
Export a solution – this option allows the preparation of an export file which will be used to migrate an ExtraView solution to one or more remote systems. The option minimizes information outside of your solution from the source database. What will be exported is confined to the following:
- Only the layouts within the source system that are within the Business Area(s) you select as filters. Layouts in the global area will not be exported
- Only the fields and their permissions that are used by layouts within the source system will be exported
- Allowed values for any fields within the layouts will be exported
- Relationships used by the layouts will be exported
- Only reports within any folders you select will be exported
If you click the option Minimize the user information exported, then only the essential user information to export the metadata is written to the export file. This may solve a number of issues. For example, user information is often dynamic, and users may frequently change passwords, or administrators may activate and deactivate accounts on a production system or the references to the user information must always be taken from an LDAP or Active Directory server. While you may want the metadata from a development system to be migrated to a production system, you often may want to leave the production data related to users in place. That being said, users who are referred to within metadata such as filter values, interest lists, escalation rules, etc. are exported, so the information can be reproduced in the target system when the import occurs. Users only referred to within metadata such as the date created and date last modified fields are not exported when the user information is minimized.
You may choose some overriding filters for the export. As opposed to exporting the data across all Business Areas and Projects, you may select a single Business Area and Project to export. You may also choose to only export data updated since a specific date and time.
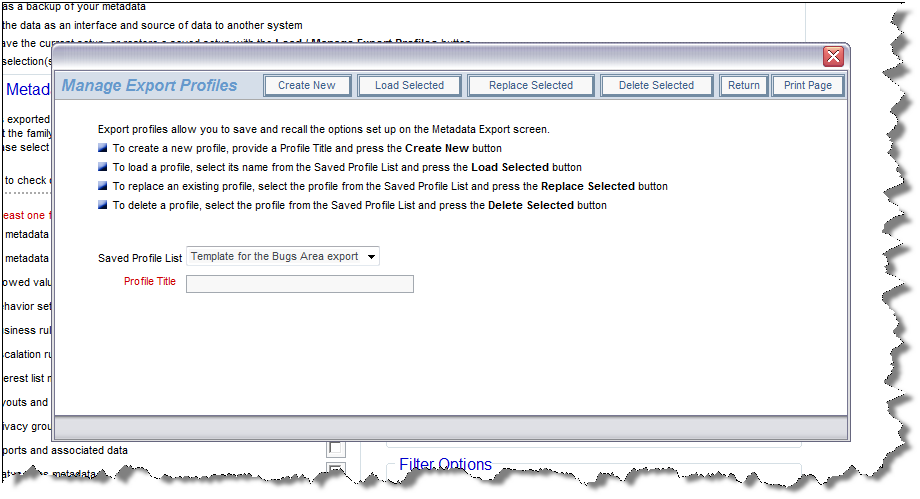
Once you have set up an export profile, you may decide to save the combination for future use. This is accomplished through the Load / Manage Export Profiles button on the menu bar. This will display a popup as follows:

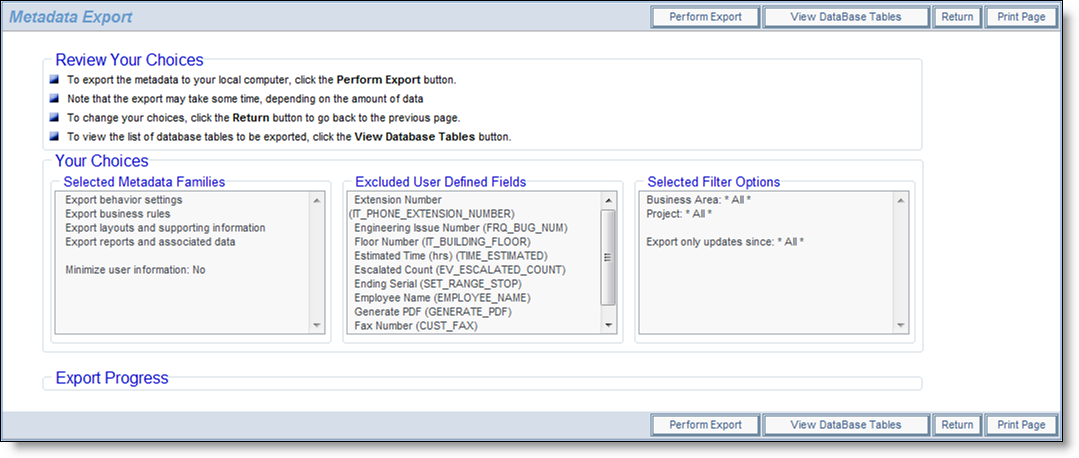
You may create new profiles and save them, load an existing template, replace an existing template or delete an existing template from the popup window. Once you have set up the profile to export, click the Continue with Export button. You are taken to a screen similar to this:

Continuing with the metadata export process
Confirm your choices on this screen, before clicking the Perform Export button.
You will be prompted to enter a file name for the export. This file will be saved on your local file system of your client computer.
An export can take some time, based upon the amount of metadata in your system. Files generated vary in size from a few to more than 50MB in size, dependent on the amount of metadata. As the export starts, one of the first steps is to compare the database against a known reference set of data that describes what the database should look like. In a perfect world, this step would not be needed, but databases can accumulate defects caused by any one of a number of factors. A previous update script might have failed, but the error not being noticed by the administrator; there might have been an incorrect command executed by a database administrator. There are other potential sources of failure as well. The metadata export process examines the database to ascertain if there is any obvious problem that will interfere with the process. The most typical problem encountered is that there is a missing database constraint. When a problem such as this is found, you will see an alert message warning of the event. You will be able to elect to continue, or to stop the process. It is recommended that you do not continue if you are not sure of the ramifications of the error.
An export file can be imported into the same or a different instance of ExtraView. The file can also be used to integrate with other applications.
Migrating Text Messages
It is worth discussing how text is migrated from one instance to another and how it is handled in a multi-lingual system. There are several options that can be used, but are dependent upon how you export the metadata.
There are two principal options available when you want to migrate messages from one instance to another.
- Use the Export system messages family option to prepare the XML file. This results in a format which can be imported into the target installation without regard to the context of metadata messages. For example, if you have a single term in your base locale (usually English) that occurs more than once within different metadata items such as list or field titles and the translator used different terminology to localize the term for each occurrence, then the import process ignores this, and the target instance will have the same localized term wherever it occurs. The advantage is that this is a relatively fast migration path
- Use the Export all metadata family option to prepare the XML file. This results in a format which retains the context of each and every term. For example, if you have used different terms in a language that all correspond to the same term within the base locale (usually English), then the target system will retain the separate values. When importing the metadata file, you may choose the Localization Update/Merge option to migrate only the text messages from the export file. The disadvantage is that this migration may take longer to execute than the first option. You may still perform a full Update/Merge or Merge when importing the metadata into the target instance.
Items that are Not Exported
There are a number of behavior settings that are not exported with this utility. This is deliberate, as it is most likely that these settings are specific to the target environment and may be different from those in the source environment. The list of settings that are not migrated is:
- APP_HOME
- ATTACHMENT_REPOSITORY_OPT
- ATTACHMENT_REPOSITORY_ROOT
- CSS_HOME
- DEBUG_MODE
- DEFAULT_LANGUAGE
- DEFAULT_REGION
- DEFAULT_VARIANT
- EMAIL_DIRECTORY
- ENVIRONMENT
- HELP_HOME
- HTTP_CHARSET
- IMG_HOME
- LOG_DIR
- NOSPILL_SESSION_COUNT
- SCHEMA_VERSION
- SITE_URL
- URL_PATH
- USER_ACCEPTS_LICENSE
