Quickfind Synchronization

This task automatically indexes newly added text to all issues entered or updated by users in order to speed up keyword searches. Once configured and started, this task will keep the indexes up-to-date as users add or update any text within issues.

This task defines exactly what text will be indexed, and where the indexes will be stored on the file system of your server. The Quickfind indexing mechanism is based upon the Apache Foundation Lucene technology.

Note that files larger than 16MB in size are not indexed.

For full end-user information on the use of Quickfind, see the page titled Keyword Searching.

First-time Setup

The basic setup and configuration of Quickfind is accomplished on the Admin ==> Task Manager screen.

  • First, Add a new task, and select the Quickfind Synchronization Task
  • Select a Node ID on which to run the task. You must not run the task on more than one node within a clustered system. If you do so, you risk corrupting the indexes created with the utility
  • Set the Start Option to STOP_NOW. More configuration is required before starting the task
  • You can set the frequency with which the task runs with the Poll Interval. It is recommended that this is set between 60 and 600 seconds. The default is 300 seconds
  • Do not alter the class name of the task
  • Click Add to add the task to the system
  • Notice that the Task Manager screen now shows the FULL_TEXT_SYNCHRONIZATION Quickfind Synchronize task
  • Click on the Edit button of the Quickfind Synchronize task. You will now see a screen that looks similar to the following:


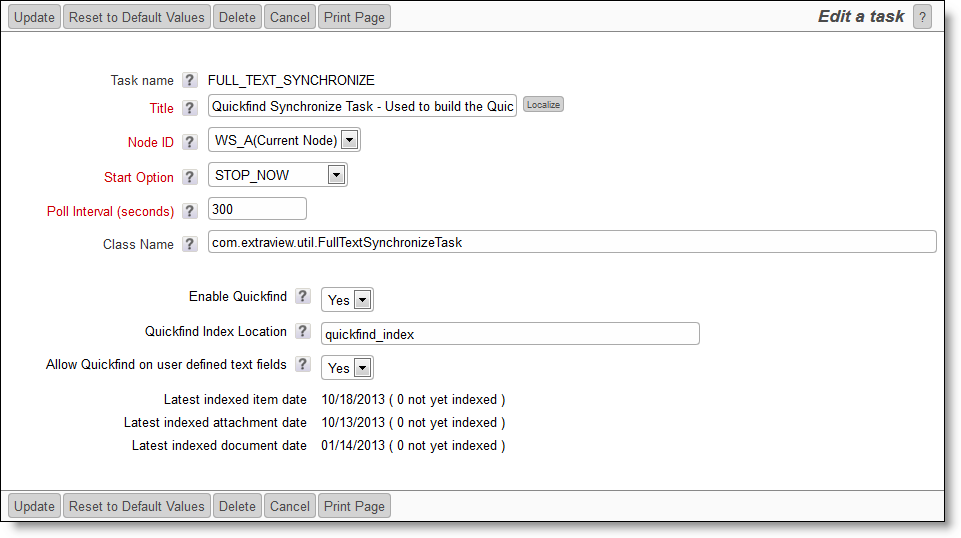
    The Quickfind task management utility

  • Notice the new configuration options towards the bottom of the maintenance screen
  • Set Enable Quickfind to a value of Yes
  • Setup the path to the location where the index files will be stored on your file system. If you will use the default path as explained below, you can skip this step. All application servers in your installation must have read and write access to the index file location. The index location is also the value stored in the behavior setting named QUICKFIND_INDEX_LOCATION. Further, you must make sure you have sufficient disk space to store the indexes as they grow. The amount of disk space is highly dependent on the quantity of text and number of fields being stored. Indexes can very in size from tens of Megabytes of space to several Gigabytes of space in a very large system.
    • The default path to your indexes is quickfind_index. Note that this is using a pathname relative to your WEB-INF folder. Any pathname relative to WEB-INF may be used, except when you are running ExtraView within a WAR file environment, in which case you must use an absolute pathname. However, for a production system, it is recommended that you use an absolute path to the index files. This is to make it easier to upgrade your ExtraView installation in the future. When you upgrade, it is usual to create a new directory structure for your ExtraView installation, and any relative path names may remain connected to the old, as opposed to the upgraded site
    • You may choose to enter an absolute pathname such as C:\ExtraView\QuickfindIndex within a Windows environment, or /usr/ExtraView/QuickfindIndex within a Linux environment
    • If the location is on an NFS mount, then you should include this in the index location by using the convention nfs:pathname
  • The prompt Allow Quickfind on user defined text fields determines whether the text within all the user defined fields should be indexed. The recommendation is that you set this to Yes
  • Observe the dates on which files were last indexed, and the count of files still to be indexed
  • If this is new site with no data, then you may now set the value of the Start Option to START_NOW, and Update. This will start the Quickfind synchronization task and begin to index data as it is entered by users
  • If this is a site that has existing data, run the external utility named FullTextIndexSetup. This is described below. The utility creates the Quickfind indexes in one fell swoop, in a fast manner. After completing this indexing operation, you can return to this screen, and set the value of the Start Option to START_NOW, and Update

FullTextIndexSetup

If you are enabling Quickfind on an existing installation, you should index all the existing information by using the external program named FullTextIndexSetup. This should be accomplished with the task named Quickfind Synchronization Task (FULL_TEXT_SYNCHRONIZE) turned off, or the ExtraView application stopped. Some upgrades may also require the indexes to be rebuilt, using the same FullTextIndexSetup program.

The FullTextIndexSetup utility is extremely quick on a new database, but may take some time on a very large existing database. It is difficult to predict exactly how long this will take on a large database, as there are many factors such as the processing speed, memory, amount of text, and the amount of attachments that all have an impact. However, it is unlikely that the process will take more than a few hours. Your users can continue working during this period, and the search results will improve as the process continues. Our recommendation is to start the process after the majority of users leave work for the day.

The utility is found in the directory named WEB-INF/data.

The syntax to run this utility is:

For Windows platforms -

FullTextIndexSetup.bat JAVA_HOME TOMCAT_HOME EV_BASE

    where JAVA_HOME is the path to your Java, TOMCAT_HOME is the path to your application server and
    EV_BASE is the path to the ExtraView installation

or for Linux platforms -

FullTextIndexSetup.sh evj

    where evj is the path to the ExtraView installation
    Alter the script to set environment variables set for JAVA_HOME and TOMCAT_HOME
    in the shell script file if needed.

What is Indexed for Quickfind Keyword Searches

The following are indexed as part of Quickfind's operations.

  • Inbuilt Fields
    • the SHORT_DESCR field
    • If the behavior setting named QUICKFIND_INDEX_USERS is YES, the following user fields are indexed:
      • OWNER
      • ASSIGNED_TO
      • LAST_UPDATED_BY_USER
      • ORIGINATOR
      • CONTACT
      • All MODULEs: ASSIGNED_TO field
      • User Defined Field USER type fields
    • All User Defined Fields with a display type of TEXTFIELD
    • All large User Defined Fields with a display type of TEXTAREA, LOGAREA, PRINT_TEXT
    • The User Defined Fields with a display type of HTMLAREA, after removing the HTML tags
  • DOCUMENT fields
    • Document description
    • File name
    • Document content according to MIME type and content size:
      • Size must be less than 16MB
      • MIME type must not be any kind of video, audio, or image
      • The MIME type is mapped to an extractor – see MIME type extractors below
  • IMAGE fields
    • Image description
    • File name
  • Attachments - these are only searched when the Search Attachment checkbox is checked
    • Attachment description
    • Attachment content according to MIME type and content size:
      • Size must be less than 16MB
      • MIME type must not be any kind of video, audio, or image
      • MIME type is mapped to an extractor – see MIME type extractors below

    MIME Type Extractors

    There are two text extractors:

    1. PDF Text Extractor: uses iText PdfReader object to tokenize the PDF strings. Document content will NOT be indexed if it is marked as being “encrypted”
    2. Office Text Extractor: uses one of the POI extractors appropriate to the type (Word, Excel, Powerpoint, Outlook, Publisher, or Visio). Note: if Excel text extractor fails, it tries to extract text assuming it is a comma-separated or tab-separated text file with an Excel MIME type
    3. Other MIME type documents are indexed as text

    Notes

    As stated above, Quickfind utilizes the Apache Lucene software to provide the indexing mechanism. One support issue is that if your Java Virtual Machine, or your application server (Apache Tomcat or whatever) crashes for any reason, then the indexes may be left in a locked state on the server. The lock files are kept in the directory specified by the org.apache.lucene.lockdir system property if it is set, or by default in the directory specified by the java.io.tmpdir system property (on Unix boxes this is usually /var/tmp or /tmp). If for some reason java.io.tmpdir is not set, then the directory path you specified to create your index is used. Lock files have names that start with lucene- followed by an MD5 hash of the index directory path. If you are certain that a lock file is not in use, you can delete it manually.