Example 5

It is often useful to search for issues in order to make individual selections from the result set, and relate individual issues to the parent record.  For example, you might have a business area that contains many bugs, and you want to atrbitrarily relate some of these bugs to the parent issue as they are similar to the parent issue by scanning up and down the results and indiivdually choosing the results to relate.


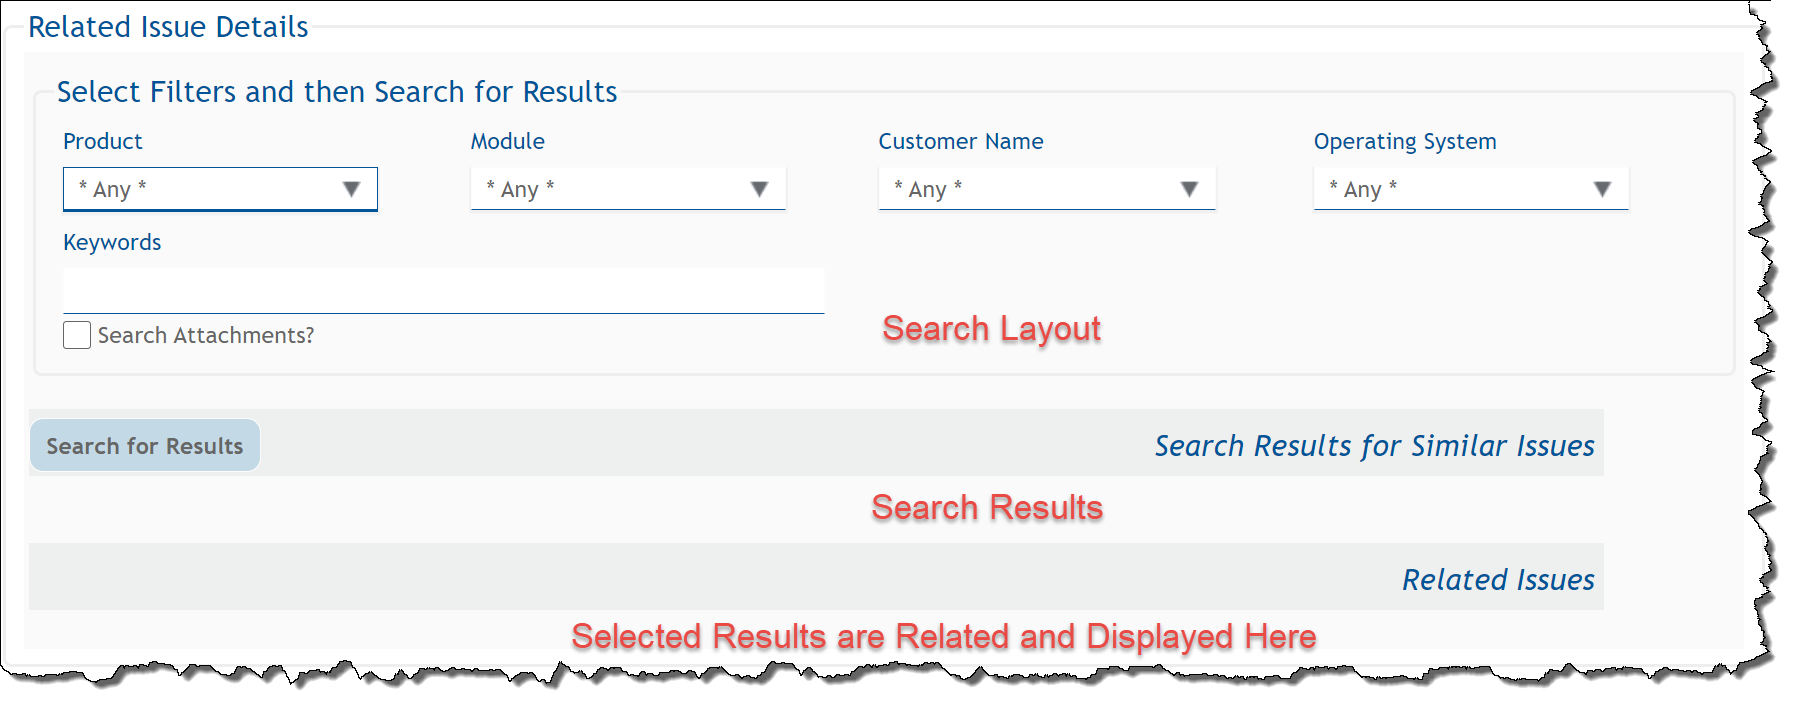
Initial presentation of screen

In the above screen, you will observe a search layout; this is used to provide a filtered set of search results within a related issue display. Note the Search for Results button in the header of the related issue display with the title Search Results for Similar Issues.


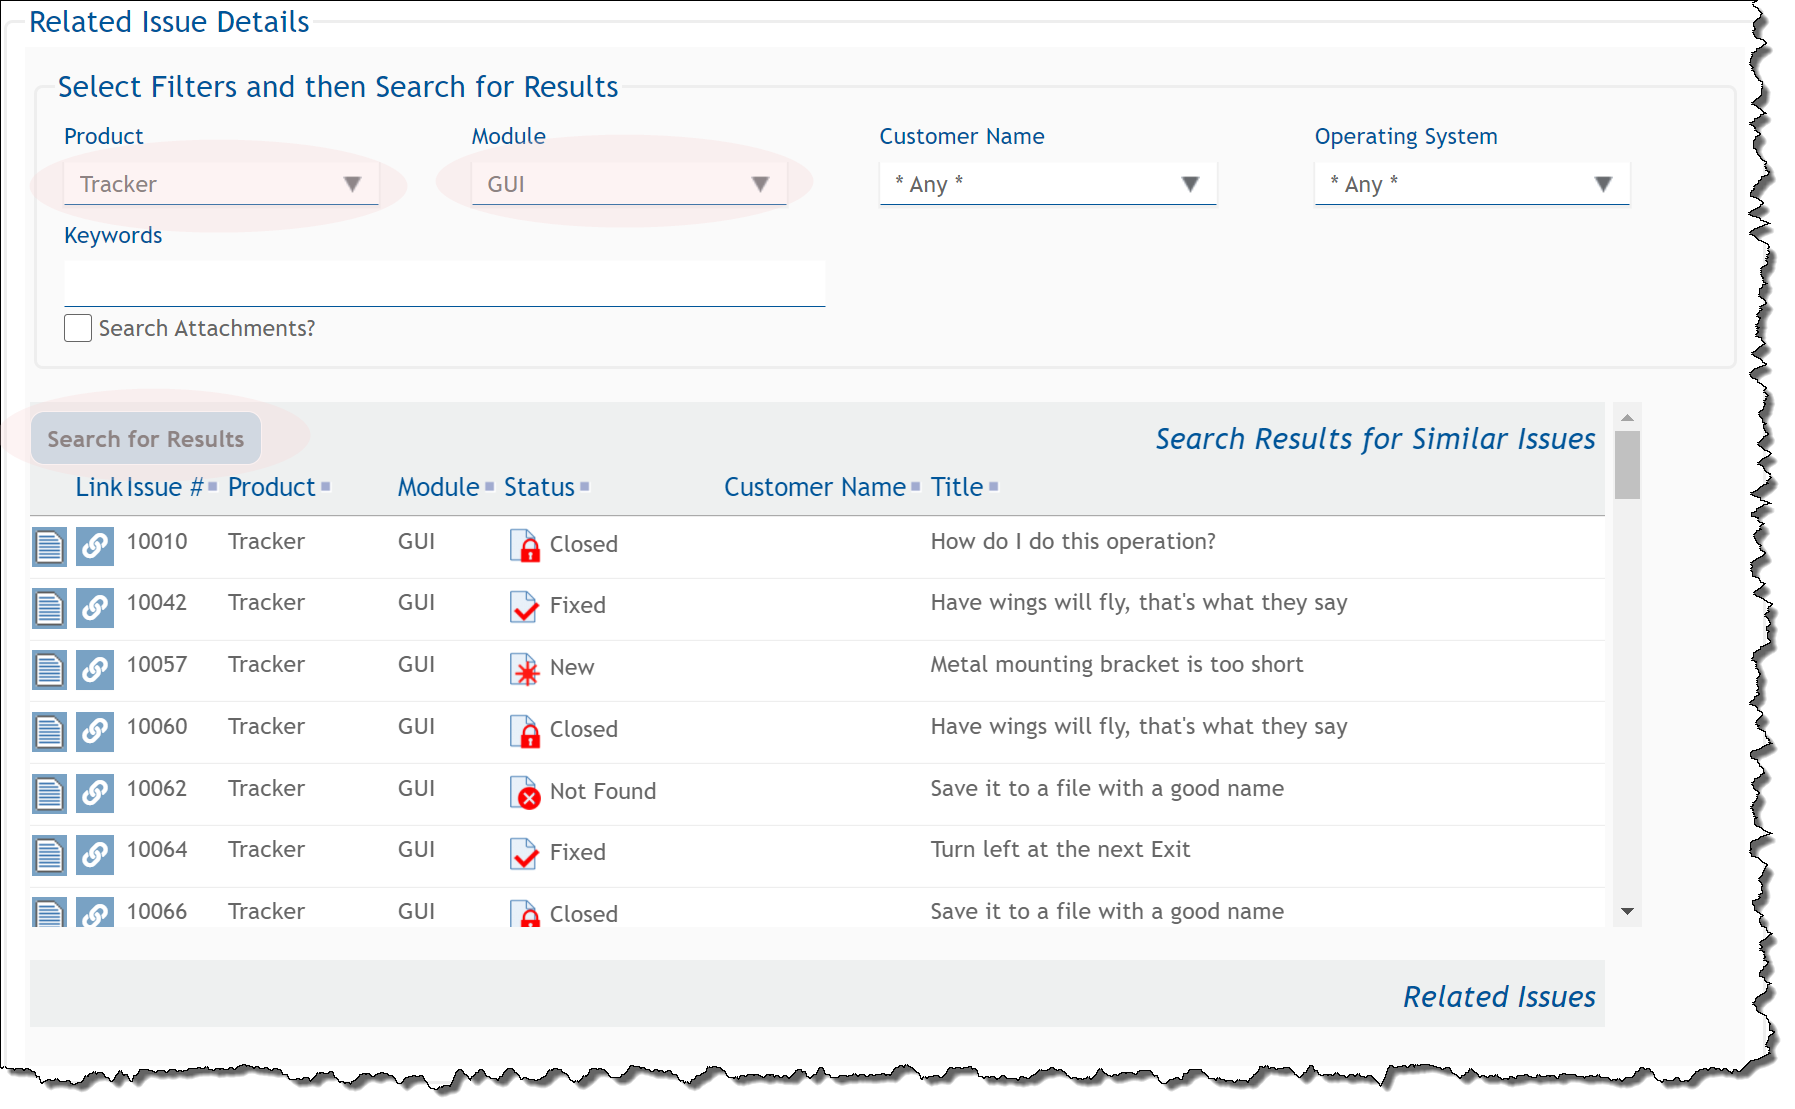
Entering the search criteria and seeing the results

Once you have selected filters, use the Search for Results button to display the results in the related issue display. With your mouse, you can click on the Link button against any one or more than one result to relate these records to the parent issue.  Note that the title of the Search for Results and the icon used for the Link button are customizable.


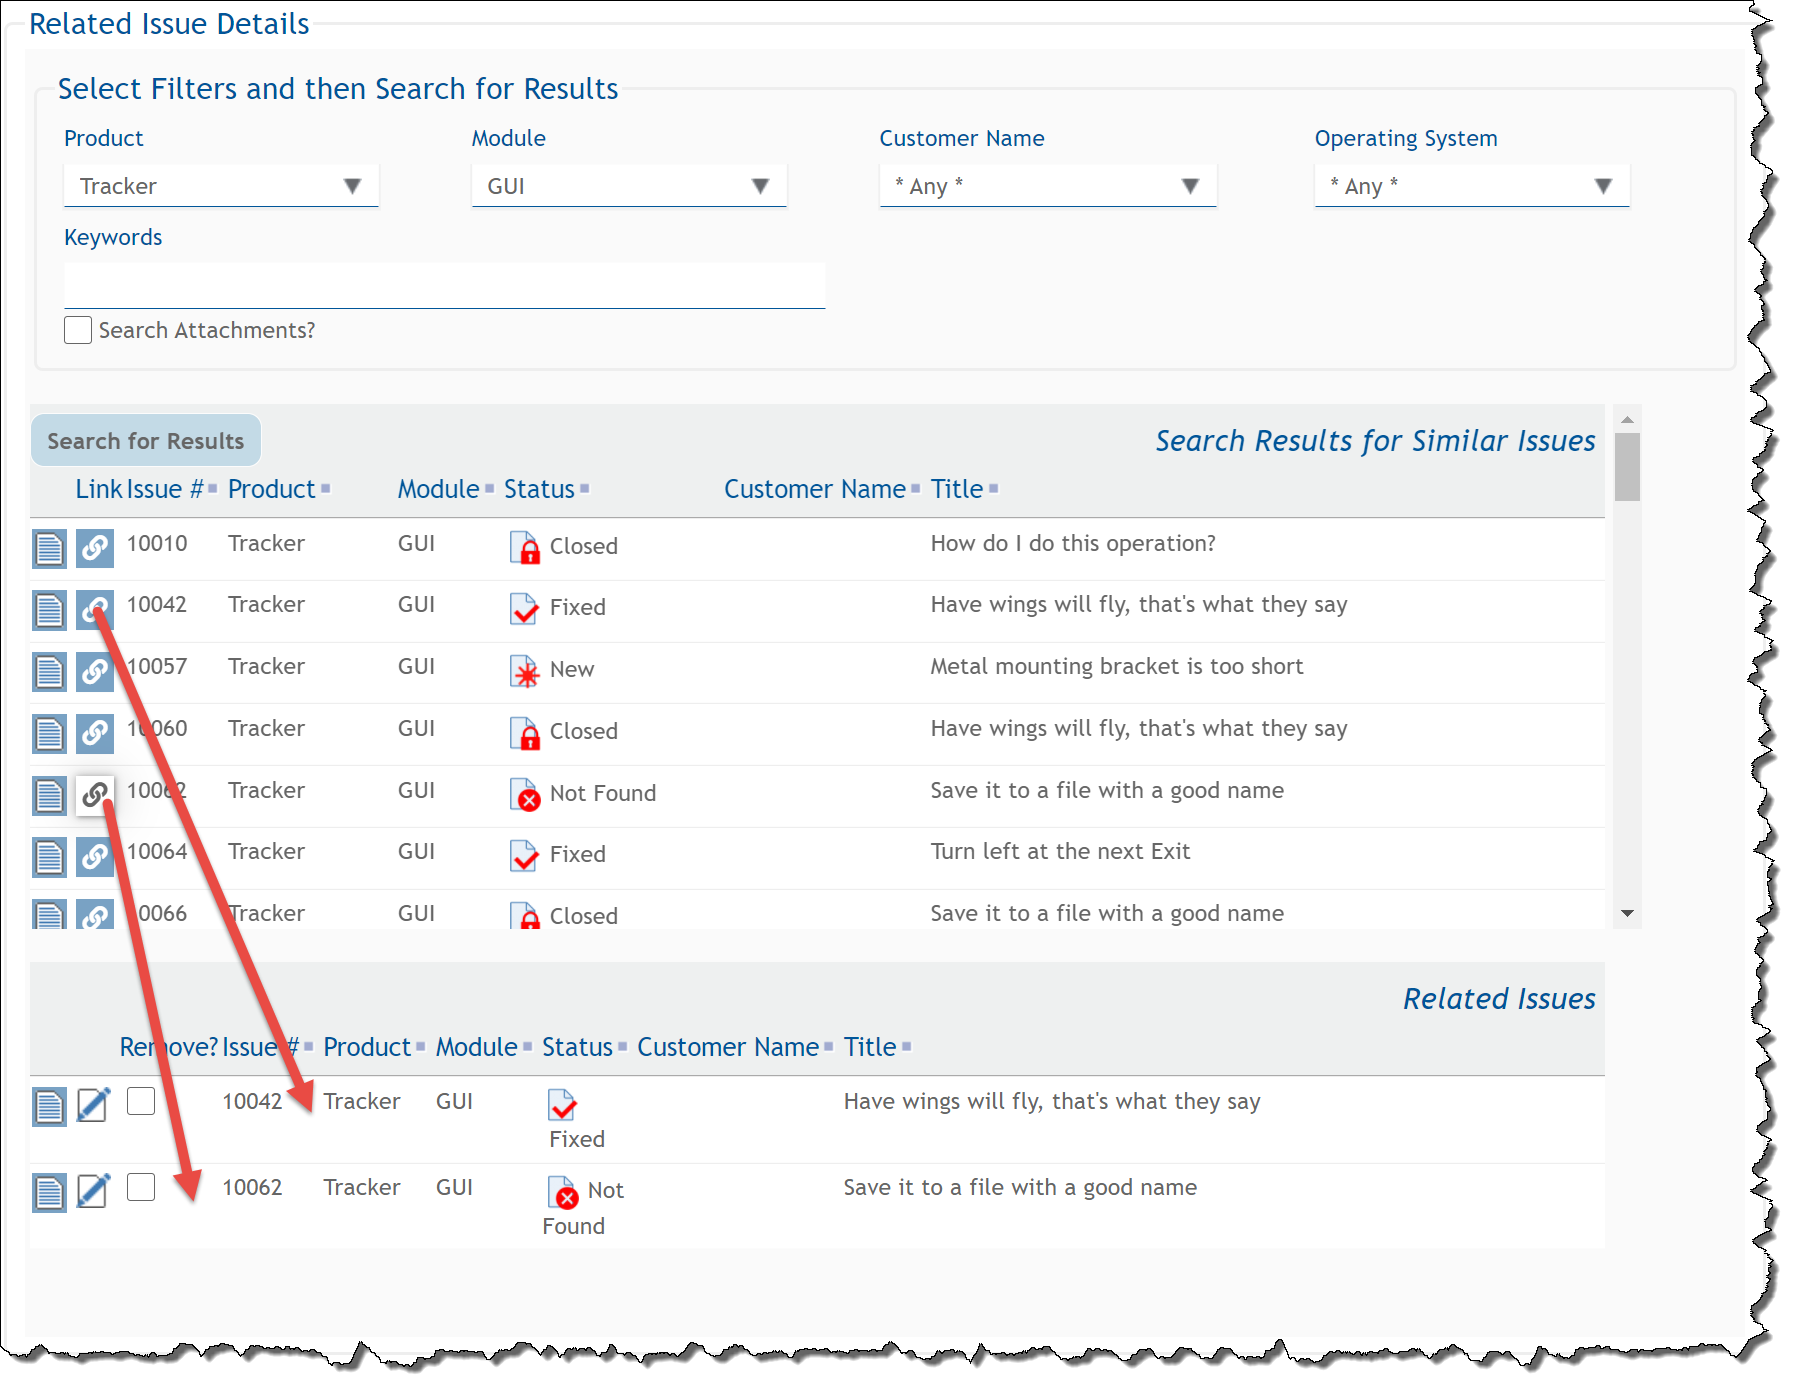
The selected results now related to the parent issue

Use the Link to move any selected record into the final result set where they will be stored with the parent issue. You may repeat the connection process with the Link button to add additional child records to the parent record. The basic configuration involves setting up 3 embedded layouts, one for the search, one for the search results and one for the selected records. A text or text area field is used to connect the selected valus from the search results to the selected records:

  1. Start by creating an add or edit screen(s) in the usual way
  2. Create a relationship group to define and hold the relationship
  3. Create a search layout to be used as the available filters for the search
  4. Create a related issue display to hold the final selected records as children to the parent issue
  5. Create and place a hidden link field on the add or edit screen to act as a transition of the record ID's from the search results to the final related issue display
  6. Create a menubar button field in the Data Dictionary to act as the link button to relate selected issues to the parent
  7. Create a related issue display to hold the results of the search
  8. Assemble the search layout and related issue display layout on the add or edit screen
  9. Quickfind should be configured within your installation.

The Relationship Group

This is created within the Administration utility, Relationship Group Maintenance. This should be of the type One-to-Many. In our example, we named this SIMILAR_ISSUES and gave it a title of Similar Issues.

The Search Layout

A prerequisite to making the search layout operate is to configure the Quickfind feature. Once this has been done, create a new layout type. This may have any name and any title, but it must have a usage type of Search. This is used to contain the search filters that will be displayed to the user. For our example, we will use the name SIMILAR_ISSUE_SEARCH. Next, add the new layout to the area and project where it is needed, creating a new layout. Onto this layout, you will place the fields to be used as filters. No special layout cell attributes are required, but you may use whatever attributes help you provide an aesthetically pleasing display. Save this layout.


The search layout

The Hidden Link Field

This should be created within the Data Dictionary as a field with a display type of Text.  The field will not be visible to users, and is used internally to pass the ID of the selected issue between the layouts on the screen.  In this example, we name the field TEST_CASE_RESULTS_LINK_FIELD.

The Menubar Button

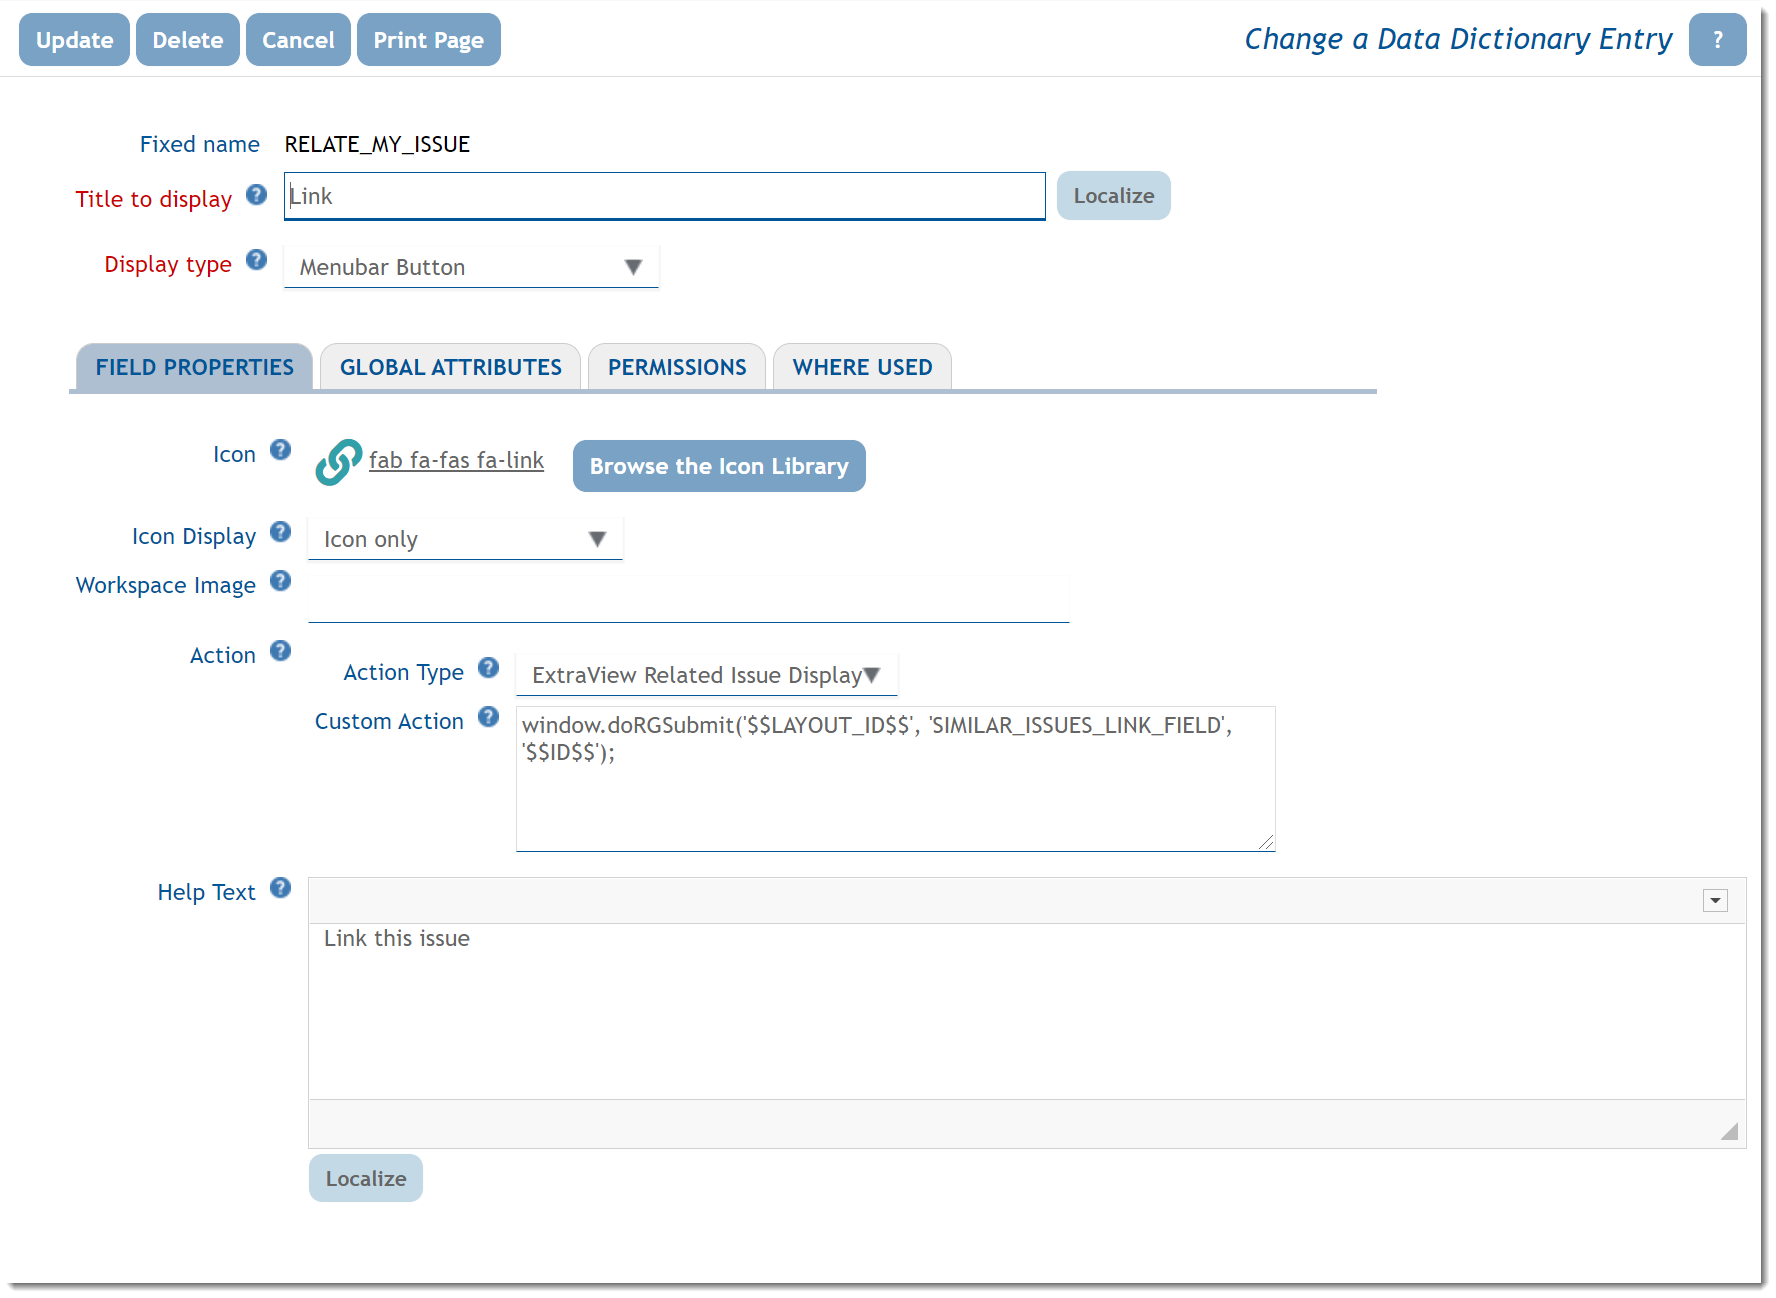
This is created within the Data Dictionary under the Labels / Buttons tab.  In our example, we have named this RELATE_MY_ISSUE

  • The Display Type must be Menubar Button
  • For the most pleasing aesthetic result, choose an icon from the library and set the Icon Display to Icon only
  • The Action Type should be ExtraView Related Issue Display.  This results in a select area for a Custom Action to open
  • The Custom Action should be entered as

    window.doRGSubmit('$$LAYOUT_ID$$', 'SIMILAR_ISSUES_LINK_FIELD', '$$ID$$');

    If you are using a different field name for SIMILAR_ISSUES_LINK_FIELD, then substitute this name

  • Provide a Help Tip for the button.

The Related Issue Display Layout Containing the Search Results

This is used to contain the results of the search. Note that the fields displayed do not need to match the fields within the search layout, although it is usual to see several fields in common. Create a new layout type to contain the related issue display. By convention, begin the name of the new layout type with RELATED_ and followed by remaining characters that provide an unique name for the layout. The usage type of this layout must be Report. For our example, we name this layout type RELATED_SIMILAR_SEARCH_RESULTS. Now, add the new layout to the area and project where it is needed, creating a new embedded layout within the Business Area and Project for the add or edit screen.  Place all the fields on the layout, including the menubar button, named RELATE_MY_ISSUE in this example. This button is used as the link button to select the record you want to place into the add or edit screen. It is recommended that you only place the VIEW_BUTTON as another button on this layout. You should not place other buttons such as EDIT_BUTTON or QUICKEDIT_BUTTON on this layout as this layout is only displaying search results.


The related issue display layout with the results

The Related Issue Display Holding the Selected Records

This layout is typically similar to the Related Issue Display that contains the search results, in terms of the fields you display, but you will likely want to see different buttons. In this example, the layout is named RELATED_SIMILAR_ISSUES.  Most typical you include a VIEW_BUTTON and an EDIT_BUTTON. A QUICKEDIT_BUTTON is often useful.


The related issue display layout that displays the selected records

Configuring the Add or Edit Screen to Use the Search and Related Issue Display Layouts

This section describes how you pull together all the above configuration to produce the complete configuration.

  • The link field you created earlier is required to pass the results from the selection made on the Related Issue Display layout.  Place the field you created, TEST_CASE_RESULTS_LINK_FIELD on the add or edit layout you are configuring.  As stated earlier, this field should not be visible and should be given the following attributes
    • STYLE - set to style=display:none to hide the field. Note that you cannot use the VISIBLE IF layout cell attribute. This is because this attribute only places the field into the HTML form when it becomes visible. ExtraView needs the field on the form even when it is invisible to be used as the link field
    • LABEL TAG - set to style=display:none
    • RID RELATIONSHIP NAME - for this example, this is SIMILAR ISSUES
    • RID RELATIONSHIP TYPE - for this example, this is CHILDREN
    • RID ACT ON FIELD CHANGE - set this attribute to trigger updates to the results when the search results alter
  • Configure the following layout cell attributes on the search result layout, in this case the RELATED_SIMILAR_SEARCH_RESULTS layout.  Many of these attributes are optiona and can different values to make the end result cosmetically pleasingl:
    • HEIGHT - This is an optional attribute. It provides an approximate row count that is displayed, before a vertical scroll bar is introduced onto the related issue display
    • RID RELATIONSHIP TYPE - This attribute defines the type of relationship. Most often this is Children, but in this example, we set Linked.  This allows all the related issues to be peers in the relationship, as opposed to there being a parent / child relationship
    • RID FILTERS - This applies filters to the search results, in addition to those that have been set within the Search layout
    • RID PREHEADER - Provides the title to the search results layout
    • RID PREHEADER REFRESH BUTTON - This places a button on the search results layout which retrieves the results and allows for the results to be refreshed.  This attribute also configures the text to be placed on the button
    • RID LINK FIELD NAME - This is the name of the hidden link field that receives the ID's of the selected issues from the related issue display. Select the field named TEST_CASE_RESULTS_LINK_FIELD from the list presented to you when you add the attribute
    • SIZE - This optional attribute provides a width, in characters, of the related issue display.


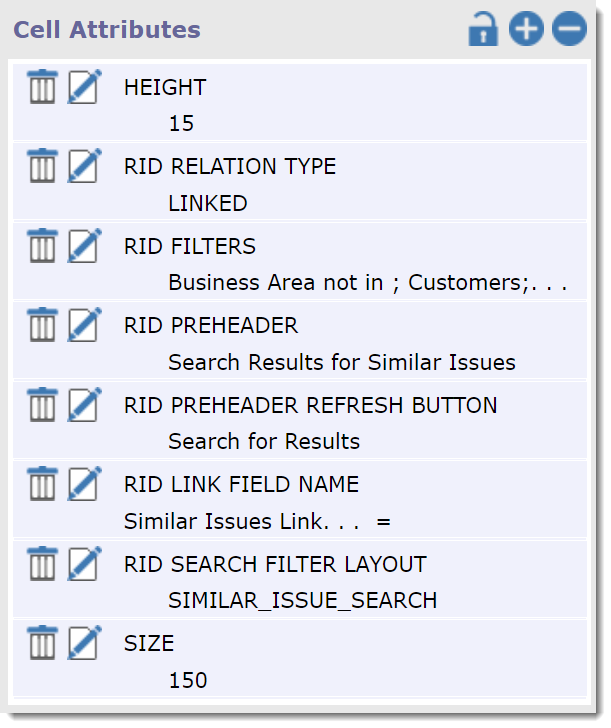
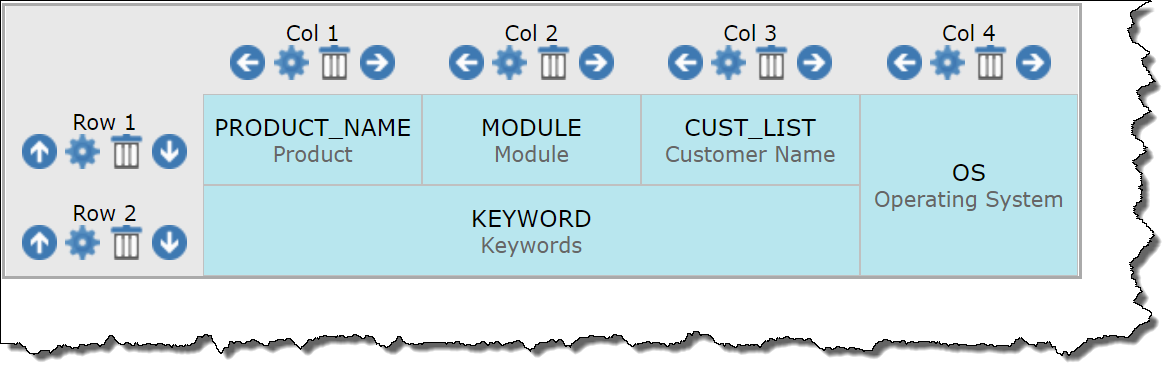
      Cell attributes on the child record layout

  • Lastly, configure the layout cell attributes on the related issue display containing the related issues, in our example RELATED_SIMILAR_ISSUES.  As the user selects each issue from the search results layout, they will be moved to this layout and will form part of the record that is being saved or updated.  Again, many of these attributes are optional, and you may configure additional attributes from those available:
    • HEIGHT - The approximate number of rows to display on the results layout, before displaying a vertical scroll bar. This is optional. If you do not provide this, all the results will be displayed
    • RID RELATIONSHIP NAME - This is the relationship that is being updated. This was created in an earlier step. In our example, this is SIMILAR_ISSUES with a title of Similar Issues
    • RID RELATIONSHIP TYPE - Set this to a value of Children
    • RID PREHEADER - This attribute provides an area above the related issue display that contains the function buttons, as well as providing a title to the related issue display. The value you provide with this attribute becomes the title. Unless you define a RID PREHEADER attribute, the RID PREHEADER ADD BUTTON, the RID PREHEADER REFRESH BUTTON and the RID PREHEADER SUBMIT BUTTON will not appear, as the RID PREHEADER is used as a container for these buttons
    • RID LINK FIELD NAME - This is the name of the link field - TEST_CASE_RESULTS_LINK_FIELD - that receives the ID's of the selected issues from the related issue display. Simply select the field name from the list presented to you when you add the attribute

  • The example layout we have just created looks like this:

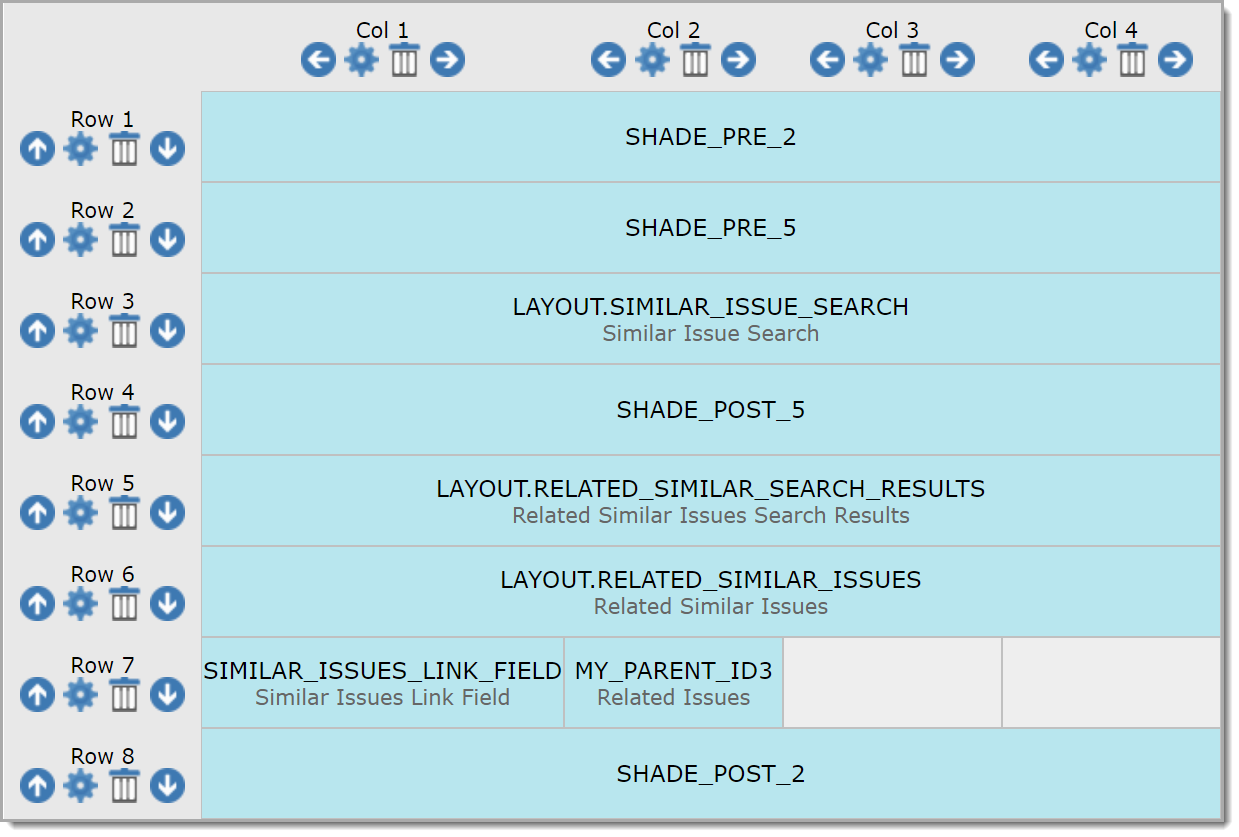
    Note the placement of other elements such as the shaded regions.