Note: Again, we strongly recommend that you backup your data before you use the import facility, using your database’s standard facilities. Importing metadata, layouts, reports and user data is irreversible, and it is possible that a failure can occur during the process.
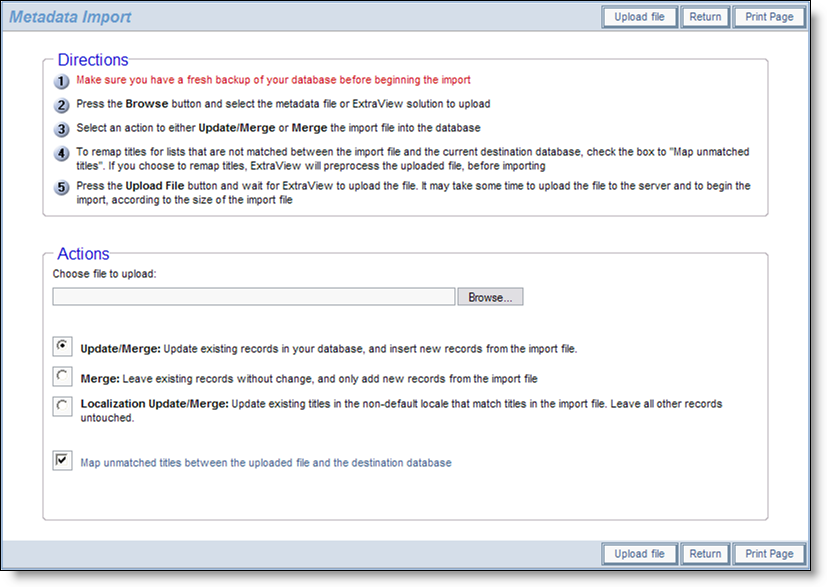
The import menu is situated within the Import/Export tab of the administration menu, and allows the administrator to specify the file to load.
The import function reads a flat image file (which is in XML format) and updates the tables as required by the administrator’s selection of objects to load. The utility takes into account the relational dependencies and all internal sequence renumbering as needed, ensuring consistent and correct instance updates.
Validity checking for data adherence to new rules is performed as early as possible, thereby minimizing the impact of some validity failure that may cause termination of the import.
Most imports will utilize the Update / Merge operation. This will update records that exist, and merge into the database the new records that were part of the file being imported.
Although it is possible to create your own file to be used as an import file to ExtraView, extreme care should be taken before attempting to do this, and it is essential that you have a complete and thorough knowledge of the ExtraView schema. Often, it may appear straightforward to compose an XML file, or to edit an existing file that was created by ExtraView’s own Export feature, but there are many relationships described in the file that are not obvious and that must be maintained for an import to be successful. We suggest that before attempting to create your own import file by modifying an existing file or creating it from scratch, that you consult with ExtraView support. In any case, always back up your target database before performing any import.
Starting the importing process
Follow the instructions on the screen. As displayed, the principal import methods are:
| Update / Merge | This combines operations of update and merge, Records that already exist in the target schema are updated, and a new record is inserted if record being imported does not exist. |
| Merge | This leaves existing records in the target schema alone, and adds new ones from the file that is being imported. ExtraView will use new sequence numbers for the operation within the database. |
| Localization Update/Merge | This mode only imports the localized messages from the import file, and does not touch the remainder of the metadata. This is typically used to move localized messages from one installation to another, providing just the updated localized messages to the target installation. |
If you have altered metadata such as the titles of objects in lists, within the destination database, and these same modifications to the data were not made in the source database from which the export was taken, ExtraView gives you an opportunity to remap the fields, as opposed to creating new fields from the import file, and inserting these into the destination database. To perform this check, make sure the Map unmatched titles prompt is checked.
When you perform the check, the import is split into two parts. First the uploaded file is preprocessed, and each list value in the import is checked against the target destination database. If there are any values in the import file that do not exist in the destination database, then you will be shown the values from the import file that do not have a matching value, and you will be able to select from the values in the target database that do not have a value specified in the import file. After selecting the values to map, if there are discrepancies, you then proceed to the second part of the import. The file is processed again, the destination database is updated, and the mappings you selected are applied.
When importing data into a business area, if the import process is able to create a project with an ID numbered 0, and the project ID in the import file is 0, then a project ID of 0 is used and mapped into the target database. If a project ID of 0 already exists in the target business area, the project ID of 0 in the import file is mapped to a new non-zero project ID. In any case, the matching project title within the business area and the mapped project overrides these decisions.
This is important, as a project ID of 0 is used for inheritance of layouts, permissions and other objects for the non-zero project ID’s within the business area, and ExtraView is trying to ensure that a project ID of 0 always exists for the inheritance to be allowed to work.
There is one circumstance in which the import process may have difficulty in resolving all the data from the export file. If you are not importing user data, and the information in the import file contains references to users that do not exist in the target database, then import errors may result. This is especially noticed if the missing user was the person who created or last updated items such as layouts. These will not be imported, as ExtraView must maintain referential integrity of the users who are connected to its internal objects.
In general, allowed value lists that have an invalid current value in parent or child will cause an import error and will not be imported. This may result in incomplete allowed value lists.
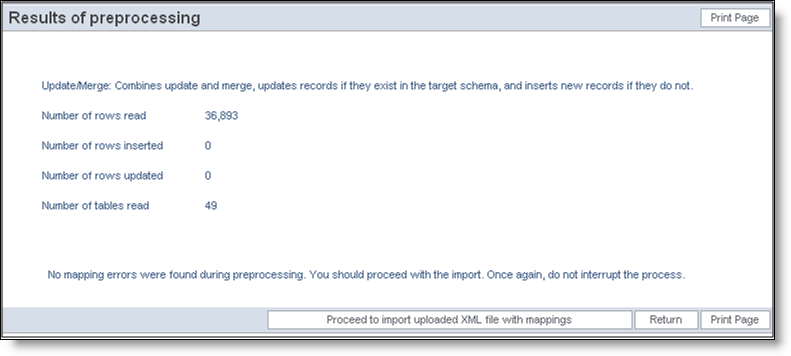
Results from preprocessing the import file
While data is being preprocessed or imported, a status bar is shown as follows:
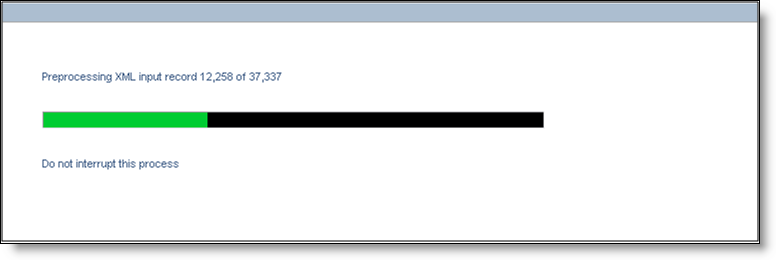
Progress bar during the importing process
Note: Importing the data can take some time, from ten minutes in smaller installations, to thirty minutes or more in larger installations. It is dependent upon the size of the file being processed, factors such as the number of fields, layouts and permissions, and the speed of the server loading the data. Due to the inherent limitations of browsers, there is little feedback during the initial part of the process, when the browser is uploading the import file from the client machine to the server. It is recommended that you prohibit users from using ExtraView during this time, especially if you are importing layouts. You can do this by locking users out of the system while you are importing the data. You can achieve this with the Disable and Enable User Access on the Users tab of the administration menu.
Note: You can improve the time to execute the import operation, by zipping the import file. Exported files compress significantly (perhaps to less than 10% of their original size). ExtraView will look for the XML file contained within a zip file as long as the name of the zip file and the name of the import file are the same.
Note: Once the import operation is started, you must not interrupt it. Once the actual import has begun, ExtraView will not cancel the server operation, even if you close your browser.
Note: When your file is imported, there is additional information within the file, termed a manifest. This manifest is used as a check against the data that you import, and provides a report if there are any unanticipated differences between the imported information and the database into which it is being imported.
After the import is complete, you will see a summary screen that shows the number of records imported into each database table. Any errors encountered will be displayed here. Note that the results of the import vary according to the exact tables imported from the file you uploaded. There may be anything from a few to more than one hundred tables displayed in the results.
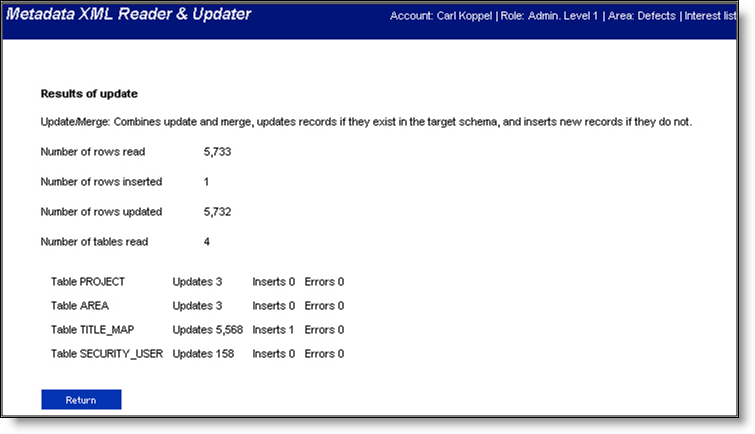
Summary screen of the imported data
Users frequently change their personal settings when using ExtraView. For example, users may change their Home Page reports, their display format for the timestamp, their password, or one of many other attributes. If you export the metadata from a development system, wait some time and then import this metadata to a production system, you may overwrite recent changes made by users in their personal data. A behavior setting named OMITTED_IMPORT_USER_COLUMNS allows the administrator to set up specific columns that will be ignored upon the import of the metadata. The value of this field is a comma-separated list of column names. Note that you set this in the target system, not the system from which you are exporting the data. The possible values you can add to this list are as follows:
| Column Name | Meaning | Notes |
| ADDITIONAL_EMAIL | The user's secondary email address | Recommend this field's omission |
| ADDITIONAL_EMAIL_ON | Switch to indicate whether the user's secondary email address is turned on or off | Recommend this field's omission |
| ADDRESS_LINE1 | Address line 1 | Recommend this field's omission |
| ADDRESS_LINE2 | Address line 2 | Recommend this field's omission |
| CELL_PHONE | Cell phone number | Recommend this field's omission |
| CHART_FONT | Chart font | Recommend this field's omission |
| CITY | City | Recommend this field's omission |
| COMPANY_NAME | Company name | Recommend this field's omission |
| COUNTRY | Country | Recommend this field's omission |
| CREATED_BY_USER | The user ID of the person who created this user's account | |
| DATE_CREATED | The date the user's account was created | |
| DATE_FORMAT | Format to display dates | Recommend this field's omission |
| DRILLDOWN_REPORT | Where does the user drill down to for reports? | Recommend this field's omission |
| The user's email address | Recommend this field's omission | |
| EMAIL_CHARSET | The character set of the email | Recommend this field's omission |
| EMAIL_FORMAT | Format for received email | Recommend this field's omission |
| EMAIL_ON | Switch to indicate whether a user's email is turned on or off | Recommend this fields omission |
| ENABLED_USER | Indicates whether the user is enabled or disabled | Recommend this field's omission |
| FAX | Fax number | Recommend this field's omission |
| FILE_ATTACH_CHARSET | The user's default character set for their attachments | Recommend this field's omission |
| FIRST_NAME | User’s first name | Recommend this field's omission |
| HOME_TELEPHONE | Home telephone number | Recommend this field's omission |
| HTTP_CHARSET | Browser character set | Recommend this field's omission |
| JOB_TITLE | User’s job title | Recommend this field's omission |
| LANGUAGE | Display language | Recommend this field's omission |
| LAST_ACCESS_DATE | Timestamp the user last accessed ExtraView | Recommend this field's omission |
| LAST_DATE_UPDATED | The date of the last update to the user's record | Recommend this field's omission |
| LAST_NAME | User’s last name | Recommend this field's omission |
| LAST_UPDATED_BY_USER | The user ID of the person who last updated the record | Recommend this field's omission |
| LDAP_UPSERT_TIME | The last date / time the user's account was synchronized with a LDAP server | Recommend this field's omission |
| LOGIN_ID | The alternative user ID | Recommend this field's omission |
| LOGIN_MSG_DT | Not used | Recommend this field's omission |
| MS_OFFICE_CHARSET | Character set output to MS Office applications | Recommend this field's omission |
| NEW_PANELS | Selects whether user created a new workspace panel or uses the same panel for each new Quicklist report when drilling down from queries and reports | Recommend this fields omission |
| NOTIFY_ON_OWN_UPDATES | User notification when making an update | Recommend this field's omission |
| PAGER | Pager number | Recommend this field's omission |
| PANEL_AUTOSCROLL | User auto-scrolls to workspace panels when they click on them | Recommend this field's omission |
| PASSWORD_EXPIRY_DATE | Password expiry date | Recommend this field's omission |
| PASSWORD_INTERVAL | The interval between password expiries | Recommend this field's omission |
| PASSWORD2 | The current, encrypted password of the user. All password changes use this field. There is a field named SECURITY_PASSWORD which contains the legacy password, if it has not been updated since version 7.0 | Recommend this field's omission |
| POSTAL_CODE | Postal code or Zip code | Recommend this field's omission |
| RECORDS_PER_PAGE | The default number of records on each report output page | Recommend this field's omission |
| REGION | Locale region | Recommend this field's omission |
| REPORT_1_ID | Home page report 1 | Recommend this field's omission |
| REPORT_2_ID | Home page report 2 | Recommend this field's omission |
| REPORT_3_ID | Home page report 3 | Recommend this field's omission |
| SCROLL_PANELS | Allows the user to scroll the workspace canvas or any workspace panel or element within that panel when the mouse pointer is over the respective area | Recommend this field's omission |
| SECURITY_PASSWORD | User’s password. Note that since version 7.0, the field PASSWORD2 is used for the purpose of holding the encrypted password | Recommend this field's omission |
| SECURITY_USER_ID | The User's ID | |
| SOUNDEX_LAST_NAME | The soundex code for the user's last name | Recommend this field's omission |
| START_PAGE_ID | The ID of the start page the user is using | Recommend this field's omission |
| STATE | State | Recommend this field's omission |
| STYLESHEET | Size of text in browser | Recommend this field's omission |
| TIMEZONE | User’s time zone | Recommend this field's omission |
| TWENTY_FOUR_HOUR_TIME | Display of times in 12 or 24 hour format | Recommend this field's omission |
| USER_FIELD_1 to USER_FIELD_10 | The user defined fields | Recommend these fields omission |
| USER_ROLE | User’s current role | Recommend this field's omission |
| VARIANT | Locale variant | Recommend this field's omission |
| WORK_TELEPHONE | Work telephone number | Recommend this field's omission |
| WORKSPACE_1_ID | The ID of the default workspace of the user | Recommend this field's omission |
Importing allowed values presents some challenges, when the data in the target database has changed significantly from the data in the source database. An entry in allowed values is unique for a given Title, Parent and Child value.
The points to observe during an import of allowed values are:
| Imported Value of Allowed Value Type Enabled | |||
| Disabled | Enabled | ||
| Current Value of Allowed Value Type Enabled | Disabled | OK | OK only if enabled count = 0 |
| Enabled | OK – AVT will become disabled | OK | |
If an existing list field is not an alias of another list field, the import logic maintains this, and keeps the list field non-aliased in the target database. The import cannot make a non-aliased list field an aliased field during the import because it cannot guarantee that the lists are intended to be the same. For this same reason, the import will not change an aliased list field to be the aliase of a different list field. In normal operation, ExtraView checks these conditions and only allows valid operations, therefore the import must also make the same checks. In the context of this section, list fields include all fields with a display type of list, popup, tab, and radio button.
The import rules for the Alias of field values are as follows:
| Imported Alias Field Name | |||
| None | List A | ||
| Current Alias Field Name | None | OK | No |
| List A | OK | OK | |
| List B | OK | No | |
A text log of errors is created on the server, as the XML updater executes. Each error entry will contain as much useful information as possible, including the table, row number, the data being used at the time, and the exception message, if any. This error log is echoed to the summary screen in the browser.
The error file is stored in the system temp directory under the name: <time_in_ms>_<user_id>_XML_ERRORS.txt
for example:
1026520070671_JEFF.SYKES_XML_ERRORS.txt
All error messages begin with
::XML_UPDATE_ERROR::
plus a new line, and end with ::END_XML_UPDATE_ERROR:: followed by two new line characters.
Here is an example of an error:
|
::XML_UPDATE_ERROR:: Exception: java.sql.SQLException: ORA-00904: invalid column name ::XML_UPDATE_ERROR:: |
In order to be able to store multi-byte characters within the error file, note that the error file is not created as standard text. If you open the file in a standard editor, you will notice that what looking at most of the metadata in the file, every second character is null.
As ExtraView processes the XML import file and fires the updating routines, if errors prevent an update are generated, the problematic XML nodes' data is captured, and used to generate a new XML file. This file is of the same structure as the original file, but only includes those items that could not be properly updated. If there are no errors generated during the upload process, this file is deleted at the end of the update process, as it is empty.
This file is saved under the system temp directory under the name:
<time_in_ms>_<user_id>_XML_REJECTS.xml
for example
1026520070671_JEFF.SYKES_XML_REJECTS.xml