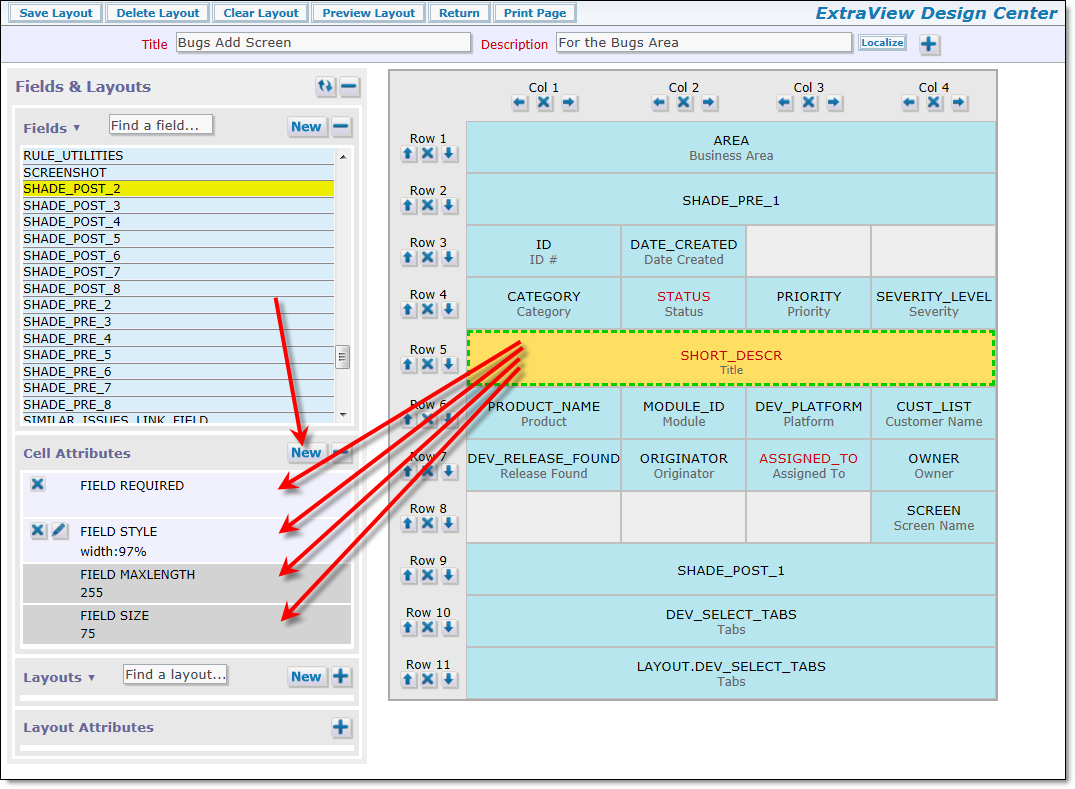
Layout cell attributes allow you to modify the appearance or function of a field or embedded layouts within a layout. This includes creating dependencies between fields and controlling related issue displays.
Layout cell attributes
Note the section on the screenshot that displays the Cell Attributes. This displays the attributes that have been set for the cell, as well as attributes that were set for the field in the data dictionary as global field attributes. The global attributes are displayed with the darker background. You may either use the global attribute inherited from the field definition, or override the global attribute with a local layout cell atrtibute.
If you add a new attribute, a screen similar to the following is displayed:
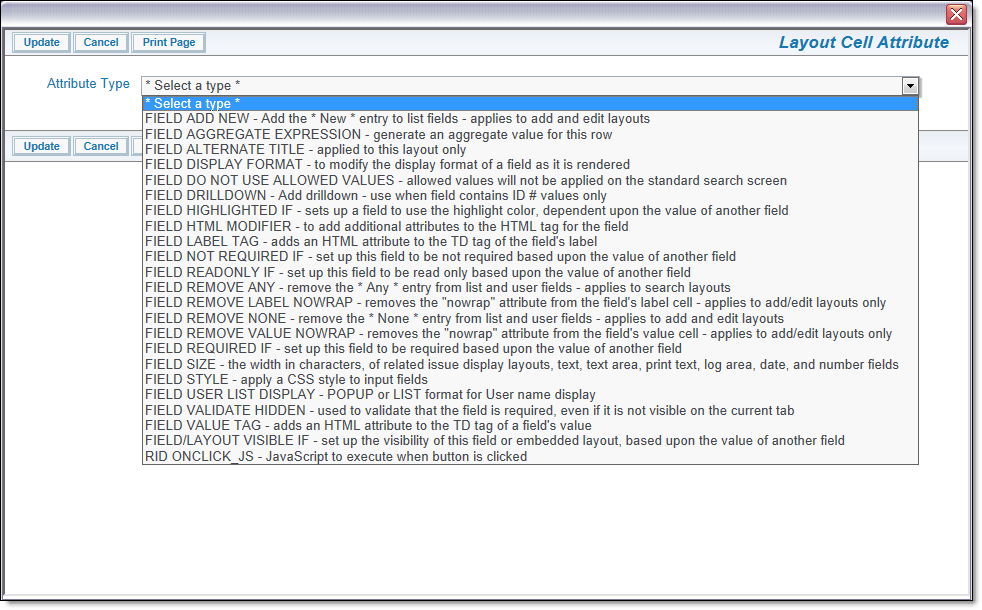
Adding a layout cell attribute
Note that you will only see a subset of the complete number of layout cell attributes, these being the ones that are valid for the field display type that you have selected in the main grid. If a layout cell attribute does not appear when you are editing the attributes, it is because that attribute is not valid for that field or embedded layout.
The attribute types are the different class of modifiers that can be applied to each cell. These are:
| Attribute | Purpose | ||||||
| COLLAPSE REPEATING ROWS | This attribute should only be used on an embedded repeating row layout with a type of report. Typically this is used when you are rendering fields from different repeating row layouts within the emedded layout, and you want the values to align as far as possible, to the top of the embedded layout. As the values from the different fields are likely to have originated in different records in the database, they would normally be rendered on different rows. This attribute shifts the values to be aligned from the top of the display for the embedded repeating row | ||||||
| DEFINE ISSUE HOVER VIEW LAYOUT | This attribute is used to define hover text that appears over the View button, when the user holds the mouse steady over the button. The administrator can configure which fields are displayed in the hover popup with this layout cell attribute. When you select the attribute, you will see two field lists. The left-hand field list presents all the available fields. Double click on the fields you wish to add to the hover text and they appear in the right-hand panel. Drag the field out of the right-hand panel into the left-hand panel to remove it from the hover text popup | ||||||
| FIELD ADD NEW | Adds a * New * value entry to list and popup field types, on ADD_PROBLEM and EDIT_PROBLEM layout types only. It modifies all user defined list fields, the PRODUCT_NAME field, the MODULE_ID field, the RELEASE_FOUND or the RELEASE_FIXED fields so that a value of * New * apprears within the list. When this * New * value is selected a modal popup window allows the addition of a new entry into the list. This has the same effect as an administrator using the list manager function to add a new entry to the list, but puts the ability in the hands of an end user without their requiring administrative privileges. This feature can be controlled by user roles. See the section titled End-User List Management for more information on setting up this feature. | ||||||
| FIELD AGGREGATE EXPRESSION | This layout cell attribute implements a method to compute an aggregate expression on a per-row basis on a Related Issue Display. The actual calculation is performed in a user custom exit, so this attribute must be accompanied with Java code. This layout cell attribute only works when used with expression display type fields placed on a Related Issue Display and has no effect in other locations. See the page Field Aggregate Expressions for more information. | ||||||
| FIELD AGGREGATE EXPRESSION TITLE | This layout cell attribute provides a title to the aggregate expression. Please see the page Field Aggregate Expressions for more information. | ||||||
| FIELD ALTERNATE FIELD TITLE | This will rename the screen title in the Data Dictionary to the value in the Field value, for the field in the Field entry. Note that if this is used in a screen layout, you can include HTML in the alternate title. If HTML is included within the alternate title, then the behavior setting of LABEL_WRAP_POSITION is ignored. This allows total control of the formatting of the label within the layout. However, if you access the field through the API or CLI then the HTML will be passed through to the output.
As the text for the alternate field title is placed within double quote marks (“) in the HTML generated when the form is rendered, you should not use these within the alternate field title. You may use single quote marks (‘) however, and these are generally interchangeable. Example: Within an organization, you may label issues as Defects, but you may want to label them as Issues for your customers. On the new attribute form, you would set Alternate field name equals Issue Example: A field on the form has the particularly long title of “Target Software Release” that wraps in an ugly way on the screen using the system-wide default you have set with the behavior setting, LABEL_WRAP_POSITION. You can control where the line breaks occur by using something similar to “Target<BR>Software<BR>Release” Example: You want to remove the title to a field on a layout. It is not valid to use a blank title. The solution is to use an alternate field title of . This inserts the character set value of a space into the layout. |
||||||
| FIELD DISPLAY FORMAT | This will modify the display of the value of the item according to a user-defined format. The format can include text as well as the values of other fields. There are specific rules for using this attribute successfully:
Example: You can set up a new field on a layout, modifying the ID field for display to be of a specific format such as PROJECT + ‘.’ + ID. The ID will be the standard sequence, but will show a value such as MyProj.12345. |
||||||
| FIELD DO NOT USE ALLOWED VALUES | This only applies to fields placed upon a search filter layout, such as the Quick Search, Full Search or Chart filter layouts. When this layout cell attribute is set, and the field is a child in an allowed value relationship, then the child list will not be filtered by its parent, and all possible values will be displayed. For this cell attribute to work, the parent field of the relationship must also be on the layout. | ||||||
| FIELD DRILLDOWN | You should only add this attribute to a field when it is to contain an issue ID. Adding the attribute will turn on the ability to click on the field value in order to be able to drill down into that issue and open up an edit screen | ||||||
| FIELD EXPRESSION TEXT | This is used to add a calculated expression to a user defined report field. | ||||||
| FIELD HEIGHT | This applies to text area, log area, print text fields and embedded relaetd issue display layouts.
The height is the approximate number of characters high that the field is displayed with when the user first brings up an add or edit layout. Example: To create a text area field where the initial display height is 20 characters, add a HEIGHT attribute with a value of 20. Note that RELATED_ISSUE_DISPLAY layouts are automatically sized in height, according to the number of issues they contain, and the FIELD HEIGHT is the maximum height that a related issue display will occupy, before a vertical scroll bar is added. |
||||||
| FIELD HIDE VALUES | This attribute allows you to hide individual values within a field which contains a list of values. When you select this attribute, you are presented with a list of all the values within the field, and you select the values you want to hide unconditionally. This may be used with great effect on fields such as AREA on an add layout, to constrain a user to only be able to add new issues into specific business areas, and to lock the user out from other business areas. Note that if you configure this attribute, you may not then configure a FIELD VISIBLE VALUES attribute on the same field.
This attribute is only supported on fields with a display type of List (including multi-value list, put not popup lists), Radio Button and Tab. |
||||||
| FIELD HIGHLIGHT VALUE IF | This provides the ability to alter the color of a field value, based upon a logical expression defined within the layout cell attribute. This attribute only works with display types of text and text area. The color used to highlight the value is the color defined within the behavior setting HIGHLIGHT_COLOR.
Example: To highlight the ID of an issue, if the issue is a customer issue, you might apply a layout cell attribute to the ID field – HIGHLIGHT VALUE IF CUSTOMER IS NOT NULL. |
||||||
| FIELD HIGHLIGHTED IF | This is to indicate if a field value is to be highlighted with an alternative color depending on the value of another field. The color may be selected by setting the value for the behavior setting HIGHLIGHT_COLOR. You may have more than one FIELD HIGHLIGHTED IF attribute on a field. A limitation at this time is that you may only use the attribute with a condition of is not null
Example: We want to highlight the ID of an issue, if the issue is a Customer issue. To achieve this, set the element attribute of Highlighted on the ID field, if the field named Customer is not null. |
||||||
| FIELD HTML MODIFIER | This will allow the user to provide values for additional attributes within an HTML tag on an add or edit layout. You may have any number of HTML modifier attributes on a cell. It is likely that you will need a reasonable understanding of HTML tags and attributes to use this layout cell attribute.
Example: A DISABLED HTML modifier to the attribute will disable the field. Most browsers would then show this field as “grayed-out”. Example: Use the HTML modifier to call a user-defined JavaScript function or to call a pre-defined JavaScript function within ExtraView. The function resides on the server and is automatically included in the HTML that is generated for the layout. The syntax specified within the HTML modifier to call a user-defined JavaScript function will be similar to: onclick=’myFunction(param1, param2)’; For a more detailed explanation of custom building JavaScript functions, please see the ExtraView User Custom Programming Guide. If you want to add a style attribute to a layout element, you should use the style (rather than the html modifier attribute) otherwise your cell element may have multiple style attributes, which is invalid HTML syntax. A reference providing a list of all valid CSS styles may be found at http://www.w3schools.com/css/css_reference.asp. Note that this layout cell attribute only works when used within a layout that is rendered as an add or edit screen. |
||||||
| FIELD LABEL TAG | This allows the administrator to add a new attribute to the HTML <TD … tag that surrounds the label of the cell. This can be used to provide a different style for the label, or to inject any other valid HTML into the cell label tag.
It is likely that you will need a reasonable understanding of HTML tags and attributes to use this layout cell attribute. |
||||||
| FIELD MAX FRACTION DIGITS | This attribute only applies within numeric type input fields on ADD_PROBLEM and EDIT_PROBLEM layout types. This provides an integer number that represents the number of digits to display, following a decimal point | ||||||
| FIELD MAXLENGTH | This will add a MAXLENGTH=nnn attribute to the HTML display tag for the field, controlling the maximum number of characters that can be typed into the field. The default if no attribute is set is 255 characters. Used in this way, the attribute works when used within a layout that is rendered as an add or edit form. 255 characters is the maximum length of any user defined text field that you create
Example: Setting an attribute of MAXLENGTH equal to 25 on a field will restrict the amount of characters that can be entered into a field to 25 characters. |
||||||
| FIELD NOT REQUIRED IF | This is the opposite condition to FIELD_REQUIRED_IF and is typically used when there are a significant number of values in a field, but the field only becomes not required on a few values. In this circumstance, it is faster to set up FIELD_NOT_REQUIRED_IF on a small number of values and set the overall required state of the field to Yes. Note that if you use the greater than or less than operators, they only work with numeric comparisons. | ||||||
| FIELD READONLY IF | This attribute indicates that the field value is to be displayed on the layout in a read only mode, based upon the value of another field. You may have more than one FIELD READONLY IF attribute on a field. For obvious reasons, this attribute only works when used within a layout that is rendered as an add or edit screen. Note that if you use the greater than or less than operators, they only work with numeric comparisons.
Example: We want to display the Customer name within the field named Customer on an edit layout, if the Customer has already been added, but make the field read / write if there is no value so the user can enter the Customer name. To achieve this, add an attribute of FIELD READONLY IF Customer is not null. If you place a FIELD READONLY IF attribute on a layout cell that contains an embedded layout as opposed to a field, then all the fields on the embedded layout will be made read only, according to the conditions set with the logic of the attribute. |
||||||
| FIELD REMOVE ANY | Removes the * Any * entry from list and user fields. This attribute will cause the * Any * entry in a select list not to be rendered when the layout is used as query filter screen. This can be used to ensure that the user always picks a value from a list before performing a search. Note that this is similar behavior to making a field required on a layout. | ||||||
| FIELD REMOVE LABEL NOWRAP | By default, ExtraView does not allow the label of a field to wrap within the user’s browser. Instead, there is a behavior setting named LABEL_WRAP_POSITION that allows the administrator to define a specific position where it will wrap. This gives a more consistent result as the user resizes their window on their browser. If you set this attribute, then ExtraView will allow the browser to control the wrapping for the field. | ||||||
| FIELD REMOVE NONE | Remove the * None * entry from list and user fields. This attribute causes the * None * entry in a select list on an add or edit layout to be removed, ensuring that the end user always selects at least one entry. This means that the field will become required, as a value is always selected. | ||||||
| FIELD REMOVE VALUE NOWRAP | By default, ExtraView does not allow the value of a field to wrap within the user’s browser. If you set this attribute, then ExtraView will allow the browser to control the wrapping for the field. This is typically only an issue for read-only text type fields. | ||||||
| FIELD REPORT MAX FRACTION DIGITS | This attribute may be set to define how many digits will appear in the rendering of a field with a display type of Number, Decimal or Currency, when the field is displayed as part of a report. It also controls how the value of the field is rounded on reports and when displayed on the add or edit screen. Note that Currency data display types generally have the number of decimal digits defined by the currency type. For example, the US Dollar has two decimal digits. | ||||||
| FIELD REQUIRED | This attribute is used to make a field required unconditionally on an add or edit layout. Contrast this with the FIELD REQUIRED IF attribute which makes a field required conditionally. Note that fields using this attribute are immediately flagged in with a highlighted color on the grid of the layout | ||||||
| FIELD REQUIRED IF | This is for indicating if a field value is required depending on the value of another field.
Note that Field Required If dependencies only work on fields with a display type of List. Further, they do not work if the field has been set in the data dictionary to be a multi-valued list, or if the field is a pop-up list. You may have more than one FIELD REQUIRED IF attribute on a field. For obvious reasons, this attribute only works when used within a layout that is rendered as an add or edit form. Note that if you use the greater than or less than operators, they only work with numeric comparisons. Example: The field on a form named CUSTOMER_NAME may become required if another field named CUSTOMER_ISSUE has a value of Yes. To achieve this, add a layout element attribute to the field named CUSTOMER_NAME. The value will be Yes, the field will be CUSTOMER_ISSUE and the equivalence will be equals. |
||||||
| FIELD SHOW IF | This attribute sets up the visibility of this field or embedded layout, based upon the value of another field | ||||||
| FIELD SIZE | This has two purposes, depending on the field with which this is used:
|
||||||
| FIELD STYLE | This is for indicating the font style of the element, possibly depending on other fields. This is supported within add and edit layouts only. It is supported when the field is in both read and write mode.
If you want to add a style attribute to a layout element, you should use the style (rather than the html modifier attribute) otherwise it will be possible for the element to have two style attributes, which is invalid HTML syntax. It is likely that you will need a reasonable understanding of HTML tags and attributes to use this layout cell attribute. Example: You may want to display a field on a report in the color red, if the Priority is equal to a value of P1. Example: On the Add Issue screen, we want to make the ID field visible only once the issue has been added to the database, i.e. when the user arrives at the add verification screen. To achieve this, set the Attribute type to Field Visible If, the field to ID, and the Equivalence to Is Not Null. This will have the effect of making only the ID field visible on the Add Issue verification screen. |
||||||
| FIELD USER LIST DISPLAY | This attribute overrides the behavior setting USER_LIST_DISPLAY for fields with a display type of user. Valid values are POPUP and LIST, to display the user field using that format | ||||||
| FIELD VALIDATE HIDDEN | Validation between tabs allows required fields on a layout in ExtraView to be validated for existence, even if they are not visibly rendered on the currently visible screen. This most often happens when you have designed screen layouts with part of the total record being displayed with different tabs being selected. The need is to validate the existence of values within fields across the entire record, not just the fields visible under the currently displayed tab. This implies that the user will most probably be making entries under several tabs on a screen, before they submit the record.
To set the attribute for the entire layout, go to the layout that embeds the subsidiary (embedded) layouts. Select the field named LAYOUT.embedded_layout_name. Add the Validate Hidden layout cell attribute to this field, and all fields within the layout will be checked. To set the attribute for any individual field(s) within the embedded layout, simply add the attribute to the field within the layout. If you place a VALIDATE_HIDDEN attribute on a layout cell that contains an embedded layout as opposed to a field, then all the fields on the embedded layout will be subject to the VALIDATE_HIDDEN logic. Note: There is an important interaction between Validate Hidden and fields that have a Visible If attribute. If a layout element has a VISIBLE_IF condition, and if the element has the VALIDATE_HIDDEN attribute, a validation between tabs must be performed. ExtraView will automatically perform this check. Note: If the Required If attribute is used within the same field as the Validate Hidden attribute, then it must be specified after the Validate Hidden attribute, so that ExtraView processes the attributes in the correct sequence. |
||||||
| FIELD VALUE TAG | This allows the administrator to add a new attribute to the HTML <TD … tag that surrounds the value of the cell. This can be used to provide a different style for the value, or to inject any other valid HTML into the cell value tag. It is likely that you will need a reasonable understanding of HTML tags and attributes to use this layout cell attribute. | ||||||
| FIELD VISIBLE VALUES | This attribute allows you to display individual values within a field which contains a list of values, hiding all others. When you select this attribute, you are presented with a list of all the values within the field, and you select the values you want to make visible. This may be used with great effect on fields such as AREA on an add layout, to constrain a user to only be able to add new issues into specific business areas, and to lock the user out from other business areas. Note that if you configure this attribute, you may not then configure a FIELD HIDE VALUES attribute on the same field.
This attribute is only supported on fields with a display type of List (including multi-value list, put not popup lists), Radio Button and Tab. |
||||||
| FIELD/LAYOUT VISIBLE IF | This is for indicating whether or not a field or embedded layout is seen depending on the value of another element, including itself. You may have more than one VISIBLE IF attribute on a field.
If a field controls a hierarchy of VISIBLE IF dependencies, and it becomes invisible, all the fields below it in the dependency tree will also become invisible according to their conditions. Note that VISIBLE IF dependencies only work on fields with a display type of List. Further, they do not work if the field has been set in the data dictionary to be a multi-valued list, or if the field is a pop-up list. The VISIBLE IF attribute is only supported on layouts that are rendered within add or edit forms. Note that if you use the greater than or less than operators, they only work with numeric comparisons. If you place a VISIBLE IF attribute on a layout cell that contains an embedded layout as opposed to a field, then all the fields on the embedded layout will be made visible or not visible, according to the conditions set with the logic of the attribute. This is the simplest method to create several embedded layouts which are to be made visible or invisible according to the selected value in a driver field. Conditional attributes such as FIELD REQUIRED and VISIBLE IF can be applied multiple times to a single field. When you use this functionality, the validation uses ‘OR’ logic. For example, you may set two VISIBLE IF rules, such as –
With this rule, the action field will be visible if (a) or (b) is true. |
||||||
| LAYOUT SEARCH EXPANDED MODE | The attribute may only be added to layouts that have a type of search and are used to provide a search and selection mechanism on add and edit screens. When this attribute is selected for a search layout, all the fields on the layout are rendered in expanded mode, allowing the end user to make multiple selections within the fields being used as search filters | ||||||
| LAYOUT SELECTED | This is for indicating which embedded layout to use on a screen depending on a tab or list value. This is one of two mechanisms that allow ExtraView to render alternative layouts, dependent on the value of a tab or list field.
Example: You want to embed a different layout, with a different set of fields on an edit screen, dependent on whether the user selects a Category of Software or Hardware. Note: If you are creating layouts which are selected according to a list or tab value, it is highly advisable to set a default value for the list or tab field. If you do not do so, and the field does not have a value, no embedded layout will be selected. The precise steps necessary to implement embedded layouts are documented in a following section, entitled Adding Embedded Layouts. |
||||||
| MODAL WINDOW | This layout cell attribute only has an effect if used on an EDIT_BUTTON within a Related Issue Display. When this attribute is set, and the user presses the Edit button on the Related Issue Display, a popup, modal window is used to provide the edit capability for the related issue. If this is not set, then the related issue is placed in a separate, new window. This provides control on whether you want to allow users to update a parent issue while editing a child or related issue. | ||||||
| RID ACT ON FIELD CHANGE | This attribute triggers relationship group actions when the field value upon which this attribute is based, changes. This is used when you set up a search layout to bring back results, on an ADD_PROBLEM or EDIT_PROBLEM layout. This configuration relies on an intermediate field, the RID LINK FIELD NAME. You place this attribute on that field, so that when it receives your selection, it uses the information to update the embedded layout that contains the related issues from the results. See the example here for use of this attribute. | ||||||
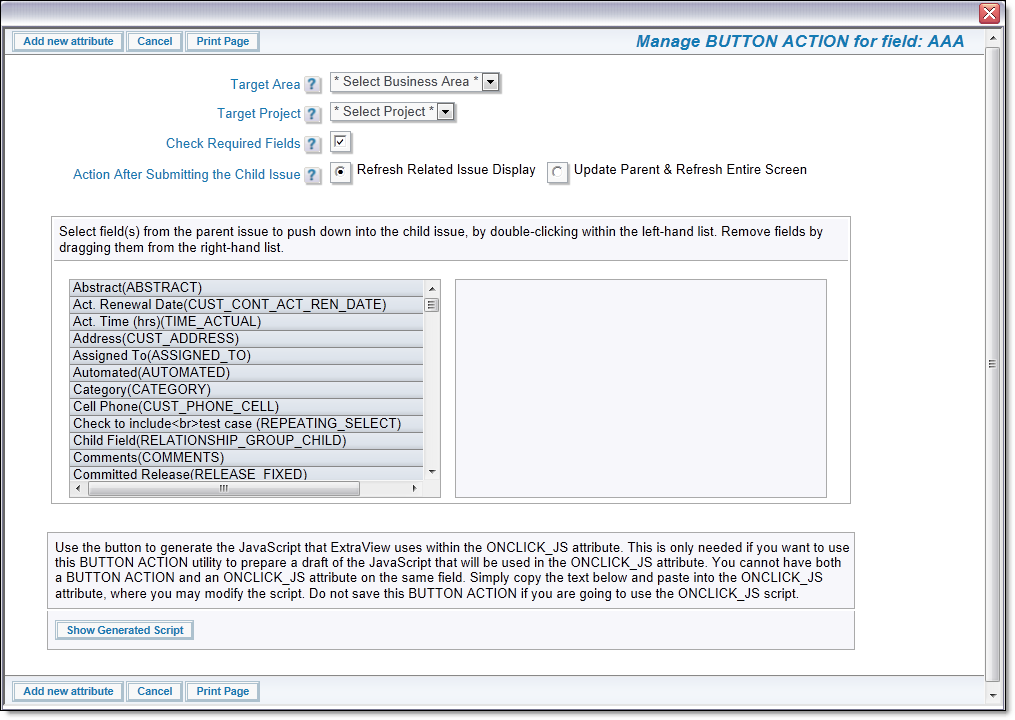
| RID BUTTON ACTION | This attribute is applied as a cell attribute to the ADD BUTTON within a related issue display header. The ADD BUTTON is configurable to allow a child issue to be added to the current parent issue that is being displayed on an add or edit layout. The action defines what happens when the user presses the add button.
|
||||||
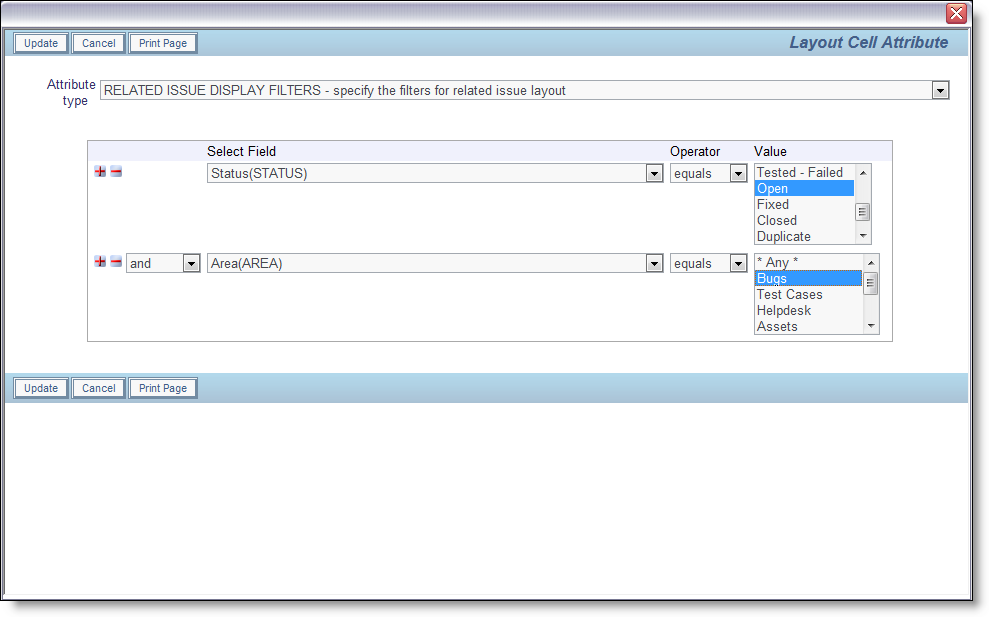
| RID FILTERS | This attribute may only be used on a cell containing a related issue display. It allows the administrator to set one or more filters on the related issue display. For example, you might want to filter the related issues to only display the Open issues, or you may want a much more complex filter. When you select this attribute, you will a dialog similar to the following. Use the query filters to compose the expression required, then update the attribute. Note that you cannot filter on the KEYWORDS field:
Note that there is a special value with the title of * Value from issue *in the list fields. This indicated that the filter will use the value that the user sets into the field when they are entering data. Consider this to be a dynamic filter. This special value appears for fields with display types of List, User and Popup. If you want to use this feature for other data types, you can enter $$<ddName>$$ in the field. |
||||||
| RID GROUP REFERENCE FIELD | If you do not use this cell attribute on the cell in a layout containing the LAYOUT.RELATED_ISSUE_DISPLAY (or other related issue layout), then ExtraView assumes that you are linking issues based upon the value in the ID field. If you have altered the behavior setting named ITEM_ID_DISPLAY to point to ALT_ID rather than ID, then issues will be related on the ALT_ID field rather than the ID field. However, you can use this entry to provide a link based upon the value of any other field on the layout. This is a very flexible feature, allowing arbitrary groups of issues to be linked, dependent upon any field. | ||||||
| RID LINK FIELD NAME | This attribute is used when linking selected search results on an ADD_PROBLEM or EDIT_PROBLEM layout to a related issue display which will contain the selected records. This field is an intermediate field which will contain the ID's of the selected records. For most purposes, this field can be hidden completely on the layout, using the following two attributes:
See the example here for use of this attribute. |
||||||
| RID ONCLICK_JS | This attribute is used on a related issue display to define JavaScript to execute when the user clicks on the RID PREHEADER ADD BUTTON. This can either be JavaScript itself, or a call to a JavaScript method in the UserJavaScript.js file. | ||||||
| RID PREHEADER | This defines a title for the header section within a related issue display. Use this attribute on the embedded related issue display within a layout. The title will appear as shown in this screenshot:
|
||||||
| RID PREHEADER ADD BUTTON | Use this attribute to place an "add" button on a related issue display layout. The button must already exist before you can use this on the related issue display. The button is created within the data dictionary with these attributes:
|
||||||
| RID PREHEADER REFRESH BUTTON | See the example here for use of this attribute. This provides a "Refresh" button on a related issue display that contains search results. The user can select new search filters with this button to refresh the results. This attribute does not require a data dictionary field. Simply enter the title for the button that you require as the value to this attribute.
|
||||||
| RID PREHEADER SUBMIT BUTTON | See the example here and here for use of this attribute. This provides the "Submit" button on a related issue display that contains search results. The user moves the currently selected issue(s) from the related issue display to either fill fields on the current parent issue, or to relate the selected records to the current parent record. This attribute does not require a data dictionary field. Simply enter the title for the button that you require as the value to this attribute.
|
||||||
| RID RELATION TYPE | This cell attribute defines how the related records will be displayed within the RELATED_ISSUE_DISPLAY (or other layout where the name begins with RELATED). This has four possible values:
|
||||||
| RID RELATIONSHIP NAME | This attribute may only be used on a cell containing one of the following:
It will be ignored on other cells. It refers to the name of the relationship group that is to be used for the field. In case a), it defines the relationship group(s) to search for the related issues; in cases b) and c), it defines the relationship group in which the new relation is inserted. In case a), the relationship group name may be the wild-card “*”, which signifies ALL relationship groups. If you do not provide the attribute on a), ExtraView will search ALL relationship groups (as if the value were “*”); for b) and c), ExtraView will substitute the relationship group name stored in the behavior setting named RELATION_GROUP_DEFAULT, on the Workflow Settings screen. In any case, non-wild-card relationship group names must denote an existing relationship group. |
||||||
| RID SEARCH FILTER LAYOUT | This contains the name of the search filter layout that is used to determine the filters for an embedded layout of type Search. This is used as an attribute on the layout that will contain the results of the search, thereby linking the search filters and search results together. This example shows how this attribute is configured | ||||||
| RID SINGLE_SELECT | This attribute is used on a search results layout. It is used to constrain the number of results that are selected by the user to a single one, so that the fields on the selected result are returned directly into fields on the current issue. Business rules transfer the results into the fields on the current issue. The example here shows how this is configured. Note the use of the inbuilt field named RELATIONSHIP_GROUP_CHOOSE_BTN field to provide a radio-button-like function to allow the user to select the result they want to transfer.
If this attribute is not set then the RELATIONSHIP_GROUP_CHOOSE_BTN field allows multiple selections, and the use case is likely to be that the entire set of results will be used to create a group of related issues |
||||||
| RID SORT ORDER | In this attribute, you specify the sort order of the records presented on the RELATED_ISSUE_DISPLAY. Specifically, you can set up:
To specify ordering by more than one field, insert multiple Relationship Group Sort Order attributes. To specify where a sort order field appears in the sort priority, use the rank number. For example, two attributes may be:
As usual, the sorting is done on SORT_SEQ within the field's definition, and then the title of the field value. |
||||||
| RID TRANSPOSE LAYOUT | This attribute only works in conjunction with a related issue display. When this is applied to a related issue display, it causes a transposition of the rows and columns on the related issue display. | ||||||
| UPDATE MAIN ISSUE | This attribute only affects the behavior of an EDIT_BUTTON field when it is placed on a related issue display. It has no function or purpose outside of this and will be ignored as an attribute on all other fields and layouts.
The purpose of this attribute is to allow control of updates of the current issue on an edit screen when you edit a related issue by clicking on an EDIT_BUTTON in the related issue display. In such circumstances there may be business rules or other logic that triggers when you update the related issue; this logic may update the current issue. Under normal circumstances this would lead to a concurrency error when the user tries to update the current issue after completing the update to the related issue. In such an event, the desired behavior is often to allow the related issue to update the current issue, and allow the user to then update the current issue, but without a warning or error. To support this, there are three possible values for the layout cell attribute. These are applied in the following order:
|