Layout types can be created from the administration utility named Create and Maintain Layout Types or can be created while editing a layout within the Design Center. Once the layout type exists, you can choose to use it within a combination of Business Area, Project and Role, from the prompt Add a new layout for the entire system as seen in the following screen.
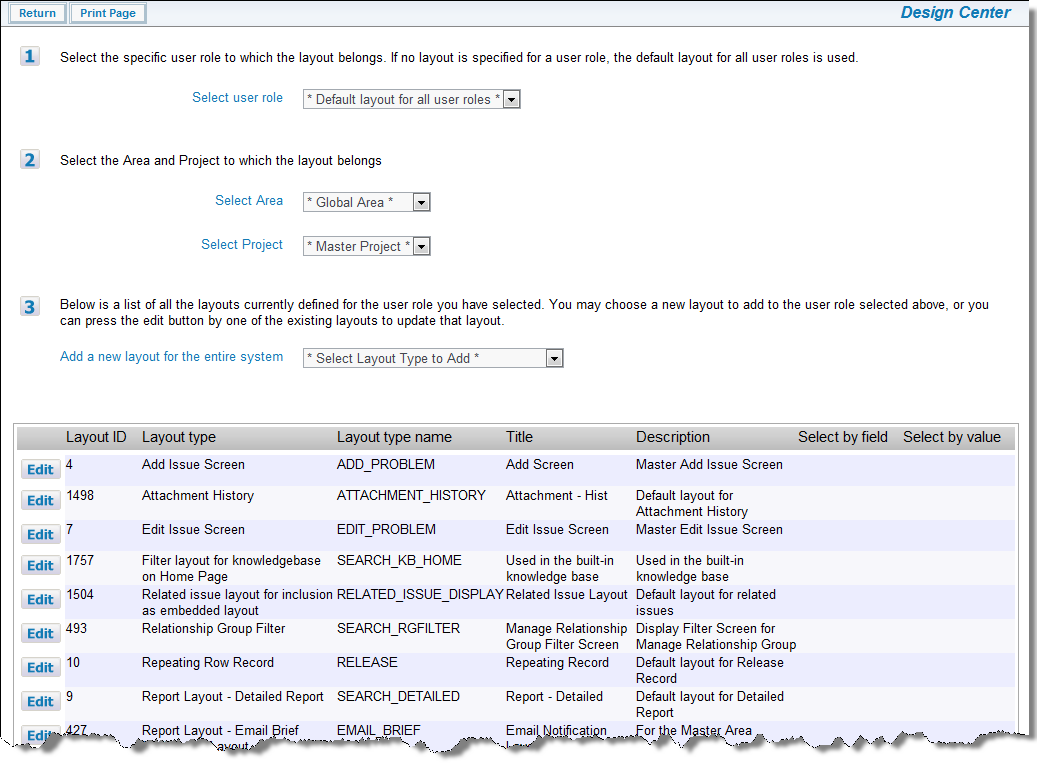
Design Center
Note:
- If you want view or update the layouts specific to an individual user role, you can choose from the select list entitled Select User Role. If you select the default layout for all roles, you will see the layouts that are used unless a role is specifically designed for a specific user role
- Use the select lists to choose the Business Area and Project for the layout you want to add or to edit
- The select list named Add a new layout for the entire system allows you to add a new layout, from the list of available layouts, for this combination of Area, Project, and user role. If a layout for this combination already exists, it will not appear in the select list, but it appears in the lower half of the screen, with an edit button alongside
- Clicking on the Edit button allows you to alter and update the layout.
Note: The edit function allows you to delete layouts, whether they were created by yourself as an administrator, or created by ExtraView. You should not delete an ExtraView created layout. ExtraView will not function correctly if you do so.
Role-Based Layouts
- If you are not selecting a layout that will be used as the default across all user roles, select the user role to which the layout will apply from the select list at the top of the screen. Note that you can clone a layout for a different user role by editing an existing layout, altering the user role to which it belongs and saving the layout
- To add a layout where an existing layout of the same type already exists, click the Edit button beside the existing layout type example you would like to use. If no layout of an available type currently exists, select the desired layout type from the Add new layout drop down select list. You can then perform a "save as" operation
Editing Operations Within a Layout
When you click the Edit button, a screen similar to the following appears:
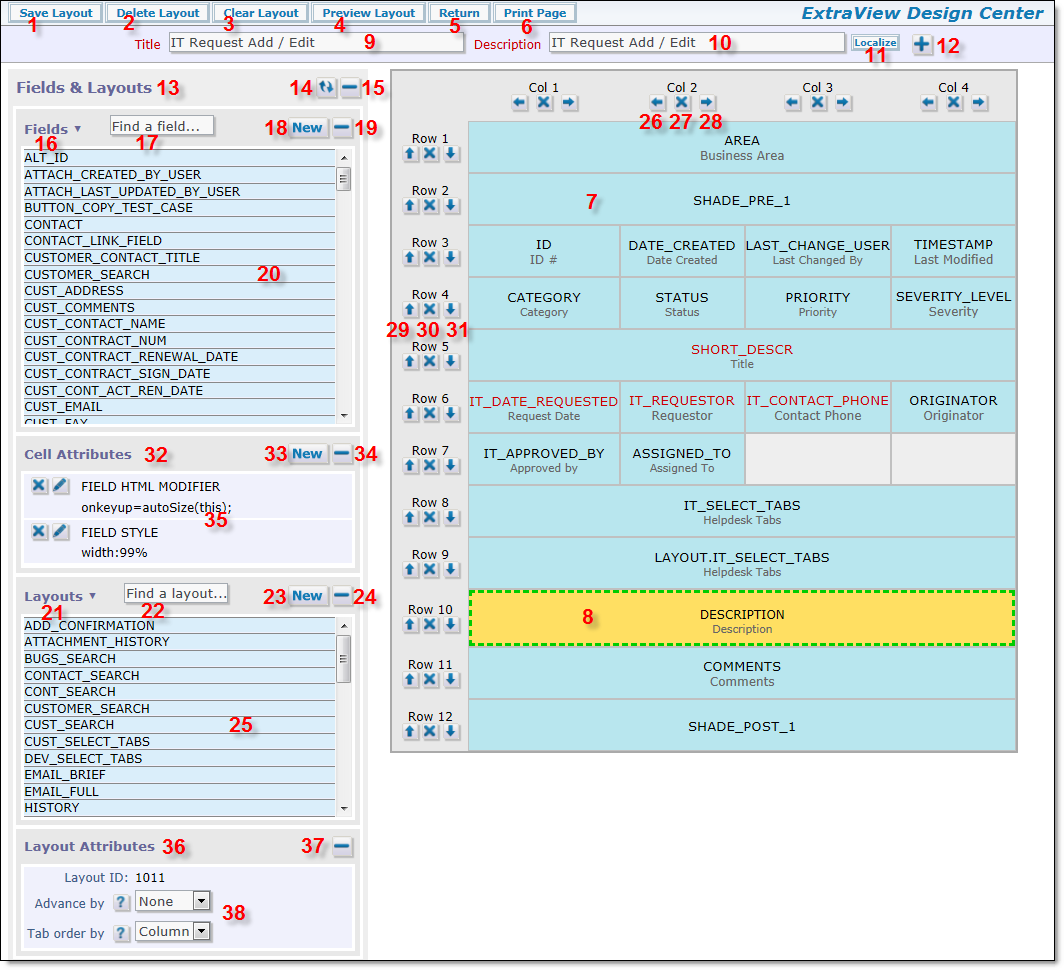
Design Center Screen
- Save Button - Saves the current layout, leaving the administrator within the layout
- Delete Button - Deletes the current layout. You must confirm the operation before the layout is deleted
- Clear Button - Clears the current layout of all fields
- Preview Button - Opens a preview of the layout in a new window. Note that the preview is only an approximation of the layout as it will be rendered, and does not utilize layout cell attributes such as FIELD/LAYOUT VISIBLE IF
- Return Button - Return to the initial Design Center screen with the list of layouts
- Print Button - Print the contents of the current window
- The main grid where selected fields are shown in the position where they will be rendered on the layout. Note the scroll bars around the main grid which allow you to reposition the layout
- A selected field on the main grid. The selected field is highlighted. Note that a field may span more than one row and / or column
- The title for the layout
- The description of the layout
- Localize button - this only appears if localization is turned on for the installation, and allows you to localize the Description for the layout
- Layout Options toggle - when this is clicked, a section similar to this opens:

Use the select lists to alter the role, layout type, business area or project where you want to store the layout, as a "save as" operation
- Fields and Layouts - This section is fixed to the left-hand edge of the screen and provides all the controls to create and place both fields and layouts onto the grid. In addition, you can create and maintain layout cell attributes to control the behavior of the fields, and layout attributes to control the behavior of embedded layouts
- Invert field list button - this button toggles the field list so that field titles are displayed in order, as opposed to displaying their names
- Minimize field/layout lists - this button toggles the field and layout section, reducig itsappearance to a single button on the screen
- Field filter list - selecting this will display allow the filtering of the field list to a single field display type

- Find a field - start typing into this field and all fields in the list that match the pattern will be displayed, and all other fields will be dropped from the list
- New field button - this brings up the data dictionary screen to add a new field. When you first click the button, you are asked if you are creating a new Field, Expression, Label or Screen field
- Minimize field list - this button toggles the field list, to reduce its appearance to a single row on the screen
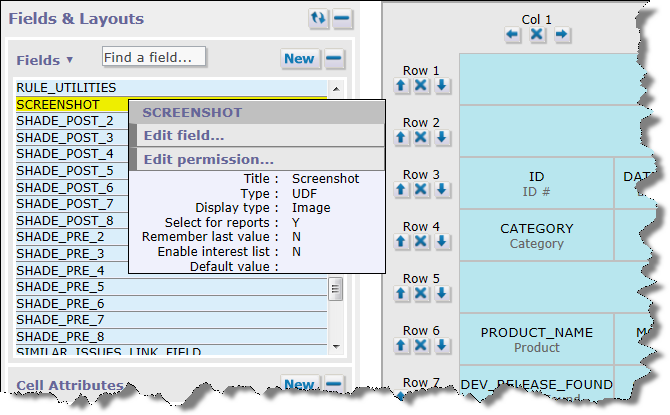
- Field list - this scrollable list shows all the available fields that you can drag and then drop on the main grid. Fields may be dropped on any empty location in the main grid. If you right-click on a field name, you will see details of the field. Note the Edit button. When you click this, a window will open showing the field in the data dictionary. You can make any modification you require to the field and its attributes at this point. If the field has a display type of list, popup, tab, or radio button, there is also the ability to Edit field list values. Clicking this pops up a window where you can modify the list values. An option is also available on this list to modify the permissions of the field. This pops up a window within which you can modify the permissions, role-by-role
- Layout section - this allows you to manage your layouts to embed within the main grid, including creating new ones
- Find a layout - start typing into this field and all layouts in the list that match the pattern will be displayed, and all other layouts will be dropped from the list
- New layout type button - this brings up the layout type screen to add a new layout type
- Minimize layout list - this button toggles the layout list, to reduce its appearance to a single row on the screen
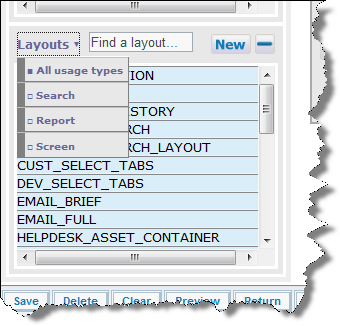
- Layout list - this scrollable list shows all the available layouts that you can drag and then drop on the main grid. Layouts may be dropped on any empty location in the main grid. Use the Layouts button to filter the layouts by type
If you right-click on a layout within the list, you will see its details. Note that layouts you have created will have a Permission button. When you click this, a window will open allowing you to modify the permissions to the layout. You can make any modification you require to the field and its attributes at this point.

- Insert column to left button - Insert a new column to the left of the button
- Delete column button - Delete the column
- Insert column to right button - Insert a new column to the right of the button
- Insert row above button - Insert a new row above the button
- Delete row button - Delete the row
- Insert row below button - Insert a new row below the button
- Cell attributes area - This is the area where all the layout cell attributes are managed. Click on a cell in the main grid to select it as shown in the screenshot below, and the cell details panel will display all the information about the cell
- New layout cell attribute button - Click this button to add a new layout cell attribute. See the section on layout cell attributes for information on managing these
- Minimize layout cell attributes button - this button toggles the layout cell attributes information, to reduce its appearance to a single row on the screen
- The layout cell attributes that are configured for the selected field in the main grid. Note the buttons to delete and modify the layout cell attributes
- Layout Attributes area - this area will display information on any selected embedded layout within the main grid
- Minimize Layout Attributes - this button allows you to open and close the layout attributes section
- The Advance By option is a layout attribute that allows you to set a direction to advance the placement of a field as you place these on the layout, to column or row. The Tab Order By layout attribute allows you to set the order for tab control by end users entering data into the form. This can be by column or by row
Field Manipulation on the Main Grid
- Selecting a field - click on the background to the cell
- Moving a cell - click on a cell and drag it to a new, empty location on the main grid. Note that any layout cell attributes to the field within the cell will be moved along with the field itself
- Removing a cell from the main grid - click on the background to a cell and drag it back to the field list.
- Layouts - perform similar actions as those above to manipulate layouts
- Extending a cell over multiple columns - click on the right-hand edge of the cell and drag the edge to the right over empty cells. Release the mouse over the rightmost cell to which you want to extend the cell
- Extending a cell over multiple rows - click on the bottom edge of the cell and drag the edge downwards to the bottom row to contain the cell. Release the mouse
Duplicate Fields on Layouts
It is not permitted to have the same field included on the same layout or different layouts that are grouped together by embedding one layout within another. ExtraView catches a field duplicated within a single layout within the design center, but the design center cannot catch the situation when a field is duplicated by virtue of being contained in an embedded layout. The reason for this is that when you create an embedded layout, it may be included in any one of a number of other layouts, and each of these may or may not have the field duplicated.
The error of duplicated fields can therefore only be caught at runtime. When testing your installation, you may see an alert message similar to the following screenshot:

The above example shows that the field named DESCRIPTION is duplicated. First it is included on the ADD_PROBLEM layout, and then on the embedded Details layout. Further, the ID of the Details layout is displayed.
You must resolve the duplication by removing one of the fields from one of the layouts before your installation will function correctly.
Using the Layout Description as the Title to Add and Edit Screens
The Description field on Add and Edit layouts has a special property. It may be used as the title to these screens, allowing the administrator to provide different titles for each Add and Edit screen. For example, you might give the Add and Edit screens different titles in different Business Areas. The standard behavior is that the title of the data dictionary field for the screen is used as the screen title. If you give a title of $$LAYOUT.TITLE$$ to any of the following fields, then the layout description will be used as the title to the screen as it is rendered.
- ADD_PROBLEM - The Add Issue screen
- ADD_PROBLEM_SUMMARY - The Add Issue Verification screen
- EDIT_ISSUE_SUMMARY - The Edit Issue screen
Layout Rendering
The layouts will be rendered by the user's browser when they navigate to the appropriate function for the layout. Note that if ExtraView sees that an entire row of cells are empty, i.e. there are no values with write permission, and there are no values to render with read-only permissions, then the entire row is suppressed and is not rendered.