Example 4

It is often useful to search for issues in order to make a selection from the result set, and relate this selection to the current record. The selection may be a subset of the result set. For example, you might have a business area that contains a library of test cases, and you want to create any number of test plans from this library. Each test plan might have a different subset of records chosen from the library.


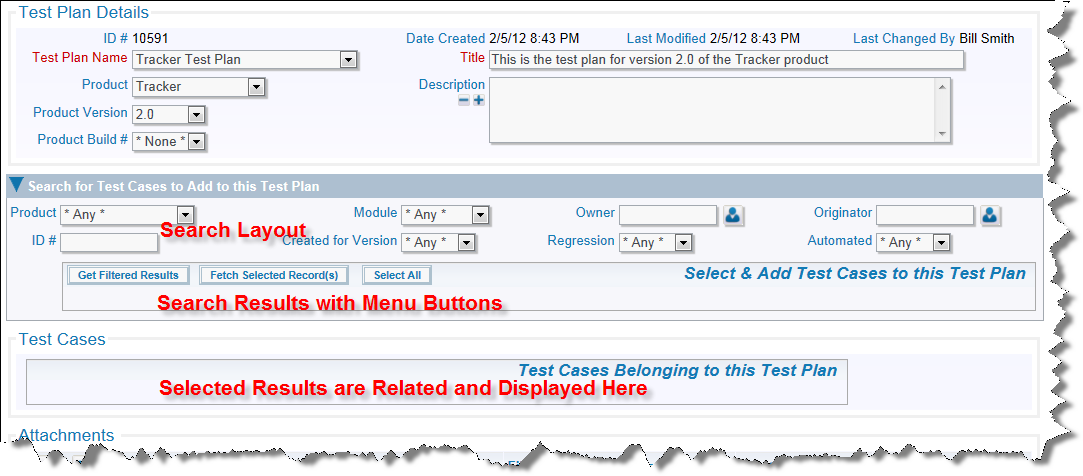
Initial presentation of screen

In the above screen, you will observe a search layout; this is used to provide a filtered set of search results within a related issue display. Note the buttons in the header of the related issue display.


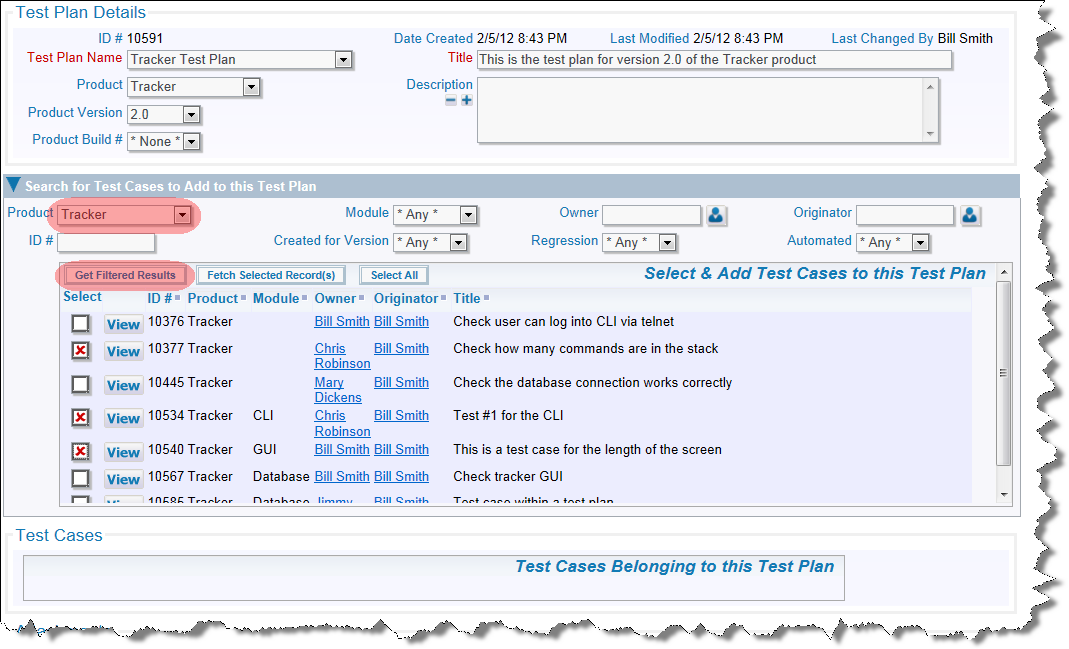
Entering the search criteria and seeing the results

Once you have selected filters, use the Get Filtered Results button to display the results in the related issue display. With your mouse, you can click on any of the results to select that record. There is also a button to Check All the results at one time.


The selected results now related to the parent issue

Use the Fetch Selected Record(s) to move all the selected records into the final result set where they will be stored with the parent issue. Note that the search layout and results are reset. You may repeat the search and selection process to add additional child records to the parent record. The basic configuration involves setting up 3 embedded layouts, one for the search, one for the search results and one for the selected records. A text or text area field is used to connect the selected valus from the search results to the selected records:

  • Start by creating an add or edit screen(s) in the normal way
  • Create a relationship group to define and hold the relationship
  • Create a search layout to be used as the available filters for the search
  • Create a related issue display to hold the results of the search
  • Create a related issue display to hold the final selected records as children to the parent issue
  • Assemble the search layout and related issue display layout on the add or edit screen
  • Create and place a link field on the add or edit screen to act as a transition of the record ID's from the search results to the final related issue display

The Relationship Group

This is created within the Administration utility, Relationship Group Maintenance. This should be of the type One-to-Many. In our example, we named this TEST_CASES_TEST_PLANS and gave it a title of Test Cases / Test Plans.

The Search Layout

A prerequisite to making the search layout operate is to configure the Quickfind feature. Once this has been done, create a new layout type. This may have any name and any title, but it must have a usage type of Search. This is used to contain the search filters that will be displayed to the user. For our example, we will use the name TEST_CASE_SEARCH. Next, add the new layout to the area and project where it is needed, creating a new layout. Onto this layout, you will place the fields to be used as filters. No special layout cell attributes are required, but you may use whatever attributes help you provide an aesthetically pleasing display. Save this layout.
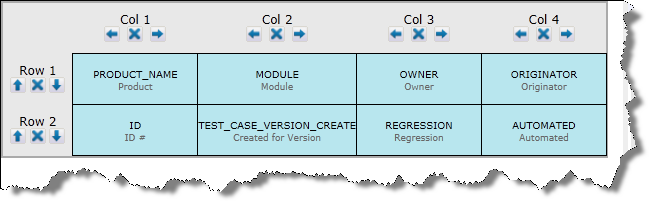

The search layout

The Related Issue Display Layout Containing the Search Results

This is used to contain the results of the search. Note that the fields displayed do not need to match the fields within the search layout, although it is common to see several fields in common. Create a new layout type to contain the related issue display. By convention, begin the name of the new layout type with RELATED_ and followed by remaining characters that provide an unique name for the layout. The usage type of this layout must be Report. For our example, we name this layout type RELATED_TEST_CASE_RESULTS. Now, add the new layout to the area and project where it is needed, creating a new layout. In the first column of the layout, place the inbuilt field with the name RELATIONSHIP_GROUP_CHOOSE_BTN. This is used as the selector for the record(s) whose results you want to place into the add or edit screen. It is recommended that you only place the VIEW_BUTTON as any other button on this layout. You should not place other buttons such as EDIT_BUTTON or QUICKEDIT_BUTTON on this layout as this layout only displays search results. Place the remaining fields that you want to display on the related issue display on the layout, and save the layout.


The related issue display layout with the results

The Related Issue Display Holding the Selected Records

This layout is typically similar to the previous one you created, in terms of the fields you display, but you will likely want to see different buttons. Most typical is to include a VIEW_BUTTON, and an EDIT_BUTtON. A QUICKEDIT_BUTTON is often useful.


The related issue display layout that displays the selected records

Configuring the Add or Edit Screen to Use the Search and Related Issue Display Layouts

A link field is required to pass the results from the selection made on the Related Issue Display layout with these characteristics:

  • Create the link field, with a display type of text area. In our example, we use the name TEST_CASE_RESULTS_LINK_FIELD. Give this field read / write permissions for the roles that will be adding the test cases
  • This field must be placed on the add or edit layout you are configuring, but it need not be visible - normally you will want to hide this. The following layout cell attrbutes are recommended:
    • STYLE - set to style=display:none to hide the field. Note that you cannot use the VISIBLE IF layout cell attribute. This is because this attribute only places the field into the HTML form when it becomes visible. ExtraView needs the field on the form even when it is invisible to be used as the link field
    • LABEL TAG - set to style=display:none
    • RID ACT ON FIELD CHANGE - This ensures that the link field updates the final layout with the selected issues by triggering a refresh of the related issue display with the selected results
    • RID RELATIONSHIP NAME - This is the relationship that you created in the earlier step. In our example, this is TEST_CASES_TEST_PLANS with the title of Test Cases / Test Plans
    • RID RELATIONSHIP TYPE - Set this to a value of Children
    • RID OMIT AUTO POPULATE - This ensures that when you delete an item from the relationship that any value in the original link field is not used, thereby re-populating the child issue back into the relationship.
    • Place your TEST_CASE_SEARCH layout on the add or edit screen layout. This layout does not require any layout cell attributes, but you might decide to hide it using FIELD/LAYOUT VISIBLE IF, once you have made your selection from the results of the search. Place your RELATED_TEST_CASE_RESULTS related issue display layout for the search results on the add or edit screen layout. This is the place where you configure several layout cell attributes that link that bind all the elements together:


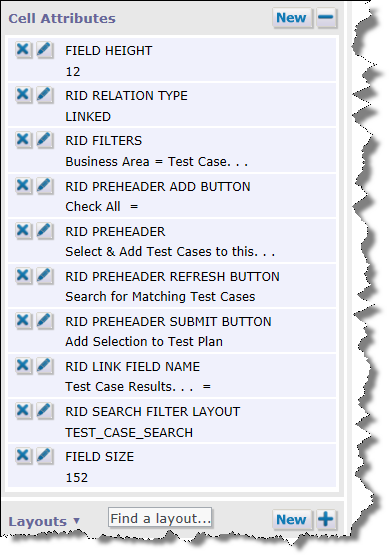
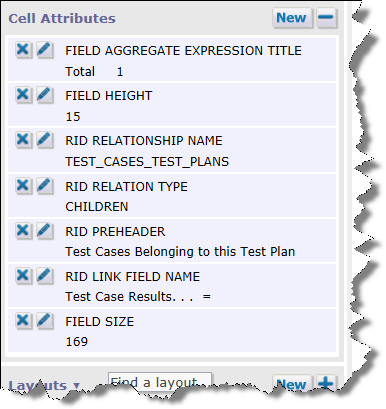
      Cell attributes on the results layout

    • HEIGHT - The approximate number of rows to display on the results layout, before displaying a vertical scroll bar. This is optional. If you do not provide this, all the results will be displayed
    • RID RELATION TYPE - You must set this to a value of Linked
    • RID FILTERS - This is optional. You may provide filters here which will be used in addition to filters the end user enters on the add or edit screen. In our example, we always want the results to be obtained from the Test Cases project within the Test Cases business area, so we create these filters within the layout
    • RID PREHEADER ADD BUTTON - This button is usually used to provide a "Submit" capability on a related issue display. This functionality is not required on search results, so we use this button to provide an alternative function, to Check All and Uncheck All records in the search result. This field is available in the Data Dictionary on the Labels tab. It has a name of SELECT_ALL_BTN, and a title of Check All in the English locale. It also has a Global Attribute of ONCLICK_JS with a value of toggleRIDSelectButtons();. This provides the JavaScript that allows all the records to be selected or deselected. You must define a RID PREHEADER for this button to be visible
    • RID PREHEADER - This attribute provides an area above the related issue display that contains the function buttons, as well as providing a title to the related issue display. The value you provide with this attribute becomes the title. Unless you define a RID PREHEADER attribute, the RID PREHEADER ADD BUTTON, the RID PREHEADER REFRESH BUTTON and the RID PREHEADER SUBMIT BUTTON will not appear, as the RID PREHEADER is used as a container for these buttons
    • RID PREHEADER REFRESH BUTTON - This places a button onto the related issue display pre-header bar that allows the user to get the results from the current set of filters, and to refresh the results if the user changes the filters. The button has a default title of Get Filtered Results, but you can optionally provide a value to the attribute which will then appear as the label on the button. You must define a RID PREHEADER for this button to be visible
    • RID PREHEADER SUBMIT BUTTON - This places a button onto the related issue display pre-header bar that allows the user to update ID's for the selected values within the display into the FIELD NAME. The button has a default title of Fetch Selected Record(s), but you can optionally provide a value to the attribute which will then appear as the label on the button. You must define a RID PREHEADER for this button to be visible
    • RID LINK FIELD NAME - This is the name of the link field that receives the ID's of the selected issues from the related issue display. Simply select the field name from the list presented to you when you add the attribute
    • RID SEARCH FILTER LAYOUT - This identifies the Search Layout you created above. Simply select its name from the list of values
    • SIZE - This is an optional attribute with the width, in characters, of the display of the related issue display layout
    • Use the RID AUTOLOAD layout cell attribute, if you want the search results to be populated with results using the RID FILTERS, when the screen is first rendered.

    The Related Issue Display with the Related Records from the Results

    Here, you place layout cell attributes on the layout named LAYOUT.RELATED_TEST_CASE_RESULTS. This layout displays the records you selected within the search results. The attributes this layout needs are:
     

    • AGGREGATE EXPRESSION - This is an optional attribute that, in our example, is used to provide a total of the hours on the related issue display
    • HEIGHT - This is an optional attribute. It provides an approximate row count that is displayed, before a vertical scroll bar is introduced onto the related issue display
    • RID RELATIONSHIP NAME - This is the relationship that is being updated. This was created in an earlier step. In our example, this is TEST_CASES_TEST_PLANS with the title of Test Cases / Test Plans
    • RID RELATIONSHIP TYPE - This attribute defines the type of relationship. This should be Children
    • RID LINK FIELD NAME - This is the name of the link field that receives the ID's of the selected issues from the related issue display. Simply select the field name from the list presented to you when you add the attribute
    • SIZE - This optional attribute provides a width, in characters, of the related issue display.


      Cell attributes on the child record layout