Privacy groups are designations that limit the visibility of issues, except those users who are members of the privacy group to which the issue belongs.
For example, your company may have six divisions, each of whom report issues using ExtraView. You may want to set up a structure, whereby each of the divisions report issues that remain private to each division, and are not shared with other divisions. Layered on top of this is the ability for a management or supervisory function that has access to all the issues, irrespective of the division that originated the issue. This can be implemented within ExtraView by setting up individual privacy groups for each division, restricting each member of a division to only enter issues for their own division (i.e. privacy group), and giving the management function access to all privacy groups.
To turn on the privacy group feature in your instance of ExtraView, use the behavior setting named ENABLE_PRIVACY_GROUPS. This is found in the Users behavior settings menu.
Note: If ENABLE_PRIVACY_GROUPS is set to NO, then issues may only be marked as PUBLIC or PRIVATE. If ENABLE_PRIVACY_GROUPS is set to YES, then issues may be marked as PUBLIC, PRIVATE or a member of a privacy group that you create. With the latter option, you may also elect to remove either the PUBLIC and / or PRIVATE designation from the list, as explained in the section following.
Note: There is a behavior setting named ENABLE_PRIVACY_GRP_OVERRIDE. If the value is set to YES, then internal users can see all issues regardless of the value of the PRIVACY field. Internal users are defined by the user's personal Company Name being identical to the company name defined by the behavior setting named COMPANY_NAME. If the value is set to NO, users may only see issues when they are a member of the privacy group to which the issue is assigned.
The precise rules for how issues are handled with respect to privacy groups are as follows:
When using privacy groups, it is sometimes useful to be able to control whether the entries for PUBLIC and PRIVATE also appear within the select list boxes on the add, edit and search screens.
For example, you may always want a privacy group to be selected for every issue without exception.
This can be achieved through the settings of the following security permission keys. These can be set for each user role within ExtraView, in the standard way of setting security permissions.
| Security permission key | Purpose |
| PR_ADD_PROBLEM. SHOW_PRIVATE_IN_PRIVACY_LIST | Write permission to this security key is needed to place the entry for Private in the select list for the Privacy field on the add issue screen. If this key is set to N, then issues cannot be marked as private for the user role. |
| PR_ADD_PROBLEM. SHOW_PUBLIC_IN_PRIVACY_LIST | Write permission to this security key is needed to place the entry for Public in the select list for the Privacy field on the add issue screen. If this key is set to N, then issues cannot be marked as public for the user role. |
| PR_RESOLUTION. SHOW_PRIVATE_IN_PRIVACY_LIST | Write permission to this security key is needed to place the entry for Private in the select list for the Privacy field on the edit issue and query screens. If this key is set to N, then issues cannot be marked as private or searched for the user role. |
| PR_RESOLUTION. SHOW_PUBLIC_IN_PRIVACY_LIST | Write permission to this security key is needed to place the entry for Public in the select list for the Privacy field on the edit issue and query screens. If this key is set to N, then issues cannot be marked as public or searched for the user role. |
From the Site Configuration administration menu, click the Privacy Groups button. A screen similar to the following appears:
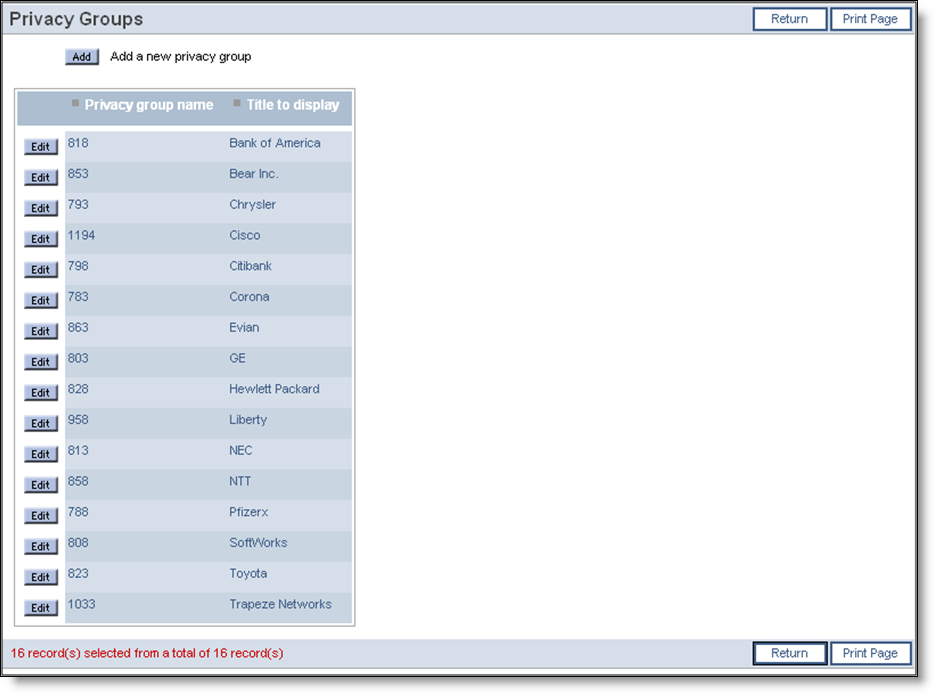
Privacy Groups screen
To create a new privacy group, click the Add button. The following screen appears:
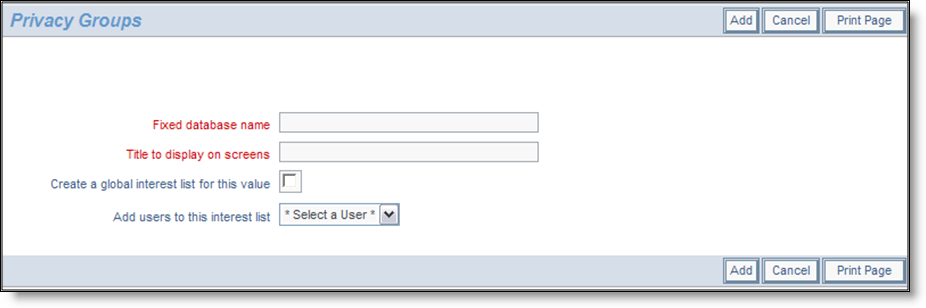
Add New Groups screen
Enter a database name (no spaces or special characters) and a display name. If an interest list is allowed on the field, you can optionally create an interest list for this value and add a user. When ready, click the Add button to create your new value. Once the Privacy Group is created, the administrative user may assign individual users to the group by checking the appropriate check box on the Change a User’s Details screen.
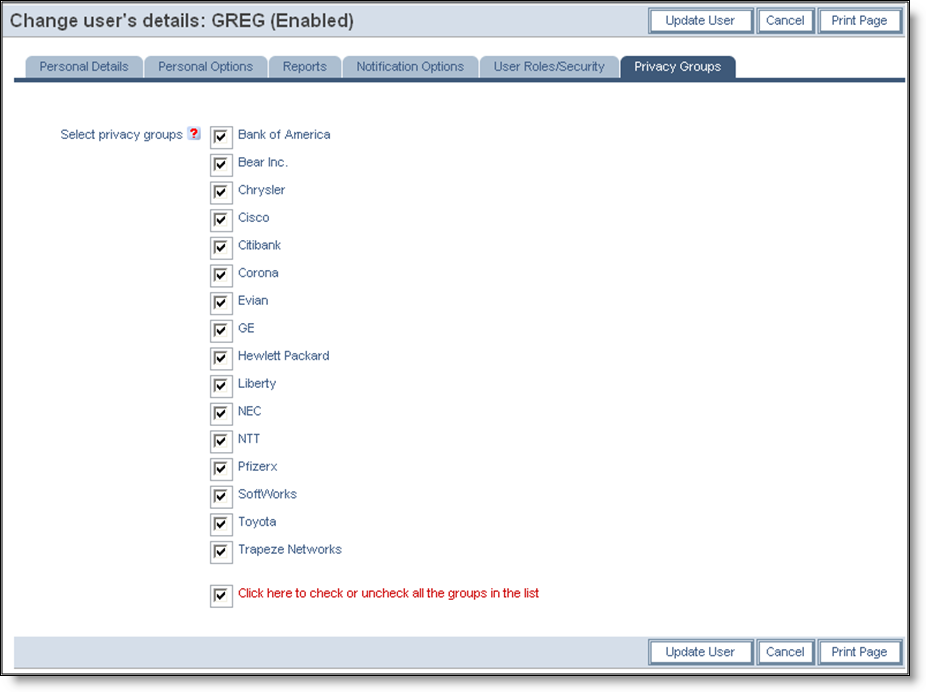
Change User's Details screen with Privacy Groups