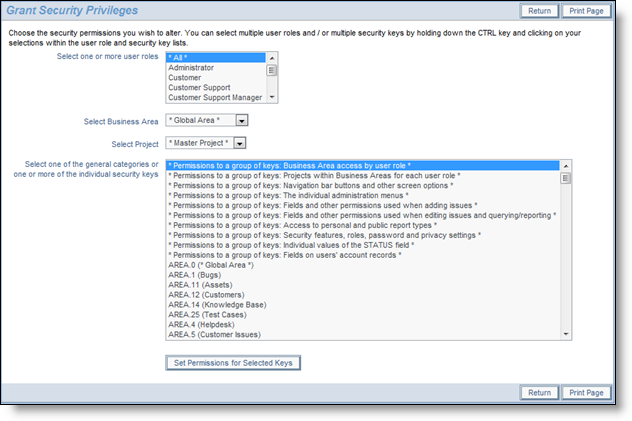
Granting Security Permissions, controls each user role’s access to all fields, buttons and features in ExtraView. In setting permissions, the System Administrator has the ability to make these kinds of items read only, write only, readable and writeable, or invisible.
The security system uses the concept of inheritance. Each Area and each Project can have different security permissions for each key. However, if no setting is made at the Area level, then the value of the key at the global level is used. In the same fashion, if no value is given at the Project level, then the key is set to the value at the Area level. This provides an economic means of administering ExtraView where you need only provide settings for security keys that differ from the global level.
When you update a security permission key, or a number of keys, the change in permissions is immediate for the administrative user who made the change. All other users will see the change when the time period defined by the behavior setting named SECURITY_CACHE_MINUTES, causes the security cache for each user to be refreshed. The default time period for this is 30 minutes, so any user signed on will see the change within this time period. Any user who signs on will see immediately, the newly updated permissions.
The security permissions for individual fields may also be set within the data dictionary and within the layout editor. This provides a convenient means of setting the permissions while working on a field.
Grant Security Privileges screen
Grant Security Privileges screen
If youwant to modify permission keys at an inherited level, i.e. you have not selected the Global Area and Master Project, the screen is modified , allowing you to see where security permissions for an individual key are inherited, and where they are overwritten. The following screenshot has an example.
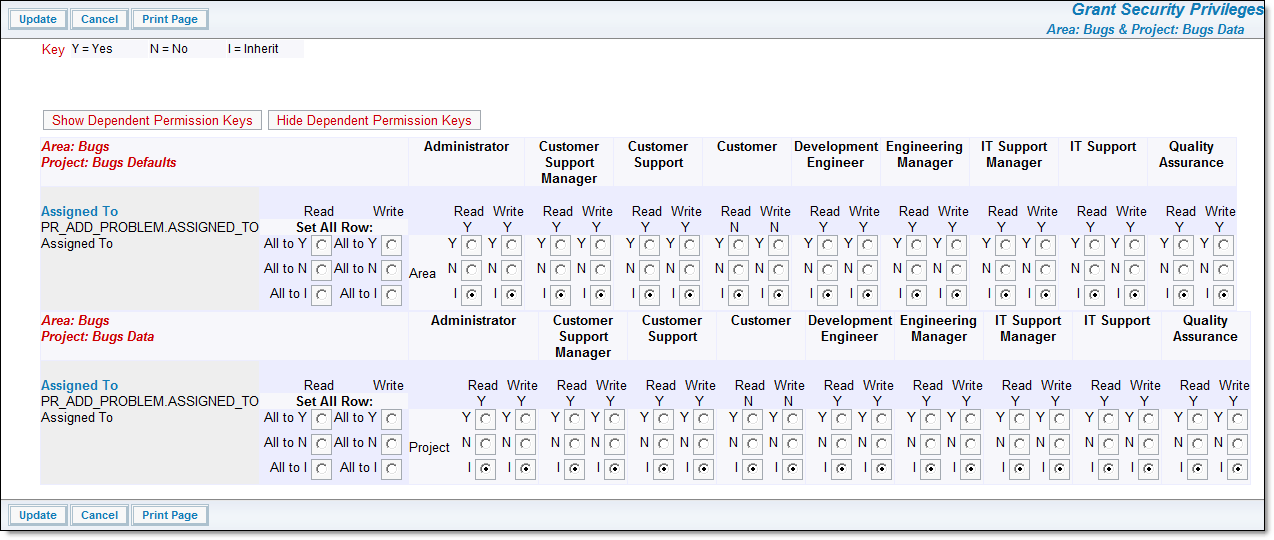
Setting permissions for an inherited field
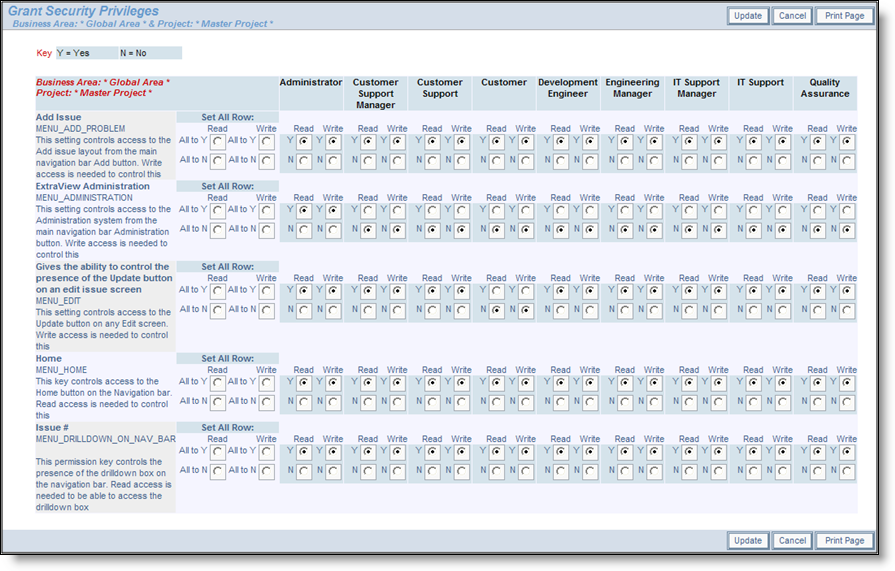
Note that you may alter all the permissions for a single field or object, across all user roles, by using the radio buttons beneath Set All Row:. Use the buttons to set all read and/or write permissions to Yes or No for any row of settings.
Permissions set in the global area and master project are inherited and used by all other business areas and projects unless the inheritance is broken at an individual business area or project. By doing this, you can establish a different set of permissions for any field or object at any level within your installation. Setting a different permission for a field within a business area, causes that permission to be used for all the projects within that business area. Setting a different permission within a master project causes all the other projects within that business area to use these permissions. Setting different permissions within a project other than the master project causes these permissions only to be used within that single project.
This provides an economic means of setting permission through your system. You set them at the root level, i.e. the global business area and master project. These permissions are then used with all junior objects, unless you choose to override them.
You provide the override by editing the field or object within the business area and project where you want to provide the override. When you first look at the permissions within a specific business area and project, you will see that the permission is set to "I", for inherit. You simply set the read and write privileges to override the inheritance. You can always set the permission bak to the "I" value to restore the inheritance.