EVMail is configured as a task. If you are setting up EVMail for the first time, you will need to create the task. Use the button labeled Add to add the task from the Task Manager screen, or use the Edit button to modify the attributes that control the EVMail task. Select the EVMail Task task name and observe a screen similar to:
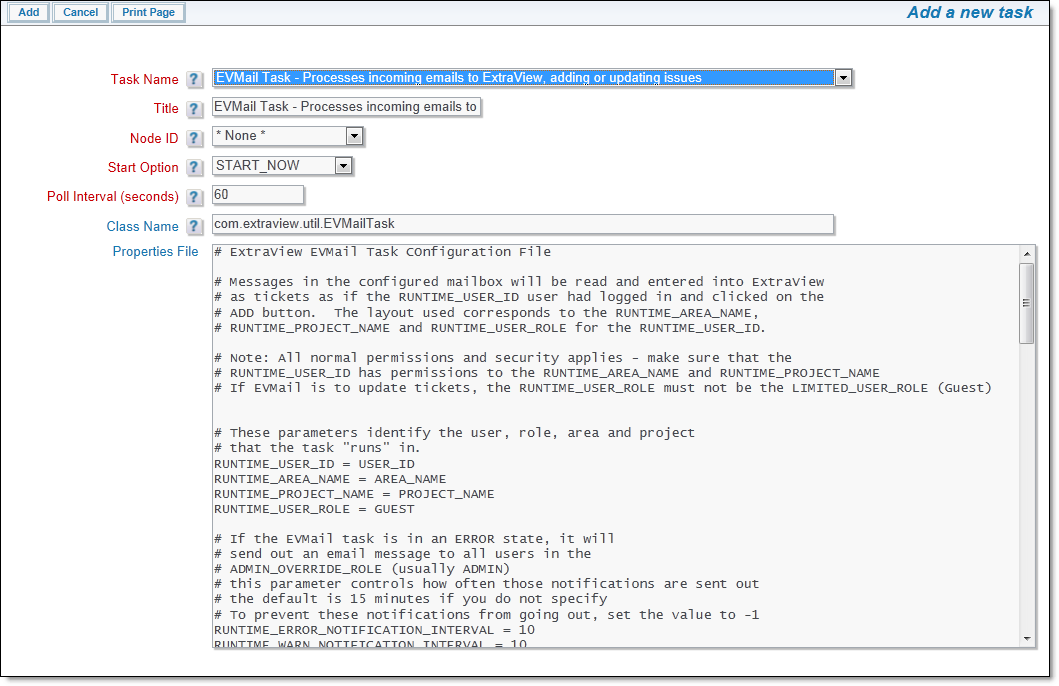
EVMail configuration screen
To configure EVMail, you will need a properly configured POP3 mailbox and you will need its username and password. You will also need to know the port to use for communication with the mailbox. It is strongly recommended that you use the POP3S protocol for a higher level of security than is achieved with POP3.
Next, you will need to identify an ExtraView user account, and a user role that EVMail will utilize. These, along with a nominated Business Area and Project, determine the add and edit screen layouts that will be used by EVMail to create new issues and to update existing issues. When selecting these values, take into account the standard licensing condition of ExtraView, i.e. non-licensed guest role users cannot update issues. Therefore, if you select a guest user for the runtime account, only new tickets will be created and you will not be able to update issues.
Note: The MAILBOX_USER value should never be the email address of a user within the ExtraView system. If you do this, there is a chance for an infinite loop to be set up where incoming emails generate notification to this user which then reply to the same address, thereby generating a new event which repeats itself.
Note: The MAILBOX_USER value should always be set to the same value as the behavior setting named EMAIL_FROM_ADDRESS. This ensures that updates to issues made by users and resubmitted are sent back to the same email address that ExtraView monitors.
You will then need to set up the fields that the EVMail task will populate - there are some field options that map to portions of the incoming email message according to whether you are inserting a new issue or updating an existing issue.
|
EVMAIL_BODY_UDF and/or EVMAIL_BODY_HTML_UDF |
For a new issue being created, use either or both of these fields to store the body of the email message. This allows you to store the body as text, HTML or both. Typically this will be mapped to the DESCRIPTION field or an HTML AREA field |
| EVMAIL_BODY_UPDATE_UDF and/or EVMAIL_BODY_HTML_UPDATE_UDF | For issue updates, use either or both of these fields to store the body of the email message. This allows you to store the body as text, HTML or both. Typically this will be mapped to the COMMENTS field or an HTML AREA field, so that successive updates will create a new entry in this log area field. Note that the COMMENTS field may use an option in the data dictionary to use it directly with HTML. |
| EVMAIL_SUBJECT | This ExtraView field will be where the subject of the email message is placed. Typically this will be the SHORT_DESCR field |
You can select other fields and set values, allowing you to set list values and user fields when creating new issues. The syntax for these fields is EVMAIL_FIELDNAME, where FIELDNAME is the field name of the field being mapped. For example, these are valid expressions:
| EVMAIL_AREA = 10 | You must use the AREA_ID for the AREA field |
| EVMAIL_PROJECT = 19 | You must use the PROJECT_ID for the PROJECT field |
| EVMAIL_STATUS = NEW | You must use the name for inbuilt fields |
| EVMAIL_ORIGINATOR = BSMITH | You must use the User ID for user fields |
| EVMAIL_COMPONENT = 12435 | You must use the UDF_LIST_ID for user defined list fields |
| EVMAIL_INSTRUCTIONS = Here are instructions | You can popuplate text, text area and log area fields with text |
Note: Updating existing issues will only result in the update of the EVMAIL_BODY_UPDATE_UDF field.
The values for these fields are database values or the internal ID value of the field (i.e. the UDF_LIST_ID value), not the title of the field. You can find the internal ID value by placing your mouse cursor over the list value in its maintenance screen, and looking at the status bar of your browser.
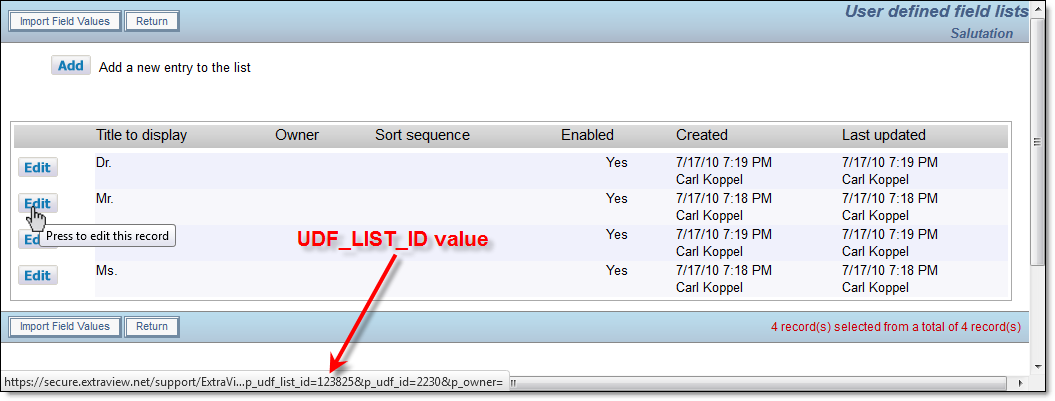
Finding the UDF_LIST_ID internal ID value
You can use a similar technique to find the AREA_ID for the AREA field and the PROJECT_ID for the PROJECT field. Look for the p_aid parameter for the AREA and the p_pid parameter for the PROJECT field.
All fields mapped in the Configure EVMail screen must be on the add layout, for the ExtraView user ID, their role, their default Business Area and their Project.
The default behavior of the EVMail task is to take the email address in the From: section of the email message, and to search for a matching user in ExtraView who has that same email address in either their primary or secondary email address field in their account. If a user is found, their User ID is used to populate the ORIGINATOR field. If no user is found, the user specified by EVMAIL_ORIGINATOR will be set into the ORIGINATOR field.
| EVMAIL_FIELDNAME | See the description above on how to map different fields from EVMail to ExtraView |
| EVMAIL_ADDL_DELIMS_TEXT |
This setting is used in conjunction with the behavior setting named EVMAIL_DELIMITER_TEXT and the EVMail configuration setting EVMAIL_ADDL_DELIMS_HTML. Together they provide additional controls on incoming email to the EVMail feature, to parse the email looing for the new content to include and to inhibit the repeated addition of older content of the emails. This is typically seen when users reply to emails add simply append their new message to the thread of existing messages. It is often desirable to only include the latest mail as an update to the ExtraView issue, and not to repeat existing, older comments. These settings are only used when updating existing issues within the ExtraView database, and not used when new issues are being inserted. The EVMAIL_ADDL_DELIMS_TEXT setting is used when the incoming email has a contentType of text/plain.
Any number of delimiters may be specified, delimited within the settings with Example: Three delimiters are specified in the example, and the incoming mail is parsed looking for all occurences of the three strings |
| EVMAIL_ADDL_DELIMS_HTML |
See EVMAIL_ADDL_DELIMS_TEXT above. The principal difference is that the delimiter being parsed within the incoming email has a contentType of text/html. Different email clients generate different delimiters and some experience with examining different email headers is required in order to be able to successfully determine the range of delimiters you expect.
Example: This delimiter string is often seen within Microsoft Outlook emails. |
| EVMAIL_ALLOW_HTML_MSG | Valid values are YES, NO and PARSE. If this is not specified, the default value is PARSE |
| EVMAIL_ALLOW_HTML_MSG_FAIL_TEMPLATE | This is used only if the EVMAIL_ALLOW_HTML_MSG parameter is set to is NO. If it does not exist, then SMTP_MSG_FAIL_TEMPLATE is used, if it exists |
| EVMAIL_ATTACH_EML | This parameter allows you to attach a copy of the received email in EML format to the created or edited issue when it is set to YES. A setting of NO or the absence of this entry means the attachment will not sent with the mail |
| EVMAIL_BODY_UDF | For a new issue being created, use this field to store the body of the email message as text. Typically this will be mapped to the DESCRIPTION field |
| EVMAIL_BODY_HTML_UDF | When you want to retain the HTML within the body of an incoming email, use this in place of, or as a complement to EVMAIL_BODY_UDF. This field should be an HTML AREA field |
| EVMAIL_BODY_UPDATE_UDF | For issue updates, use this field to store the body of the email message. This allows you to store the body as text. Typically this will be mapped to the COMMENTS field, so that successive updates will create a new entry in this log area field. |
| EVMAIL_BODY_HTML_UPDATE_UDF | When you want to retain the HTML within the body of an incoming email that is updating existing issues, use this in place of, or as a complement to EVMAIL_BODY_UDF. This field should be an HTML AREA field or a LOG AREA field configured to use HTML |
| EVMAIL_CC_UDF |
This parameter takes the entries in the CC field of an incoming email being processed by EVMail. You may set the value of this parameter to a field with a display type of text or text area.
The contents of the EVMAIL_CC_UDF field are not cumulative, but the issue history will show the successive values from each issue update. The value stored in the field will simply be the CC addresses of the current incoming email message. The email address within the setting named MAILBOX_USER is not used as a recipient. |
| EVMAIL_FROM_UDF |
You may set the value of this parameter to a field with a display type of text or text area.
If an incoming email is processed by EVMail and ExtraView fails to find a valid user who has an email address or alternate email address that matches the incoming message FROM address, Extraview will place the incoming FROM email address in the EVMAIL_FROM_UDF parameter. If ExtraView finds a matching user, it will not populate the new field, and will simply set the Originator field to the identified user account. This action works only when creating new issues - the EVMAIL_FROM_UDF field is not modified when an existing issue is being updated. This setting only works with ExtraView Enterprise versions. |
| EVMAIL_ID_REGEX | This is a regular expression used to parse the subject line and search for an ExtraView ID value. If an ID is found, EVMail attempts to update a matching issue ID in ExtraView. If no matching ID is found, a new issue is created. If you enter an invalid regular expression, ExtraView will report this information to the application server log. |
| EVMAIL_PRIORITY_FIELD |
This is an optional property. If this is set to a value that is a User Defined Field with a display type of Checkbox, then the following happens:
|
| EVMAIL_REMOVE_CONSECUTIVE_BLANKLINE | Some email client software such as Microsoft Outlook turn each occurence of a newline/linefeed sequence of characters into 2 linefeed characters. This can have the effect when the email is handled via EV Mail that the 2 linefeed characters introduce additional, unwanted space, betweeen paragraphs. This option will alter 2 consecutive linefeed characters into a single linefeed character, thereby preserving the intent of the author or the email. |
| EVMAIL_SENDER |
When set, this option will take the email address of the sender of the incoming email and store it within a field within the issue that is being inserted or updated. The usage is:
This allows the user to view the field and determine who provided the last update to the issue via email, as opposed to the user who last updated the issue with the user interface of ExtraView. |
| EVMAIL_SUBJECT | This ExtraView field will be where the subject of the email message is placed. Typically this will be the SHORT_DESCR field |
| EVMAIL_SUBJECT_LOOKUP |
The EVMAIL_SUBJECT_LOOKUP setting works in addition to the EVMAIL_ID_REGEX setting by searching existing records for matching subject line. When no ExtraView ID is detected in the subject line and EVMAIL_SUBJECT_LOOKUP is set to YES, then existing records are searched by the field specified in the EVMAIL_SUBJECT setting and matched against the incoming email subject line.
If a record matches, then that record is updated. Otherwise, when no match is found, then a new record is inserted. Note that subject line prefixes such as Re: and Fwd: are removed from the incoming email subject line for the purposes of performing the search and match. Also, the field specified in the EVMAIL_SUBJECT setting must be configured in Data Dictionary to have their Filter Criteria attribute set to Yes, so that a query can be executed with that field as a filter. If multiple records match the subject line, then a new record is inserted as opposed to updating multiple existing records. |
| EVMAIL_SUPPRESS_HEADER |
This configuration option allows ther administrator to remove specific lines from the header of the incoming mail, before the mail is inserted into a field within ExtraView. The remaining text is inserted into the destination field defined with EVMAIL_BODY_UDF. The header lines removed begin with the following strings and they must appear within the incoming mail before the occurrence of the EVMAIL_DELIMITER_TEXT contained within the email body:
From: Only header lines that begin with these strings are removed. There must not be blank lines between the header lines and they must all be followed within the mail body by the EVMAIL_DELIMITER_TEXT. If the mail does not contain a the expected value for EVMAIL_DELIMITER_TEXT, then this configuration option is ignored. This implies that the header information is not removed when creating a new issue within ExtraView, and is only operable when updating issues. |
| EVMAIL_TO_UDF |
You may set the value of this parameter to a field with a display type of text or text area.
EVMail parses the TO header within the incoming email and extracts the email address(es) in this list. If the EVMail address is in the list, it is removed. This may result in an empty list. If the list is not empty, EVMail creates a semi-colon separated list of email address and uses this as the value within the EVMAIL_TO_UDF field. This processing happens for both emails that create new issues within ExtraView as well as for emails that update issues within ExtraView. The contents of the EVMAIL_TO_UDF field are not cumulative, but the issue history will show the successive values from each issue update. The value stored in the field will simply be the TO addresses of the current incoming email message. The email address within the setting named MAILBOX_USER is not used as a recipient. Great care should be taken in the use of this parameter, as it is possible to generate an endless loop whereby an email generates an email that is processed by EVMail, generating an email notification that is again seen by EVMail and updates the same issue, ad infinitum. |
| IGNORE_SUBJECT.xx |
The optional IGNORE_SUBJECT setting can be used to specify one or more strings to detect within the subject line of the incoming email, to determine whether to ignore and skip the entire email message from being processed. The string text configured in this setting is case-sensitive and be matched exactly anywhere in the subject line of the incoming email message.
Note: For a single text, use simply IGNORE_SUBJECT; for multiple texts, use IGNORE_SUBJECT with a unique postfix for each entry, such as a number. For example to configure multiple entries to be ignored: |
|
PARSE_EMAIL PARSE_FIELD.STATUS PARSE_FIELD.COMMENTS PARSE_FIELD.DUE_DATE |
This collection of properties allow parsing of incoming mails to ExtraView.
You may configure the parsing of the incoming email message subject line and the body looking for specific tags to specify the field and value to assign to the ExtraView record being created or updated. The PARSE_EMAIL setting must be configured to one of three values:
If the setting is commented out or set to any other value, then the feature is not configured correctly and is not used. The PARSE_FIELD setting specifies the field name to map to the tag expected in the incoming email message, as follows:
where Note: Do not use the equals character within The value to set the field to must follow the tag in the email message, and must be on the same line as the tag in the email body. For example, to specify value of John Doe for the
In the subject line, the value must be enclosed in double-quotes, separate from the rest of the subject line text. For example, to specify value of High for the
Multi-line text or multi-list values must be ended with the same tag name within the email body. For example, to specify multi-line text for the [Comment] tag (i.e. a log area display type field):
When this setting is used, but the field configured with PARSE_FIELD does not exist on the Add or Edit screen layout, or the EVMail user does not have write access to the field, or the value specified in the email is not valid, the expected behavior for the field is to not be assigned a value by EVMail. A warning message is written to the ExtraView application log. If you are writing to a multi-valued list field, then values are additive, i.e. the new values are added to existing values in the list. If you mistakenly utilize the same tag more than once within the email message, only the first occurrence is processed and the others are ignored. Examples
|
| SMTP_CC | Other email addresses to copy when sending auto-reply or failure messages back to the sender of the email |
| SMTP_FAIL_MSG_TEMPLATE | The database name of an Ad Hoc email template to use when sending out failure messages. The template supports the use of the special variable, $$BODY$$. If you include $$BODY$$ in the template, the body of the original incoming email will be included. |
| SMTP_FROM | The email address used when sending auto-reply or failure messages back to the sender of the email |
| SMTP_NAME | The friendly name used when sending auto-reply or failure messages back to the sender of the email |
| SMTP_REPLY_TEMPLATE | The database name of an Ad Hoc email template to use when sending out auto-reply messages. The template supports the use of two special variables, $$ID$$ and $$BODY$$. If you include $$ID$$ in the template, then the ID of the newly created issue is retrieved and included in the template email. If you include $$BODY$$ in the template, the body of the original incoming email will be included. |
The behavior of the last two parameters controls how HTML-based incoming emails are handled.
RUNTIME_USER_ID = BSMITH

	RUNTIME_AREA_NAME = CUST_ISSUES

	RUNTIME_PROJECT_NAME = CUST_ISSUES_DATA

	RUNTIME_USER_ROLE = SUPPORT
MAILBOX_TYPE = POP3

	MAILBOX_PORT = 110

	MAILBOX_SECURE = NO

	MAILBOX_SERVER = mail.mycompany.com

	MAILBOX_USER = support

	MAILBOX_PASSWORD = myPassword
SMTP_FROM = support@mycompany.com

	SMTP_NAME = "The Support Team"

	SMTP_CC = leeann@mycompany.com

	SMTP_REPLY_TEMPLATE = SUCCESS_EMAIL
EVMAIL_ID_REGEX = [ExtraView-(d+)]

	EVMAIL_BODY_UDF = DESCRIPTION

	EVMAIL_BODY_UPDATE_UDF = CUST_DESC

	EVMAIL_SUBJECT = SHORT_DESCR

	EVMAIL_CATEGORY = EMAIL

	EVMAIL_STATUS = NEW

	EVMAIL_ORIGINATOR = DEV
When a user sends an email to ExtraView, EVMail examines the incoming email to determine whether this is a reply to an existing issue which should update the existing issue, or whether to generate a new issue within ExtraView. This determination is made by parsing the subject line of the incoming email. If the EVMail utility is able to parse a valid, existing issue ID out of the subject line, then it is assumed that the mail is being used to update an issue; else it is assumed that the mail is meant to generate a new issue.
One consequence of this is that when a user replies to an email notification which was generated by ExtraView automatically, the original notification will be included in the reply, simply adding to the update with information that already exists. To eliminate this, the value within a behavior setting named EVMAIL_DELIMITER_TEXT is used. This value is embedded with invisible tags within HTML emails from ExtraView to surround the entire contents of the outgoing email. When EVMail is updating the issue it looks for the value of the behavior setting and removes all text between the tags. Thus, only the new comment made by the user is added to the issue.
When issues are updated via EVMail, the Last Change User field is set to the value of the RUNTIME_USER_ID, and not to the person who sent the email.
Note that if EVMail is running with a user who only has a GUEST role, updates to issues are not permitted.
The logic to locate which issue to update with a received mail is a multi-step process, as follows.
This is accomplished if the configuration parameter EVMAIL_MESSAGE_ID points to a TEXTAREA field to store the MESSAGE_ID. This field must be present on both the ADD_PROBLEM and EDIT_PROBLEM layouts and must be writable, although you can hide the field.
Supported formats and their meanings are:
Examples:
If your ExtraView configuration is configured to use ALT_ID as the issue ID, you will have set the behavior setting named ITEM_ID_DISPLAY to a value of ALT_ID. Once this is set, EVMail will use ALT_ID as the issue ID when matching incoming email updates.
With the configuartion options EVMAIL_BODY_HTML_UDF, EVMAIL_BODY_HTML_UPDATE_UDF and log area fields configured to use HTML, incoming emails via EVMail will be treated as HTML, and the contents placed in the corresponding fields. If the source of the incoming email is pure HTML, then the presentation of the data within the fields will look extremely similar to the source data. If the source of the data is an email client such as Microsoft Outlook, there may be differences in the presentation which cannot be reconciled.
The major differences occur for these reasons:
The result is that underlying text within the email will be displayed, but sometimes will not have the correct formatting.
EVMail follows all the status change rules and the ALLOW_EDIT_CLOSED behavior setting. These may be based on the user, their role, their current business area and project as configured in your installation.
If you want to bypass all of those constraints for testing purposes, and make sure that tickets are updated regardless of any rules in place, use the ADMIN user account. This account (which should not be used for ordinary purposes) bypasses all status change rules.
It is worth ensuring that your workflow does not put any issue into a status value where EVMail will not be able to update it -- you may get failures, and/or the update will be captured as a new issue within the system as opposed to an update to an existing issue.
This section covers instructions on how to connect ExtraView to a POP3 mail server configured with SSL, i.e. POP3S. It is highly recommended that you configure POP3S rather than POP3.
The instructions here are for a Microsoft Windows environment, but are similar for other operating systems. The basic steps to configure SSL, are to install the SSL certificate on your mail server into the Java keystore, as a trusted root certificate.
You will then see the something like this:
Your keystore contains 11 entries:
engweb, Wed Apr 11 16:22:49 EDT 2001, trustedCertEntry?,
Certificate fingerprint (MD5): 8C:24:DA:52:7A:4A:16:4B:8E:FB:67:44:C9:D2:E4:16 thawtepersonalfreemailca, Fri Feb 12 15:12:16 EST 1999, trustedCertEntry?,
Certificate fingerprint (MD5): 1E:74:C3:86:3C:0C:35:C5:3E:C2:7F:EF:3C:AA:3C:D9 thawtepersonalbasicca, Fri Feb 12 15:11:01 EST 1999, trustedCertEntry?,
Certificate fingerprint (MD5): E6:0B:D2:C9:CA:2D:88:DB:1A:71:0E:4B:78:EB:02:41 verisignclass3ca, Mon Jun 29 13:05:51 EDT 1998, trustedCertEntry?,
Certificate fingerprint (MD5): 78:2A:02:DF:DB:2E:14:D5:A7:5F:0A:DF:B6:8E:9C:5D thawteserverca, Fri Feb 12 15:14:33 EST 1999, trustedCertEntry?,
Certificate fingerprint (MD5): C5:70:C4:A2:ED:53:78:0C:C8:10:53:81:64:CB:D0:1D thawtepersonalpremiumca, Fri Feb 12 15:13:21 EST 1999, trustedCertEntry?,
Certificate fingerprint (MD5): 3A:B2:DE:22:9A:20:93:49:F9:ED:C8:D2:8A:E7:68:0D verisignclass4ca, Mon Jun 29 13:06:57 EDT 1998, trustedCertEntry?,
Certificate fingerprint (MD5): 1B:D1:AD:17:8B:7F:22:13:24:F5:26:E2:5D:4E:B9:10 verisignclass1ca, Mon Jun 29 13:06:17 EDT 1998, trustedCertEntry?,
Certificate fingerprint (MD5): 51:86:E8:1F:BC:B1:C3:71:B5:18:10:DB:5F:DC:F6:20 verisignserverca, Mon Jun 29 13:07:34 EDT 1998, trustedCertEntry?,
Certificate fingerprint (MD5): 74:7B:82:03:43:F0:00:9E:6B:B3:EC:47:BF:85:A5:93 thawtepremiumserverca, Fri Feb 12 15:15:26 EST 1999, trustedCertEntry?,
Certificate fingerprint (MD5): 06:9F:69:79:16:66:90:02:1B:8C:8C:A2:C3:07:6F:3A verisignclass2ca, Mon Jun 29 13:06:39 EDT 1998, trustedCertEntry?,
Certificate fingerprint (MD5): EC:40:7D:2B:76:52:67:05:2C:EA:F2:3A:4F:65:F0:D8
Enter default keystore password: changeit
Owner: CN=Division name, OU=Department, O=Your Company, L=Anytown,
You will now see a list of all the certificates including the one you just added. This confirms that your private root certificate has been added to the ExtraView Java cacerts keystore as a trusted certificate authority
Microsoft Exchange Server 2007 and newer is recommended. Configure these settings to achieve this connection:
| MAILBOX_TYPE | Set this to a value of EXCHANGE to use Microsoft Exchange Server |
| MAILBOX_USER | Set this to the user name of the connection to Exchange |
| MAILBOX_PASSWORD | Set this to the password of the user with which you are connecting to Exchange |
| EXCHANGE_URL | This value should be the URL of the Exchange server |
EVMail can connect to the older Microsoft Exchange 2003 Server, via OWA (Outlook Web Access). To select Exchange 2003 mailbox in EVMail use the following configuration settings.
Notes:
Specific settings for OWA Exchange 2003 connections only - we provide sample settings to help you identify the equivalent settings in your Exchange Server.
MAILBOX_SERVER = Name of your MS Exchange Server
OWA_PATH - Exchange path for MS Exchange OutLook Web Access
The URL used to access your Outlook Web Access page is made up of the values for MAILBOX_SERVER and the OWA_PATH, e.g.
http(s)://MAILBOX_SERVER/OWA_PATH/ - should take you to your Outlook Web Access page
OWA_DOMAIN - the Exchange/Windows domain for the MAILBOX_USER account
OWA_FTA_PATH - path to Form based authentication - this can be found if you look at the HTML source of the OWA authentication/login page - search for "destination".
OWA_DESTINATION - on the OWA login page, search for the hidden field "destination" OWA_ISA - needed for use with OWA_DESTINATION
When EVMail encounters a problem, it may be either a "transient" error, i.e. one that might fix itself if the operation is tried again at a later time, or it might be a "permanent" error, i.e. one that needs a change in the EVMail configuration in order to be resolved. Examples of permanent errors include:
An example of a transient errors would be the inability to connect to the mail server because of a network error. In a test situation, you can create a transient error by setting MAILBOX_PORT or MAILBOX_SERVER to an invalid value temporarily. When EVMail encounters a permanent error, it does the following:
Once the task is in an ERROR state, the following must be done to repair the error
When EVMail is running and encounters a transient error, it will do the following:
Example:
At 10:00 a.m. EVMail runs, and encounters a transient error as it cannot connect to the POP3 mailbox. A message is placed in the system_log table similar to the following:
<LOG_MESSAGE>EVMail Task had a WARN condition</LOG_MESSAGE>
<TASK_ID>700983</TASK_ID>
<TASK_TITLE>EVMail Task (Incoming email)</TASK_TITLE>
</LOG_MESSAGE>
ExtraView checks to see how many messages of this type, for this task_id exist in the system log table in the past 3 minutes - there is 1. 1 is less than 3 so ExtraView does not send any notification to the administrators.
At 10:01 a.m. EVMail runs again, and encounters the same error - a message is placed in the system_log table:
<LOG_MESSAGE>EVMail Task had a WARN condition</LOG_MESSAGE>
<TASK_ID>700983</TASK_ID>
<TASK_TITLE>EVMail Task (Incoming email)</TASK_TITLE>
</LOG_MESSAGE>
ExtraView checks to see how many messages of this type, for this task_id exist in the system log table in the past 3 minutes - there are 2. 2 is less than 3 so ExtraView does not send any notification to the administrators.
At 10:02 a.m. EVMail runs again, and encounters the same error - a message is placed in the system_log table:
<LOG_MESSAGE>EVMail Task had a WARN condition</LOG_MESSAGE>
<TASK_ID>700983</TASK_ID>
<TASK_TITLE>EVMail Task (Incoming email)</TASK_TITLE>
</LOG_MESSAGE>
ExtraView checks to see how many messages of this type, for this task_id exist in the system log table in the past 3 minutes - there are now 3. 3 is not greater than 3 so ExtraView does not send any notification to the administrators.
At 10:03 a.m. EVMail runs again, and encounters the same error - a message is placed in the system_log table:
<LOG_MESSAGE>EVMail Task had a WARN condition</LOG_MESSAGE>
<TASK_ID>700983</TASK_ID>
<TASK_TITLE>EVMail Task (Incoming email)</TASK_TITLE>
</LOG_MESSAGE>
ExtraView checks to see how many messages of this type, for this task_id exist in the system log table in the past 3 minutes - there are now 4. 4 is greater than 3, so we add a new message to the system log table:
<LOG_MESSAGE>EVMail Task had a transient error that persisted more than 3 times in 10 minutes.
<TASK_ID>700983</TASK_ID>
<TASK_TITLE>EVMail Task (Incoming email)</TASK_TITLE>
</LOG_MESSAGE>
ExtraView checks to see how many messages of this type for this task_id, exist in the system log table in the past 10 minutes - we have 1, so we need to send an email to all ADMIN users.
At 10:04 a.m. EVMail runs, and encounters the same error - a message is placed in the system_log table:
<LOG_MESSAGE>EVMail Task had a WARN condition</LOG_MESSAGE>
<TASK_ID>700983</TASK_ID>
<TASK_TITLE>EVMail Task (Incoming email)</TASK_TITLE>
</LOG_MESSAGE>
ExtraView checks to see how many messages of this type, for this task_id exist in the system log table in the past 3 minutes - there are now 4. 4 is greater than 3, so a new message is added to the system log table:
<LOG_MESSAGE>EVMail Task had a transient error that persisted more than 3 times in 10 minutes.
<TASK_ID>700983</TASK_ID>
<TASK_TITLE>EVMail Task (Incoming email)</TASK_TITLE>
</LOG_MESSAGE>
ExtraView checks to see how many messages of this type for this task_id, exist in the system log table in the past 10 minutes - there is 1, so ExtraView will send an email to all ADMIN users. Even if the transient error persists ExtraView only sends out warning emails every 10 minutes. If your EVJ.log shows errors similar to:
Check to see if the POP3 account is on an Exchange2010 server. If so, the problem is likely due to the fact that the Exchange POP is expecting encrypted credentials. To resolve your email administrators will need to run the following command in an Exchange shell which allows Exchange POP to use plain text credentials:
Then restart the POP3 service and the problem should be resolved.
It is possible to configure multiple EVMail tasks, each with their own configuration. If you configure this on a single application server, then all the mail connections must either be secure (using POP3S) or not secure (using POP3). If there is a requirement to have mixed secure and non-secure servers, then you should set up a cluster of application servers, and then different servers may be configured to be secure or non-secure.
There are three possible ways in which attachments to incoming emails can be handled. The first type is handling attachment parts or non-body parts of the incoming email. In general, anything that is attached to the incoming email should be uploaded to the ExtraView issue as a file attachment. The second type is when the body of the email message is not copied to a field on the ExtraView issue, but is instead uploaded as a file attachment to the ticket. This happens automatically if the body of the message itself is greater than 512kb in size. The third type is when the incoming email message itself is attached to the ExtraView issue. This will occur, through parameter settings, or encountering a message that cannot be processed for some reason.
Incoming emails processed by EVMail that have their own attachments - those files are always attached to the ticket.
contentType.toLowerCase() = image/gif; name="ali's.gif" (the BODY is empty)
Incoming emails processed by EVMail sometimes have inline attachments. These are often images in the user's signature, inline images within the email body or something similar to "this email has been checked by Virus Scanner".
contentType.toLowerCase() = image/jpeg; name="businesscard.jpg" (the BODY is empty)
These are only attached to the ticket if the EVMail behavior setting named EVMAIL_INCLUDE_INLINE_ATTACHMENTS is set to YES and a filename and content type are present. Otherwise, if content type is text, the text is appended to the email body. This setting defaults to YES, to not lose anything, but if your preference is not to have what are often just logos attached to issues, you can change this behavior setting to a value of NO.
If the incoming body of the email message exceeds a size of 512kb, ExtraView will NOT put the message body in the description/comments field, but will attach the email message to the issue and insert a line of text in the issue, indicating "see attachment <attachment filename> for body of email."
contentType.toLowerCase() = text/plain; charset=utf-8; format=flowed (this has a BODY)
contentType.toLowerCase() = text/html; charset=utf-8 (the BODY is empty)