Built-In fields are part of the basic ExtraView product and exist in all databases. Most of these fields have special properties. For example there is a built-in field named ID that is used to provide a unique identifier for every issue stored. Built-in fields should not be deleted from the database else functionality may be lost, or in the worst case, ExtraView will not function. User Defined Fields are fields that are created within your ExtraView installation and do not exist in the basic product. Since you may want to customize your own site to include fields that are more specific and appropriate to your needs, UDF’s satisfy this requirement. UDF's are a highly efficient and extensible mechanism. An unlimited number of UDF’s may be created. All User Defined Fields are created and maintained in the Data Dictionary. UDF’s must be typed, i.e. they will take on one of many display types such as text, number or date. The display type is the most importanat property of each UDF. In addition, UDF’s that have a list type can retain multiple values at one time, with the values being individual members of the whole list.
Fields may be created and assigned to be global, or created and assigned to an individual Business Area, or created and assigned to an individual Project within a Business Area. This is termed the scope of the field. All inbuilt fields are global in their scope. When a field is restricted in its scope to an individual Business Area, or to a Project within a Business Area, then you will not see that field unless you have permission to read fields in that Business Area and Project. Similarly, you cannot write to a field unless you have write permission to the field in the Business Area and Project within which it is held.
Fields have properties, or attributes, that enhance their capabilities, and provide options as to how they should work. Not all properties are applicable to all field display types. The following is a complete list of properties. Only the properties for any field display type will be shown on the user interface. As you choose a field's display type, the appropriate properties will be displayed.
| Field Property | Explanation | |||||||||||||||||||||||||||||||||||||||||||||||||||||||||||||||||||||||||||||||||||||||||||||||||||
| Business Area & Project | Sets the scope for the field. If Global Area is selected, then the field will be available over all Business Areas. If a specific Business Area is selected, along with its Project Defaults, then the field will be available throughout that Business Area. If a specific Business Area and a specific data project is selected, then the field will only be available within that Business Area and Project | |||||||||||||||||||||||||||||||||||||||||||||||||||||||||||||||||||||||||||||||||||||||||||||||||||
| Field Belongs To |
Enter the record type that the UDF is to be associated with against the prompt Field belongs to. There are presently two choices: sea Issue Records – this indicates the UDF is to be associated with the main record for each issue in the database Repeating Records – this indicates the UDF is to be associated with each repeating row added to the main issue. Repeating rows maintain a many-to-one relationship with issues, therefore the UDF you create will be available for each repeating record that is added to the main issue.
Note: You cannot change this property once the field has been created |
|||||||||||||||||||||||||||||||||||||||||||||||||||||||||||||||||||||||||||||||||||||||||||||||||||
| Fixed Name | The Name is the fixed name of the field. This field is required. Names may be from one to thirty characters long, and must be composed of the characters – A – Z 0 – 9 _ The first character of a name must be alphabetic. You must not have consecutive underscore characters in a fixed name. Field names must be unique across an installation | |||||||||||||||||||||||||||||||||||||||||||||||||||||||||||||||||||||||||||||||||||||||||||||||||||
| Title to Display | The Title will appear on screens and reports. It may be from 1 to 255 characters in length and is required. It may contain any text. If you have turned on multiple locales, this field may be translated into any valid language and its length may be up to 3,800 characters. The title may contain HTML for formatting purposes but it is a best practice not to include HTML within the field title. You should provide a plain text title within the data dictionary, and use HTML to embellish the field title using an ALTERNATIVE TITLE wiithin the layouts where the field is used. If you do include HTML within the field title and access the field through the API or CLI then the HTML will be passed through to the output. If you do not want to display a title, use a space character as the title | |||||||||||||||||||||||||||||||||||||||||||||||||||||||||||||||||||||||||||||||||||||||||||||||||||
| Display Type | The data type of the field, controlling its appearance and behavior. Example display types are text, number, checkbox and date. For a complete list of display types, click here | |||||||||||||||||||||||||||||||||||||||||||||||||||||||||||||||||||||||||||||||||||||||||||||||||||
| Allow Selection on Reports | A switch to allow or disallow the field to be selectable for reports. If this option is not set to Yes, then the field will not be available in reporting and on the abbreviated history display. This is useful in order to prevent fields used as labels and for formatting appearing in field lists within reporting. It’s important to note that not all fields should be allowed on reports. For example, you may not use all of ExtraView’s inbuilt fields within your installation and therefore want to hide them from the view of users (note you can also do this by changing the field's permission so it cannot be read). There are also fields in the Data Dictionary, such as images, buttons and screens that should not be selectable for reporting. It is highly recommended that you set all fields to No if they are not used in your installation. This avoids the lists of fields that your users can select from to be populated with unneeded entries | |||||||||||||||||||||||||||||||||||||||||||||||||||||||||||||||||||||||||||||||||||||||||||||||||||
| Remember Last Value | If you set this option, the last value that individual users enter or select on both the Add Issue and the Search screens will be remembered. This serves the purpose of remembering values that may not change frequently. For example, many users may work with the same Product for extended periods of time. Note that you can only set this feature for fields where the value of “field belong to” in the data dictionary is Issue records. The feature is not supported with repeating row records | |||||||||||||||||||||||||||||||||||||||||||||||||||||||||||||||||||||||||||||||||||||||||||||||||||
| Display as URL |
This option need not be completed for any UDF. You can use either the name or value associated with the field as part of the URL that you generate. This allows you to link any field value on a form with any remote application (or an inbuilt ExtraView function that can be accessed with a URL) and optionally to use values on the form to pass as a parameter to another application. If a field with this attribute is rendered as read-only on an Add or Edit screen or a browser-based report, then it becomes a link to the URL specified. To activate a field with a link to a URL, click the Display as URL radio button to Yes.
|
|||||||||||||||||||||||||||||||||||||||||||||||||||||||||||||||||||||||||||||||||||||||||||||||||||
| Image for Display as URL | This optional entry is used in conjunction with the Display as URL setting. If provided, the entry is the file name of an image in the directory specified in the IMG_NAV_BAR_HOME behavior setting. When this image is provided and Display as URL is set to Yes, then your image is used rather than the inbuilt LinkButton.gif image. Care should be taken not to provide an image that is too large. The recommended size is 18 x 18 pixels. | |||||||||||||||||||||||||||||||||||||||||||||||||||||||||||||||||||||||||||||||||||||||||||||||||||
| URL | An optional URL which can be used to link the field to any other application | |||||||||||||||||||||||||||||||||||||||||||||||||||||||||||||||||||||||||||||||||||||||||||||||||||
| Default Value |
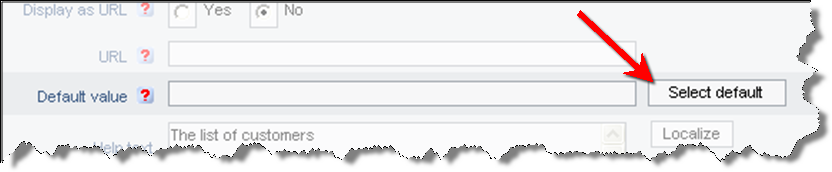
A field must be created before you may give it a default value. This is because default values are used most commonly in list fields, and you need to populate your field with these values before you can select one to be the default. If you provide a default value for a field, the value specified will be auto-selected whenever you are adding a new issue. Note that if you also have remember last value set on the field, the last value will be used in preference to the default value. The default value is used to populate a field in a record, when the field is visible on the add layout for an issue. You may also use a load business rule to set a default value on a field.
Note: Default values for fields of display types Checkbox, List, Pop-up, Radio Button – Horizontal, Radio Button – Vertical, Tab and User must be entered using the Select Default button. Entering text into the box for these fields does not work. The reason for this is that in addition to the value that is displayed, ExtraView also needs to know the internal ID value of these fields. You may enter text directly for other display types, such as Text. Default values may only be entered after the field has been created, by editing the field.
Entering Default values |
|||||||||||||||||||||||||||||||||||||||||||||||||||||||||||||||||||||||||||||||||||||||||||||||||||
| Help Text | This field provides a facility that when you mouse over the label adjacent to a field you can provide a tool tip message that will appear. You can have up to 2,000 bytes in a tool tip, without localization being turned on in your ExtraView instance. If localization is turned on, then the tooltips can store up to 3,800 bytes. However it is not recommended that you have large tooltips, because of the way in which Windows and other operating systems display these. Typically they are displayed for around 2 seconds, so you should not store more information that can be read in that time | |||||||||||||||||||||||||||||||||||||||||||||||||||||||||||||||||||||||||||||||||||||||||||||||||||
| Help URL | With a Help URL, you can link this to a bookmark or page in your own online help system. If you are an ExtraView customer hosted by ExtraView Corporation, note that this URL need not be on our server. You can store and access these files anywhere over the Internet | |||||||||||||||||||||||||||||||||||||||||||||||||||||||||||||||||||||||||||||||||||||||||||||||||||
| Currency unit | This block of information only appears if you have chosen a field display type of Currency. Choose the currency symbol to display for the field. The list of currency units is complete, and you may select one for each field. You cannot use a field with a currency display type if you want it to signify different currencies. You can choose how to display negative currency values from one of the negative display options shown below | |||||||||||||||||||||||||||||||||||||||||||||||||||||||||||||||||||||||||||||||||||||||||||||||||||
| Negative Display | This block of information only appears if you have chosen a field display type of Decimal, Currency or Number. Simply choose the formatting you require for the field using the radio buttons | |||||||||||||||||||||||||||||||||||||||||||||||||||||||||||||||||||||||||||||||||||||||||||||||||||
| Symbol | This block of information only appears if you have chosen a field display type of Currency. This determines whether the currency symbol will appear along with the number when the field is displayed | |||||||||||||||||||||||||||||||||||||||||||||||||||||||||||||||||||||||||||||||||||||||||||||||||||
| Thousands Separator | This block of information only appears if you have chosen a field display type of Decimal, Currency or Number. Select whether you do or do not want a thousands separator to appear with the field | |||||||||||||||||||||||||||||||||||||||||||||||||||||||||||||||||||||||||||||||||||||||||||||||||||
| Rounding mode |
This block of information only appears if you have chosen a field display type of Decimal, Currency or Number. The default rounding mode is ROUND_HALF_UP for Decimal and Number display types. For Currency display types, the default rounding mode is the rounding mode of the currency instance for the chosen currency locale. This table shows the result of rounding data input to one digit, with the given rounding mode:
|
|||||||||||||||||||||||||||||||||||||||||||||||||||||||||||||||||||||||||||||||||||||||||||||||||||
| Internal Precision | This block of information only appears if you have chosen a field display type of Decimal, Currency or Number. This is a number from -24 to 10 indicating how many digits of precision should be maintained for internal computations with this field | |||||||||||||||||||||||||||||||||||||||||||||||||||||||||||||||||||||||||||||||||||||||||||||||||||
| Report Precision | This block of information only appears if you have chosen a field display type of Decimal, Currency or Number. This is a number from -24 to 10 indicating how many digits of precision should be displayed on reports or read-only displays of this field | |||||||||||||||||||||||||||||||||||||||||||||||||||||||||||||||||||||||||||||||||||||||||||||||||||
| Percentage | This block of information only appears if you have chosen a field display type of Decimal. If you set the Percentage option, then users must enter the number with a percentage sign. This will be converted internally by ExtraView and stored as a decimal value | |||||||||||||||||||||||||||||||||||||||||||||||||||||||||||||||||||||||||||||||||||||||||||||||||||
| Alias Of | A field that is the alias of another field is restricted to fields that you create with a display type of List, Pop-up or Tab. When you create a field with this setting, you will not maintain the list of values for the field, but the field will be created using the list of values from the field you select in the Alias of selection list. This is a labor saving device that is used when you require more than one field with the same list of values, but you only want to maintain the list in a single place. For example, you may want to create a list of product releases, and use this list in two forms, one for Release Found and one for Release Fixed. You can place both these fields on a single edit screen, and update the fields independently, but only maintain the field in a single place. A field that is an Alias of another field may still be controlled by its own allowed value list. This allows you to create different lists from one base list, where each of the aliased lists is a subset of a master list. This entry only appears when you are creating a new field, or when you are editing a field with a display type of List, Pop-up or Tab. The option is only valid when creating a field of the same types. When creating a new field, you may point it to another list field and the new field will be an alias of the field to which it point. It will be kept in synchronization with the first field. If you are editing an existing entry which is an alias of another field, you can remove the alias entry, from which time the fields will work independently | |||||||||||||||||||||||||||||||||||||||||||||||||||||||||||||||||||||||||||||||||||||||||||||||||||
| Total Field on Reports | This only has an effect on numeric display types. When this is selected, the field will be totaled automatically on column reports. This setting is ignored if the field does not have a display type of Number. | |||||||||||||||||||||||||||||||||||||||||||||||||||||||||||||||||||||||||||||||||||||||||||||||||||
| Enable Interest List | This flag in a data dictionary item enables a notification interest list for specific values of the field. For example, you may want to create an interest list based upon issues that have a critical severity level. If you enable the interest list for severity level, then the administrator can edit the critical list item in the severity level interest list and maintain the list of user names in the interest list | |||||||||||||||||||||||||||||||||||||||||||||||||||||||||||||||||||||||||||||||||||||||||||||||||||
| Auto-complete |
This option may be used with popup list fields and with user fields when the behavior setting named USER_LIST_DISPLAY is set to a value of POPUP. Auto-complete, or type-ahead as it is sometimes known, works by having one or more characters typed into the list and then automatically presenting you with the most likely matches for the value you are composing. At any time you can select a value from those presented to you by clicking on the value, or you may continue typing in characters until you complete the value. As you type, the values presented in the list are refined to further match your entry.
When you set auto-complete to on for a field, then you also select the number of characters that the user enters before the auto-complete is activated. There is also control over the maximum number of entries returned in the list and control over the height of the list. This allows fine-tuning when you are dealing with very large lists, ensuring that the user does not retrieve a very large number of records while they are typing characters into the list |
|||||||||||||||||||||||||||||||||||||||||||||||||||||||||||||||||||||||||||||||||||||||||||||||||||
| Multiple Value |
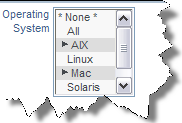
Multiple values can only be enabled for UDF’s with a display type of LIST, POPUP or User. If you enable a UDF to have multiple values, you are allowing the user to select any number of items from its list as being valid entries. For example, say you have a list of operating systems against which an issue may be recorded. If you want to note that the issue is found in some of the operating systems, but not all, you can choose the relevant entries from the list. A behavior setting named SORT_SELECTED_VALUES controls how the selected values in multi-valued lists and multi-valued user lists are sorted. When this is set to NO, all multi-valued lists will be displayed in the order set by the field's standard sort sequence. When this value is set to YES, all selected values will be displayed at the beginning of the list, using their sort order, then the non-selected values will be displayed using their sort order. Note that if you place a multple value list UDF on an add or edit screen layout, and then add a layout cell attribute of FIELD REMOVE NONE, and you then deselect the very last value in a list, the first value in the list will be selected when you submit the form. If this behavior is not desirable, then the recommendation is to also make the field required, which will force the user to select a value before the record is inserted or updated. You can set the character used to signify that a value in a multi-valued field is selected with the behavior setting named MULTI_VALUE_HIGHLIGHT_CHAR. The default value is &# 9654;. This displays as a ? against the selected value. If you want to use a character that is in the basic character set of older computer browsers, it is suggested you use the + character.
|
|||||||||||||||||||||||||||||||||||||||||||||||||||||||||||||||||||||||||||||||||||||||||||||||||||
| Filter Criteria | This option allows the field to be selected on a query filter layout, as a criteria for a search. Only if this item is checked can the field allowed to be placed on a filter screen layout for querying and searching. Note that not all display types can be used as filter criteria. Fields with a display type of Label, Image, Text Area, Log Area and Print Text cannot be used as filter criteria | |||||||||||||||||||||||||||||||||||||||||||||||||||||||||||||||||||||||||||||||||||||||||||||||||||
| Is Sortable |
If this option is set to Yes, then the field will appear on the Sort Order lists on report composition screens. Typically fields with a display types as follows should be flagged as sortable or not:
|
|||||||||||||||||||||||||||||||||||||||||||||||||||||||||||||||||||||||||||||||||||||||||||||||||||
| Used for user attributes | This is only an option when the user's role has permission to SE_USER_ATTRIBUTES and the field being modified is a UDF, with a type of List, Popup or Tab. When set to Yes, the field is placed on the User Account Administration screen, under the tab which has the default title of Attributes. Custom code must support this operation, typically defining what happens to issues when the user does or does not have specific values set in the lists. Once this option has been set on any field, and the administrator has set a value into the field within the user accounts maintenance screens, then you cannot remove this attribute from field, without first removing all the values in all the users who have this field set | |||||||||||||||||||||||||||||||||||||||||||||||||||||||||||||||||||||||||||||||||||||||||||||||||||
| Sort sequence for user attributes | This field only appears when Used for user attributes is set to Yes. It provides the ability to sort the different fields that are used as user attributes on the User Account Administration screen. The default if this is not set is to sort the fields alphabetically | |||||||||||||||||||||||||||||||||||||||||||||||||||||||||||||||||||||||||||||||||||||||||||||||||||
| Encrypt this field |
This field only appears for fields with a display type of Text Field, and only when adding a new field. This enables encryption for the field, at the database level. The key purpose is to provide an additional level of protection against unauthorized access direct to your database. The feature works in conjunction with a secret key obtained from a keystore. They secret key(s) must be defined before you create fields that utilize encryption. View the page on Encryption Key Management for more information.
Note: You cannot change this property once the field has been created |
Also, note that there are reserved words that cannot be used as UDF names. These are:
| ACTION | NEW_REPORT | REPORT_OWNER | RG_RELATION_FIELD |
| CALLED_FROM | NOTIFY | REPORT_START | SEARCH_ATTACH_SIZE |
| CHILD | OPTION | REPORT_STOP | SECURITY |
| CLASS | PAGE_LENGTH | REPORT_TITLE | SELECTED |
| CUSTOM_URL | PAGE_SIZE | RG_NAME | SELECTEDSO |
| CUSTOMER | PARENT | RG_NAME_FIELD | SHOW_EXPANDED |
| DATE | RECORD_COUNT | RG_REF_ID | SOURCE |
| FROM_ACTION | RECORD_START | RG_REFERENCE_ID_FIELD | SOURCESO |
| FROM_OPTION | REPORT_AS_OF | RG_REFERENCE_NAME | TEMPLATE_EXPANDED |
| GROUP | REPORT_DESC | RG_RELATE_THIS_TO | UDF |
| INTERFACE | REPORT_ID | RG_RELATION | VALUE |
| LANGUAGE | |||
| LAYOUT_SESSION_TAG |