Service Level Agreement management allows the administrator to set up the conditions to measure whether the handling of individual issues fall within predetermined conditions that you have set up to manage your customers. For example, you may have an obligation to respond to all customer issues within two hours, and an obligation to provide closure on an issue within two days. This utility allows you to set up these criteria. Under reporting, your users may use these criteria to prepare and run reports that show your organization’s performance against these SLA’s.
SLA definitions for organizations can differ widely, and different parts of an organization may need to create their own SLA terms for their individual customers.
ExtraView provides a scalable method to provide many SLA’s within the product, but for simplicity an example follows that builds a global set of SLA conditions that look like this:
| Status Transition | |||
| Priority | New-Open | Open-Resolved | Resolved-Close |
| P1 Issues | < 2 hours | < 1 day | < 2 days |
| P2 Issues | < 4 hours | < 5 days | < 30 days |
| P3 Issues | < 1 day | No commitment | < 180 days |
This implies that the STATUS field contains (at least) the values New, Open, Resolved and Closed. The PRIORITY field has the values P 1, P 2, and P 3.
Note: A key feature of measuring SLA’s is that an issue may move between the different statuses many times, yet it is the total time in the status that is measured and reported. For example, a customer may report a P 2 issue via email, and it is initially created as an issue and placed in the New status via the EVMail capability. Your support technician moves the issue to an Open status in 3 hours, within the agreed time of 4 hours or less.
Three days later, the issue is moved from the Open to the Resolved status and handed back to the customer. This is within the agreed time for the SLA. However, some time later the customer reports back to your support technician that the resolution was not sufficient, and the issue is moved back to the Open status. In a further four days time the issue is handed back to the customer and the issue is once again moved to the Resolve status. The customer accepts this resolution.
The SLA that followed this workflow was not met, as the issue took a total of seven days to resolve, not just the three or four days for which the issue was Open on each occasion. The SLA measurement spans all the occasions the issue was in the Open status.
Following are instructions on how to set up this scenario to monitor all the conditions in the above table. The reporting tool allows end users to run reports that utilize SLA States defined by the administrator. The end user may not define their own SLA States.
From the Site Configuration menu in Administration, select Service Level Agreement Management. You will see a screen similar to:

SLA Management screen
Click the Add button. First, we use the upper part of the screen to create and add the SLA. For our example we can use the values in this screenshot to create our first SLA named NEW_ISSUE_SLA.

The NEW_ISSUE_SLA
Looking at the table at the top of this page, we are going to create three SLA's, one for New Issues, one for Open issues and one for Resolved issues. The New SLA State will have three SLA States, one for P 1 issues, one for P 2 issues and one for P 3 issues.
We create the SLA in the top-half of the screen, providing a Fixed Name, Title, Business Area (if any) and Project (if any) as the minimum. There is the capability to enable/disable the SLA, provide a sort sequence and notes.
To define the three SLA States, we use the bottom-half of the screen. For each SLA State, we provide a Fixed Name, and Title. The Drop-dead threshold is the time in the status you will provide in the filter below, for this SLA State. At the same time that we implement the requirements for the SLA’s we will optionally add an additional value. This is the Warning threshold. After this time, and before the drop-dead date / time for the SLA, reports will display the fact that the deadline is approaching.
Use the section beneath the Define SLA States to provide the filters for the SLA State you are defining. Given we are defining the SLA for New issues, and the first SLA State we are defining is for P 1 issues, the filters should be Priority = P 1 and Status = New, as shown below:
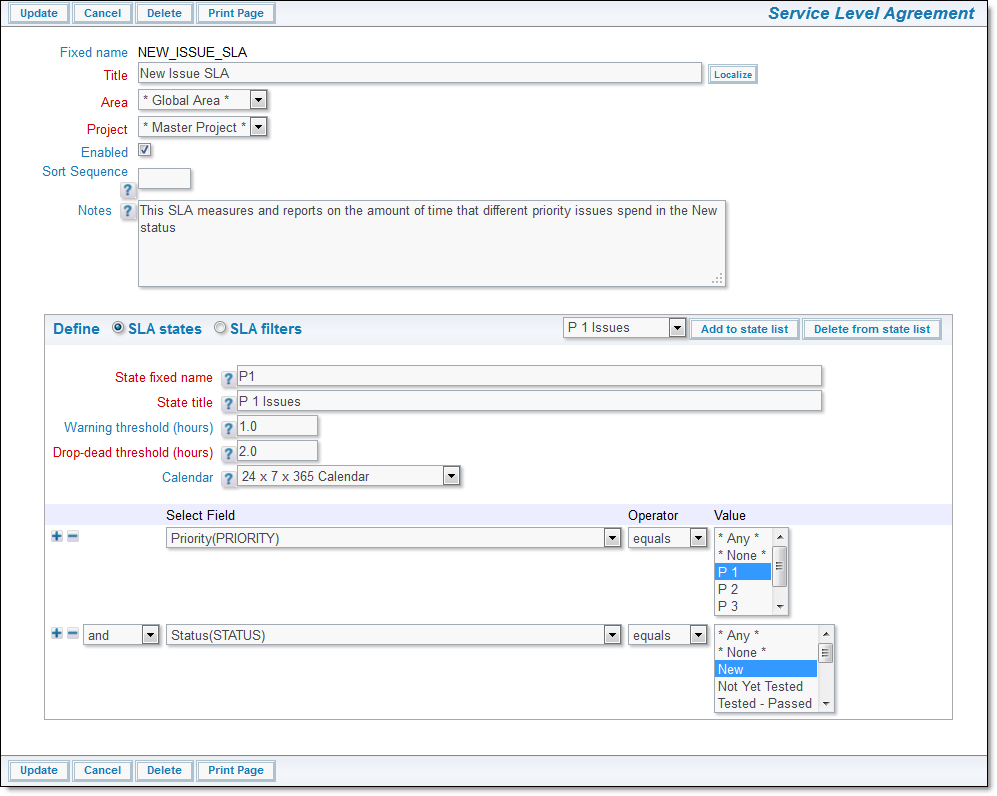
Defining an SLA State
Each time we define an SLA State as exemplified by the above paragraphs, we use the Add to state list button to save the SLA state. When we have added all the individual SLA States, you must also use the Add or Update button at the top and bottom of the screen to save the entire set of metadata, i.e. you are saving the overall SLA information plus the individual conditions that make up the SLA’s. We can create the SLA with the following values:
| State fixed name | State title | Warning threshold (hours) | Drop-dead threshold (hours) | Filters |
| P1 | P1 Issues | 1 | 2 | Priority = P1 Status = New |
| P2 | P2 Issues | 3 | 4 | Priority = P2 Status = New |
| P3 | P3 Issues | 20 | 24 | Priority = P3 Status = New |
Next, to implement the requirement, we will create an OPEN_ISSUE_SLA with the following metadata:
Fixed name = OPEN_ISSUE_SLA
Title = Open Issue SLA
| State fixed name | State title | Warning threshold (hours) | Drop-dead threshold (hours) | Filters |
| P1 | P1 Issues | 18 | 24 | Priority = P1 Status = Open |
| P2 | P2 Issues | 96 | 120 | Priority = P2 Status = Open |
Lastly, we implement the RESOLVE_ISSUE_SLA as follows:
Fixed name = RESOLVED_ISSUE_SLA
Title = Resolved Issue SLA
| State fixed name | State title | Warning threshold (hours) | Drop-dead threshold (hours) | Filters |
| P1 | P1 Issues | 40 | 48 | Priority = P1 Status = Resolved |
| P2 | P2 Issues | 650 | 720 | Priority = P2 Status = Resolved |
| P3 | P3 Issues | 4000 | 4320 | Priority = P3 Status = Resolved |
When you have completed these additions, you have set up three SLA’s to measure the conditions in the table at the beginning of this section, plus we have added warning times to aid users be aware of impending deadlines being exceeded.