This is where you assign the user a unique User ID (which they will use when logging in to the system), their password and other information about the account. You must enter data into all of the required fields, plus any optional fields that you wish to complete.
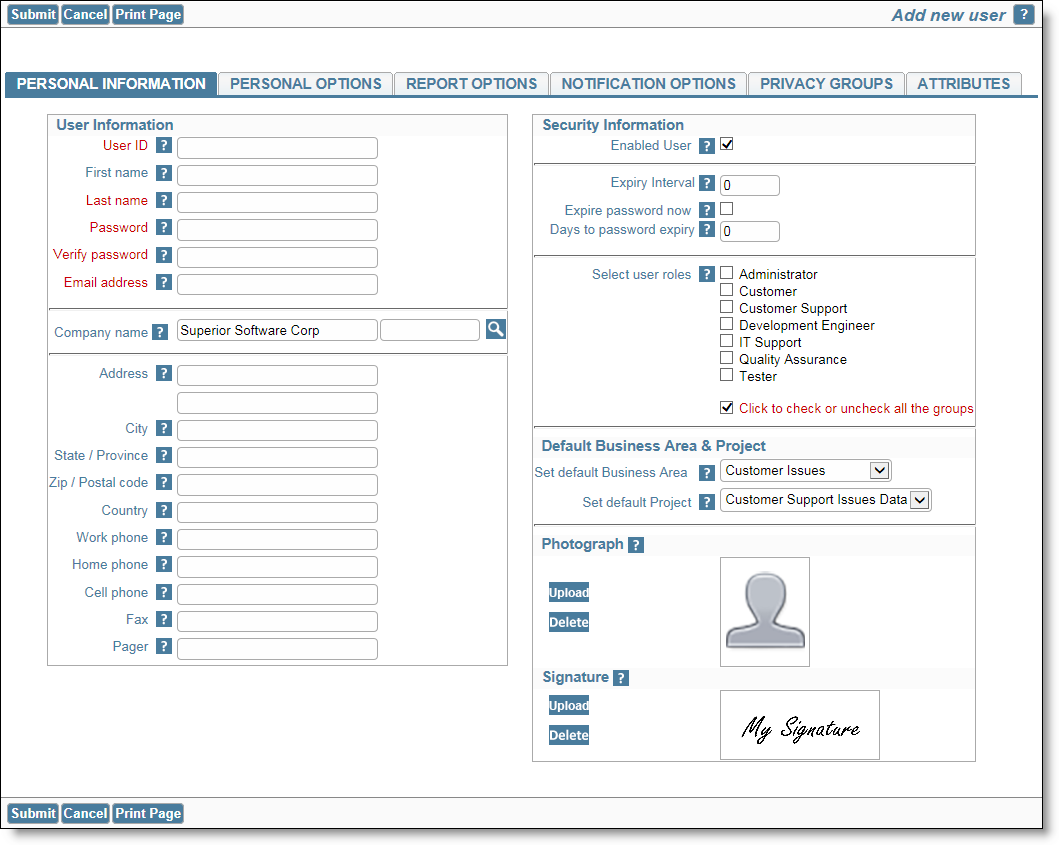
Basic Information screen
| User Information Fields | Purpose |
| User ID | The name that the new user will use to login to the system (required). User names the following letters, numbers and characters: A – Z 0 – 9 - _ . @ The user ID must be unique. |
| Alternative User ID | This field is turned off with the security permission keys named USER.LOGIN_ID and USER.LOGIN_ID_ON_ADD. When you enter the User ID for a new user, the alternative User ID is populated with the same value. This may be changed. Alternative User ID's are available to allow the changing of a user's sign on ID. User ID's are attached to many items of data within ExtraView and are used as foreign key constraints in the database. It would be complex to change all of these if you required to change the User ID for a purpose such as a name change for a user. The Alternative User ID allows the administrator to change the sign on credentials for a user, yet maintain underlying data integrity within the database |
| First Name | First name. On the Change a user’s details screen, you can control access to this field with the security permission key named USER.USER_FIRST_NAME |
| Last Name | User’s last name (always required). Note that if you attempt to add a user where the combination of first name and last name already exists, then you will receive a warning, but you will be able to go ahead with the update if you decided this is correct. . On the Change a user’s details screen, you can control access to this field with the security permission key named USER.USER_LAST_NAME. If the administrator does not have write permission to this key, they are prohibited from creating new users. The field is always visible as ExtraView is unusable if a user’s last name is not visible. Thus you cannot turn off read permission for the field. |
| Password | The user’s password. You can control access to this field with the security permission key named USER.USER_SECURITY_PASSWORD. The only occasion that you are likely to make this field not visible is when you are using a LDAP server for user authentication. There is also a security permission key named USER.USER_PASSWORD_MANAGEMENT. This controls the ability to expire user's passwords, and the time interval information associated with passwords, such as the password expiration interval and the number of days until the password expiry. Write access is needed to alter these fields. . If the administrator does not have write permission to USER.USER_SECURITY_PASSWORD, they are prohibited from creating new users. |
| Verify Password | Retype the User’s password. The same security permission key as for the Password field is applicable. |
| Primary Email Address | The email address to which automatic email notification will be sent. This is required if the behavior setting named EMAIL_NOTIFICATION is set to YES. Note that if you attempt to add a user where the email address already exists, then you will receive a warning, but you will be able to go ahead with the update if you decided this is correct. The security permission key named USER.USER_EMAIL_ADDRESS controls access to this field, but only when editing a user. The user's email address is always writable when you are creating a new user. When you are updating a user, this field may be given read or read/write permission, or no permissions, in which case it will be invisible. |
| Job Title | The user’s job title. Permission to access this field is controlled with the security permission key named USER.USER_JOB_TITLE. |
| Company Name | For internal users, this should reflect the same value as COMPANY_NAME in installation setup, especially if you are using the Privacy Group feature of the product as this match is used to determine whether a user may or may not see specific issues. As this field is instrumental in setting up privacy groups accuracy in setting the entry here is important. If you have several or many users in different companies that all access your ExtraView installation, you should consider using the COMPANY_NAME_LIST_UDF setting to provide a list of company names, to complement the manual entry of each company name and potentially spelling these differently for different users. The control for this is a behavior setting named COMPANY_NAME_LIST_UDF. If this is empty, then the Company Name for each user is entered and updated manually. When a new user is created, the field is given a default value of the value of the COMPANY_NAME behavior setting. If you place the name of a User Defined Field (UDF) with a display type of List into the COMPANY_NAME_LIST_UDF behavior setting, then the Company Name becomes a choice of entering a new value or selecting from the list of these values, eliminating the possibility of misspellings and simplifying the population of the field. The UDF field is a normal UDF in all respects, and you may share its use on add and edit screens as well as use it on reports. Note that the internal company name configured in the COMPANY_NAME behavior setting, does not appear in this list and is never added to the list. When a user self registers to access ExtraView, this field is set to a value of their email address, ensuring uniqueness and that the user cannot become a member of a Privacy group, thereby seeing issues which he is not authorized to view. When updating the user’s account, this field can be controlled with the USER.COMPANY_NAME field. |
| Address | This is two-line field that is always present on the user account screen |
| City | The city of the user. This is always present |
| State / Province | The state or province of the user’s address. This is always present |
| Zip / Postal Code | The zip or postal code of the user’s address. This is always present |
| Country | The country of the user’s address. This is always present |
| Work phone | The user’s work phone. This is always present. |
| Home phone | The user’s home phone. This is always present. |
| Cell phone | The user’s cell phone number. This is always present. |
| Fax | The user’s fax number. This is always present. |
| Pager | The user’s pager number. This is always present. |
| User field 1 - User field 10 | This series of ten fields are turned off by default, using the security permission keys named USER.USER_DEFINED_1 through USER.USER_DEFINED_10. You may enable the security permission keys and alter the titles of these fields with their entries in the inbuilt field section of the data dictionary, thereby using these fields for any purpose. |
| Security Information Fields | Purpose |
| Enabled User | This checkbox controls whether the user is enabled or disabled. User's accounts are never deleted from ExtraView; instead they are disabled and the user may no longer access their account. In addition, the user's name will not appear selectable in lists in the normal fashion. If enabled with the behavior setting named ALLOW_SEARCH_DEACTIVATED_USERS, users may still use deactivated users as a filter to search for records. The reason that user's accounts are not deleted but rather deactivated is because you may still wish to view users' names who originated issues or otherwise have their name set as a value in a field within an issue. |
| Named User | This field appears if you have a mixed mode license to ExtraView with both named and concurrent users. If this box is checked, then the user will occupy a named license, else they will occupy a concurrent license |
| Expiry Interval | This is a number that defines how many days should elapse between the user being prompted to change his password.If the value is zero, the behavior setting named PASSWORD_EXPIRE_TIME_DAYS is used to determine the interval. |
| Expire Password Now | If the administrator checks this option, then the user’s password is expired immediately. On the next occasion that the user attempts to sign on, they are forced to alter their password. Note that this option does not appear if an LDAP server is controlling user authentication. |
| Days to password expiry | The label to this field also shows the number of days left, before the password expires. You can set this field to any number of days to choose a new expiry date. If you set this number to -1, the current password may be used once, and the user must provide a new password on the next occasion they sign on. If the behavior setting named PASSWORD_EXPIRE_TIME_DAYS is set to zero, then user's passwords are not expired automatically. |
| Select User Roles | Functional teams where members have the same set of privileges. Simply click on one or more roles that you want the user to be able to adopt. If the user is not granted any role, then they will assume the role nominated by the behavior setting named DEFAULT_USER_ROLE. If they are granted more than one role, then the user will see a select list in the navigation bar, and they can assume any of their valid roles by making a selection from this list |
| Default Area / Project Fields | Purpose |
| Set Default Area | This is where you set the default Business Area for the user. This is the Business Area they will point to when they sign on |
| Set Default Project | This is where you set the default Project for the user. This is the Project they will point to when they sign on |
If you wish to store users' photographs, they can be uploaded. Valid image file types are GIF, JPG and PNG. Images are resized to 80 pixels wide by 100 pixels in height. Once a user's photograph is uploaded and saved, you may use it within workflow, for example to include a photograph of the user on the add or edit screen of an issue. This is accomplished using rules, which take the user's image and copy it into a field within the issue. If you have a field name USER_PHOTO on a sreen, you can populate it within rules as follows:
<== load ==>

	USER_PHOTO = USER.{image};
If you wish to store users' signatures, they can be uploaded. Valid image file types are GIF, JPG and PNG. Signatures are resized to 750 pixels wide by 300 pixels in height. Once a user's signature is uploaded and saved, you may use it within workflow, for example to print the user's signature on outgoing correspondence. Assume the correspondence to be printed is held within an HTML Area field on the edit screen of your issues. Placing the signature within the correspondence is a two-step process. First, create and hide a field on the edit screen which will receive the signature. This field is populated with rules, such as:
<== load ==>

	USER_SIGNATURE = USER.{signature};
Within the HTML Area field, include a token for the signature field. In this case, the token would be $$USER_SIGNATURE$$.
When the HTML Area field is used as the content for an email (probably using a rule that sends the HTML Area field as an email, the token is replaced with the image of the user's signature.
Signatures are typically scanned into your computer, and then uploaded into ExtraView. It's important to upload a signature of a usable size. There is no point scanning an entire sheet of paper with the signature somewhere in the middle, as the white space surrounding the signature will be included in the uploaded image. Scanning software often includes tools that crop images, and most desktop operating systems such as Microsoft Windows include tools that crop images. There are also many third-party utilities that perform the function. To assist you in scanning a signature of the correct size, use the template that you may download here, to aid in scanning an image to the correct size, before cropping. Print the template and ask users to sign within the box before the signature is scanned.