Layouts have a type, and many of these types may me embedded within each other. However, some such as the Add, Edit, Quicklist and Detailed Report layouts cannot be embedded in other layouts. Typically, new layout types that you create may be embedded within other layouts. For example, if you have many layouts to create that are slightly different, but a significant number of the fields share the same characteristics, you can define a layout and embed it within many other layouts, thereby sharing the configuration and minimizing the amount of work to configure your site. As well as embedding a layout within another layout, you can define alternate layouts that are rendered at run-time, according to a value of a field on the main layout. For example, you may want to embed different layouts with fields relevant to the collection of data about hardware and software, according to the user’s choice of Hardware, Software or Documentation, in a field on the main layout. When the user selects this field, the screen is refreshed, and the appropriate embedded layout will be generated. There are two methods for doing this. First there is the method to embed layouts using the "Layout Visible If" technique. Second there is the "Selected By Layout" method. It is recommended that you use the first technique. The second technique is provided for backwards compatibility. Some general rules need to be observed with embedding layouts within one another:
- You must not place the same field on a layout, and within any layout that is embedded within it. Doing so would lead to unpredictable results and errors. As embedded layouts can be created independently of layouts, and they are interchangeable, this condition cannot be checked by ExtraView prior to execution of the rendering of the screens. When rendering the screens, if ExtraView detects that a field is used more than once over all the screen (including the embedded layouts), then a warning is generated
- You should not place the same field on different embedded layouts of the same type. Fields on embedded layouts are unique across the layout type being used
- It is recommended that any embedded layout that you place on a layout should span all columns of the layout. An embedded layout should never start in any but the first column of a layout. Other placement may work, but there is no guarantee that the layout will render correctly. This is due to limitations of HTML and how different browsers will render complex HTML. You should always test your embedded layouts in all the target browsers that your organization uses
- All the layouts of a single type must be contained within the same Business Area and Project for which the template for the embedded layout is created. For example, if you create a series of embedded layouts all dependent upon the same field for selection, these embedded layouts must all reside in the same Business Area and Project
- An embedded layout should not contain the parent field of an allowed value relationship, if the child field is contained in the outer layout. Both parent and child fields can be in the same layout or the parent can be in the outermost layout with the child in the embedded layout
- With the exception of Related Issue Display layouts, you cannot embed a layout within a Quicklist layout
- You cannot embed a layout within a Related Issue Display layout
- As a general rule, you should never embed a layout within itself, causing recursion or a condition which will be an infinite loop. ExtraView cannot detect this condition until runtime, and this can cause significant system and behavior problems requiring the restart of the application server.
Embedded Layout Types
- Simple embedded layouts - In this instance a layout type that you create is embedded inline within another layout
- "Visible If" layouts - Layout types that you create are all embedded within a layout. Each layout is initially hidden with a VISIBLE IF layout cell attribute. This attribute references a driving field, usually a tab or list field such that each of the embedded layouts is made visible one by one, according to the value of the tab or list field
- Repeating row layouts - These layout types must be embedded within another layout. You cannot embed another layout within a repeating row layout
- Related issue layouts - These layout types must be embedded within another layout. You cannot embed another layout within a related issue display layout.
- "Selected By" layouts - These embedded layouts are driven by a tab or list field. A template layout is created and this is used to create a different layout that will appear under each tab or list value. This is done with the LAYOUT SELECTED layout cell attribute. "Visible If" layouts are recommended and simpler to configure. "Selected By" layouts are provided for backwards compatibility only and you should use the Visible If layouts going forward for any new configuration.
"Visible If" Layouts
As an example, you may want three cells on a layout to be displayed according to the value selected in a list box. You may set this up with embedded layouts, or with the layout cell attribute named VISIBLE IF on each of the three cells. A guide to implementing the most effective method is to consider the following:
- If you have several or many fields to make visible, embedded layouts are processed a little faster, resulting in higher performance for the end user
- Once set up, embedded layouts can be re-used on different layouts such as add and edit screen layouts.
To set up a "Visible If" layout and embed this within another layout, follow these steps:
- Use the Create and Maintain Layout Types administration utility to create a new layout type. The usage of the layout should be Screen
- Navigate to the Design Center, select the user role, business area and project where you will use the embedded layout, and the use the list with the label Add a new layout for the entire system to open up a new layout of the type you created in the previous step
- Place the fields onto this new layout within the Design Center. This will become the embedded layout. Save your layout
- Edit the layout (or layouts) within which you wish to embed the layout. If necessary create space for the layout you are going to embed, by creating a blank row. Typically you will also place the layout beneath its driver field. The driver field is the field that will be used to select and make visible, the embedded layout, dependent upon its value
- From the list of layouts in the Design Center, locate the layout you are going to embed, and drag it to its position on the main layout. Extend its width across the main layout, as required
- Now, add a layout cell attribute to the embedded layout. This will be an attribute of the form VISIBLE IF. Select the field and its value which will be used to trigger the visibility of the embedded layout
- If you want to embed further layouts, each triggered off a different value in the driver field, you can create a layout type for each of the values of the driver field, embed the layout within the main layout and then use the VISIBLE IF attribute to trigger its visbibility based on different values of the driver field.
"Selected By" Layouts
This feature allows the administrator to design a series of layouts, which are generated within a global layout such as the Add or Edit Issue screen. Each of these layouts is based upon the value of a trigger field. For example, you may want to generate a series of fields within a layout, dependent on the category of issue you are adding. Thus, if you want to render a different embedded layout for each of Software, Hardware and Documentation, which are different values of UDF named ISSUE_TYPE, with a title of Issue Type, then you will choose the Issue Type field. When the user selects the value of Issue Type, the embedded layout is refreshed, displaying the layout that is tied to the value of the trigger field. One usability feature is that if you have a form within a browser window that is longer than the height of the window, and you choose a different value for the trigger field, ExtraView will place the new embedded layout to display at the top of the screen, thereby preventing the situation where the new layout may be hidden beneath the bottom of the window. The sequence of administrative operations required to create selectable embedded layouts is as follows:
- First, decide on the field that is to be used to trigger the rendering of the different embedded layouts. For example, if you want to render a different embedded layout for each of Software, Hardware and Documentation, which are different values of the Issue Type field, then you will choose the Issue Type field.
- From the Administration Site Configuration tab, select Create and Maintain Layout Types feature. The following screen appears:
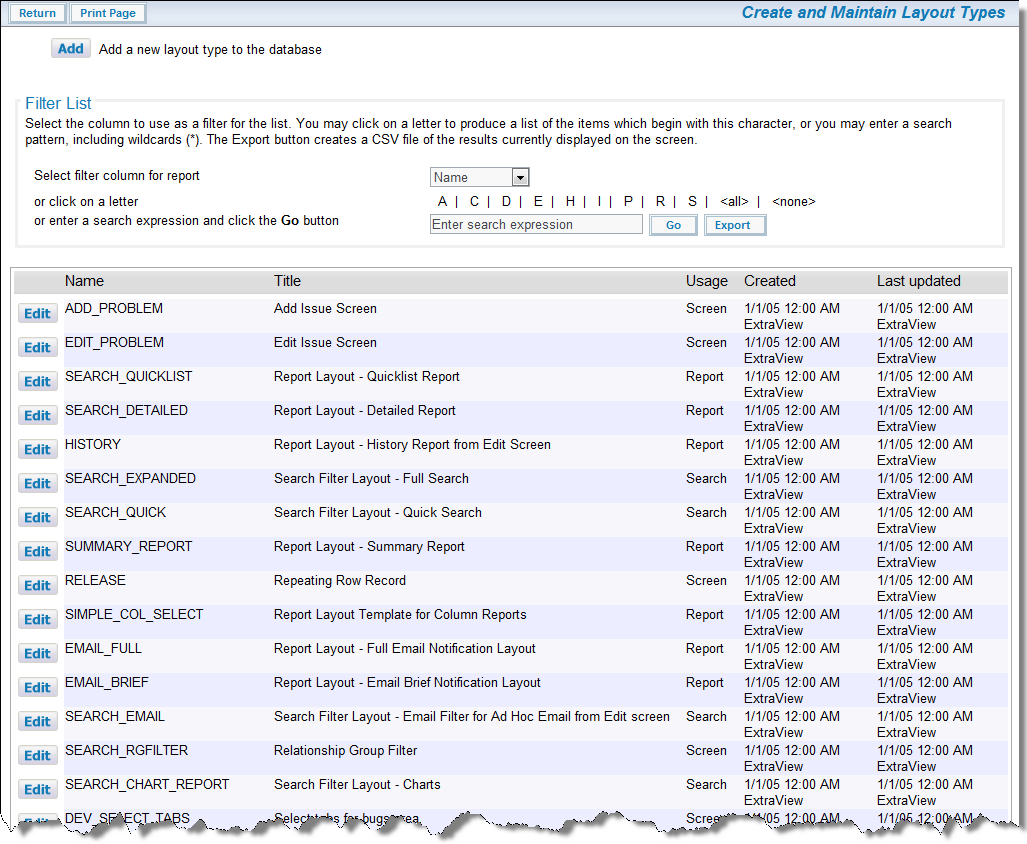
Layout Types
- Press the button to add a new layout type to ExtraView. You must name this layout with the fixed name of the trigger field. In our example, this is ISSUE_TYPE. The title should be Issue Type and the type must be Screen
- Now navigate to the Design Center
- Navigate to the Business Area and if appropriate, the Project within which you want to use the embedded layouts
- Next, select the layout type you just created from the Add a new layout for the entire system select list. Once again, in our example, this is named Issue Type
- Give this new layout a title and a description. This layout is only used as a reference to create the different embedded layouts. You do not need to add any fields to this layout. Simply Save this layout. This now serves as a template for each embedded layout you create. Any fields that are contained in this layout will be propagated to the selectable embedded layouts created in the remaining steps of this procedure
- Return to the initial Design Center screen
- If you are adding the embedded layouts to the Add screen, edit the appropriate add screen. Place the Issue Type field on the maing grid of the layout, if it is not already there
- Now place the embedded layout on the main grid, by dragging it from the list of Layouts. In our example, the layout is named LAYOUT.ISSUE_TYPE. You should be sure to give the embedded layout a suitable colspan within the layout. ExtraView will suggest that it can do this for you at this step, creating an embedded layout that will span the width of the entire layout
- Step 12 will be repeated for each value of the Issue Type field (in our example, Software, Hardware and Documentation). We will be creating and saving an embedded layout for each of these values, from the template created in step 7
- Make sure the embedded layout is selected on the main grid and click on the New layout cell attribute button. Add a layout cell attribute of LAYOUT SELECTED, for the field named Issue Type and then select the appropriate value for each required embedded layout (often there is an embedded layout for every value of Issue Type, but that is not necessary). For example, if you want an embedded layout for the Software value of Issue Type, choose Software and Return to the layout
- Save the layout and Return. You should see the new layout in the list of layouts, with the Select by field containing the title of Issue Type, and the Select by Value containing the values that were specified in the SELECTED attributes
- You may repeat steps 12 and 13 for other values as your needs change (or you add values to the selector UDF) in the future. From the Design Center you can directly proceed to editing the layout cell attribute of the LAYOUT.ISSUE_TYPE field, add the selected value, and then Save the layout. The new embedded layout will be automatically created for each new value added to the LAYOUT SELECTED attributes
- You can delete selectable embedded layouts as you would delete any other layout. However, you should not delete the “template” layout created in step 7, or you will not be able to add new selectable embedded layouts of that type.
Positioning Embedded Layouts
Within ExtraView, a design decision was made to always align the columns of an embedded layout with the columns of the layout that embeds it. This provides the most pleasing presentation of fields to a user. However, the limitations of HTML are such that this works precisely when an embedded layout is defined to start in the first column of the layout within which it is created. If the embedded layout has multiple rows (and most do), then the second and subsequent rows will always be rendered from the first column of the second and subsequent row, which may cause a misalignment. To prevent this, set a rowspan on the field at the left of the embedded layout, such that it spans one row greater than the number of rows in the embedded layout. To see this effect, see the following two layouts and the differing rendering of the results:
Layout 1

Layout definition with embedded layout
Note that this layout leads to the wrong rendering of the embedded layout, where the embedded layout titles appear correctly, but the data rows are offset to the leftmost column.
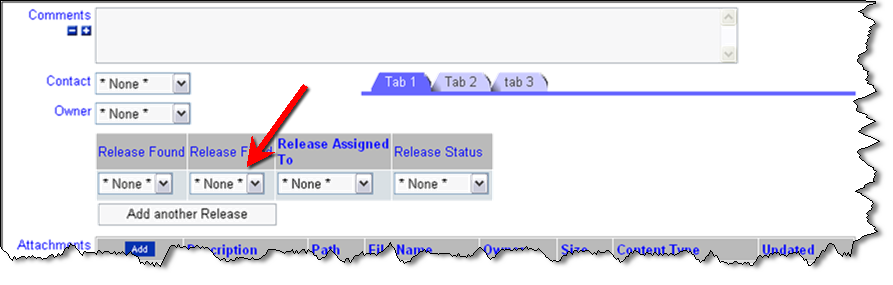
Rendering of layout
Layout 2
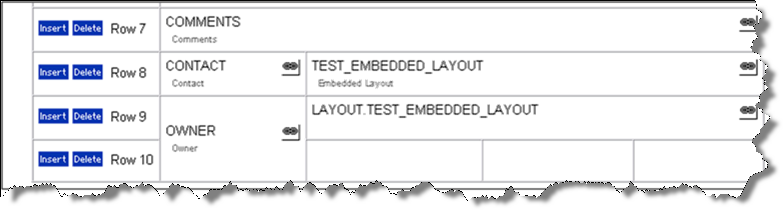
Layout definition with padded field in first column
In this layout, not that the OWNER field was set to have a rowspan of 2. This corrects the position of the embedded layout rows so they align correctly.
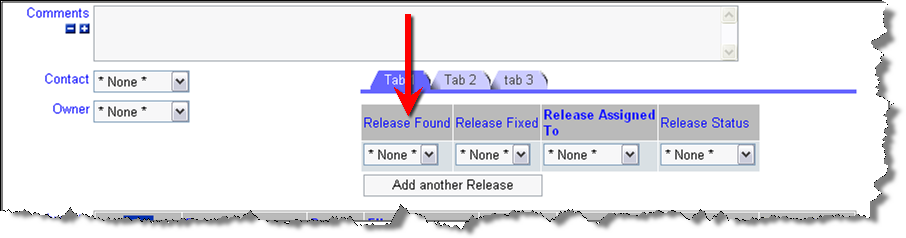
Rendering of layout