The basic principal of the repeating row layout is that it provides a repeating block of fields, where each block can be added by the user at runtime, or added by business rules, creating additional fields on the screen. For example, you may want to have a row of fields that refer to a sub-issue, assigning part of the issue to an individual. You can create as many rows as needed, to assign different parts of the issue to different people. Each of these may have a field named RELEASE_STATUS, which can be used to follow the workflow you create.
You may embed repeating row layouts within an ADD_PROBLEM, EDIT_PROBLEM, EMAIL_FULL, or HISTORY layout. You may also embed a repeating row layout within another layout which is itself to be embedded within one of these layouts.
You can also create UDF’s that are attached to the repeating records, as opposed to being added to the main issue record. Care should be taken when doing this. For example, it is problematic for users and for reporting to add field display types such as Log Area to each line of a repeating record. Log Area fields are therefore not supported on repeating record layouts. The section on the Data Dictionary describes how to set up UDF’s, including UDF’s attached to repeating records.
At the same time as this limitation, note that if you move a field defined as a repeating row field from within one repeating row layout, to a different layout, the data entered by end users does not follow the field. The data is stored with a connection to the repeating row layout as well as a connection to the field. You may move the field, but data previously associated with the field will not be visible. It is a better practice on a system that already contains data, to create a new field for the new layout, and remove the field from the old layout. In this way any historic values accumulated for the field will still be available.
The following keys exist for both PR_ADD_PROBLEM and PR_RESOLUTION, having their effect on the Add screen and the Edit screen respectively.
| Key | Purpose |
| RELEASE | This permission key controls access to all the repeating row layouts that appear within the Add screen and the Edit screens. Giving this key read and write permission for a role enables all the repeating row layouts that appear |
| ALLOW_ADD_REPEAT_RECORDS | This controls the visibility of the Add Another xxx button on the screen. The xxx text is determined by the title to the data dictionary field named RELEASE |
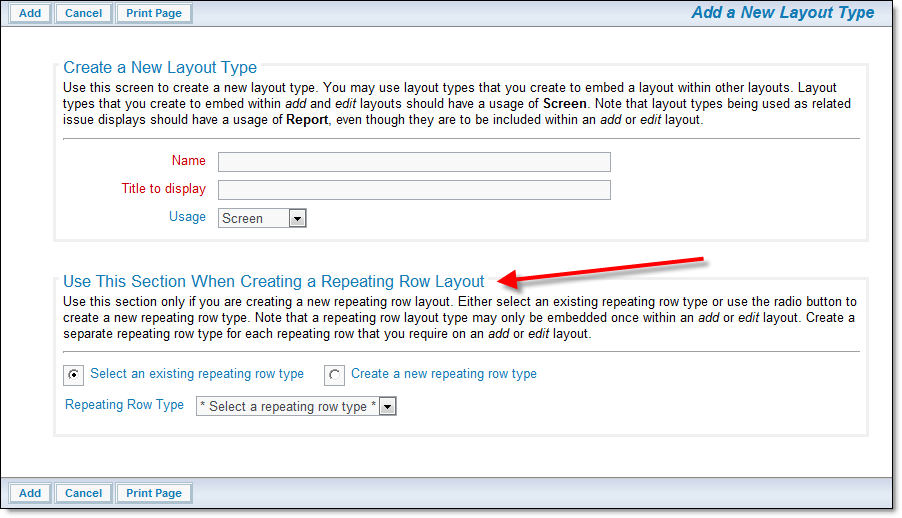
Creating a Repeating Row Layout
Add Release Layout
The inbuilt fields that can be added are taken from the following list. Note that these fields may only be placed on a single repeating row layout.
Design Center screen
Repeating records such as the inbuilt Release layout are not designed to be rendered as individual screens, but designed to be embedded within other layouts. This allows you to create a system that either allows you to have issues that can, for example, have multiple release records within each issue. Different layouts can be designed that can be embedded within both the Add and Edit screens if desired.
You should be aware that you should not create recursion by embedding a layout within itself. Note that if you require a system where you require a single repeating row record (e.g. there is only one release found and one release fixed for each issue) then you should not use a repeating row record.
The inbuilt repeating record named RELEASE contains fields with the following names and default screen titles:
| RELEASE_FOUND | Version Found |
| RELEASE_FIXED | Version Fixed |
| RELEASE_SEVERITY_LEVEL | Severity Level |
| RELEASE_PRIORITY | Priority |
| RELEASE_STATUS | Status |
| RELEASE_OWNER | Owner |
| RELEASE_ASSIGNED_TO | Assigned To |
| RELEASE_RESOLUTION | Resolution |
Each of these fields is protected with a security permission key, one for the add screen and one for the edit and query screens. These are manipulated in the standard way, as explained in the section named Grant Security Permissions.
There is a security permission key that allows you to control the presence or absence of a delete checkbox on the repeating row. This is named PR_RESOLUTION.PROBLEM_RELEASE_DELETE. This key controls the presence of a check box on a repeating row record, that allows the user to delete a complete repeating row. Write access is needed to control the checkbox.
Note: There are two security permission keys, named PR_ADD_PROBLEM.RELEASE and PR_RESOLUTION.RELEASE. These keys control the presence of the entire repeating record, and switch the entire structure on or off for an individual user role. To turn on or off access to the whole repeating record, use the write privilege.
Note: There are two security permission keys named PR_ADD_PROBLEM.ALLOW_ADD_REPEAT_RECORDS and PR_RESOLUTION.ALLOW_ADD_REPEAT_RECORDS that control the visibility of the Add another xxxxxx button beneath the repeating rows on add and edit screen layouts. You can remove the button to stop users in some roles being able to add additional repeating rows, but have users in different roles being allowed to add the repeating rows. The xxxxxx is the title of the data dictionary field named RELEASE. For example, if you provide a title of issue to the field, then the button is named Add another issue.
Differing purposes may require you to implement repeating row records which either have or do not have a unique key field. There are two parts to configuring this capability. First, in the Workflow behavior setting screen, use the ENFORCE_UNIQUE_RELEASES setting to switch on the capability of enforcing a unique key field. Second, you must place the field named RELEASE_FOUND on the repeating row record. This normally has a display type of LIST, although TAB and POPUP are also supported. You can re-title the field in the data dictionary to any suitable title you require for your installation. Also, note that the RELEASE_FOUND and the RELEASE_FIXED fields are the child fields where the PRODUCT_NAME field is the parent. This means that if you have the RELEASE_FOUND or RELEASE_FIXED fields on a repeating row record, then you must have the parent PRODUCT_NAME field on the add and edit screens that contain the repeating row record.
The ExtraView Status Change Rules features work with the inbuilt RELEASE_STATUS field. The RELEASE_STATUS field is treated the same as the inbuilt STATUS field with Status Change Rules. One aspect of this is that you may have configured the STATUS field to use Status Change Rules, but you are not placing the RELEASE_STATUS field on the RELEASE layout described on this page. In this case, ExtraView still needs to be able to handle the * None * value for the missing RELEASE_STATUS field. To accommodate this, configure the Status Change Rules to accept a * None * value, i.e. it is a legitimate update to allow the status of the issue to be changed to a null value, for the appropriate range of Business Areas, Projects and Roles that are configured.
There are occasions when working with repeating rows that it is useful to know which row you are targeting with an event. For example, you may have a popup field that returns a value to a specific field on a repeating row. You will need to know which row to target with the return value. To make this task simpler, there is a JavaScript function available on add and edit layouts that you can call from an HTML modifier to any cell. This function is named getRowNumber and is used in this way:
var rowNum = getRowNumber(this, this.form);
This function returns the following in rowNum:
-1 if the field is a singleton repeating row
0 – nn if the field is in a repeating row with 2 or more rows, where nn indicates which row the field is in.
Repeating row layouts do not support –
As far as possible, repeating rows are added and updated on an add or edit screen using Ajax. This provides the best performance possible. There are some cases where ExtraView cannot use Ajax, and in this case all the repeating rows have to be re-rendered upon a change. This usually occurs if there are field differences between what is rendered on the page and what will be on the newly added record.
For example, suppose you have a FIELD/LAYOUT VISIBLE IF layout cell attribute on a field and the parent field is also on the same repeating row. It is possible that you can make the field invisible on all the rows. When this happens, ExtraView does not display the title for that field and suppress the entire column. If adding a new row makes the invisible column visible, then ExtraView needs to re-draw the entire set of repeating rows.
The following cases show where ExtraView forces a complete rendering of the repeating row layout, as opposed to an Ajax refresh of just a single row: