Planning reports will not work with all configurations, and require your data to be organized in a specific way. Your administrator may have turned off this feature if it's not appropriate.
The basic premise is that you have a controlling issue (i.e. a parent issue). This controlling issue will be in a relationship with a number of child issues, where each of the child issues has two date fields, signifying a start and an end time for an event. The use case is often that you have a project, and this project has an open-ended number of tasks, each scheduled to start and to stop at a specific time.
The Planning report allows the user to see many project records, and their tasks, all on a single report. The user can interact with the tasks on the report, allowing them to move the start or end dates of each task. The user can also drilldown into any task and update the fields on the task. This is shown in this screenshot:
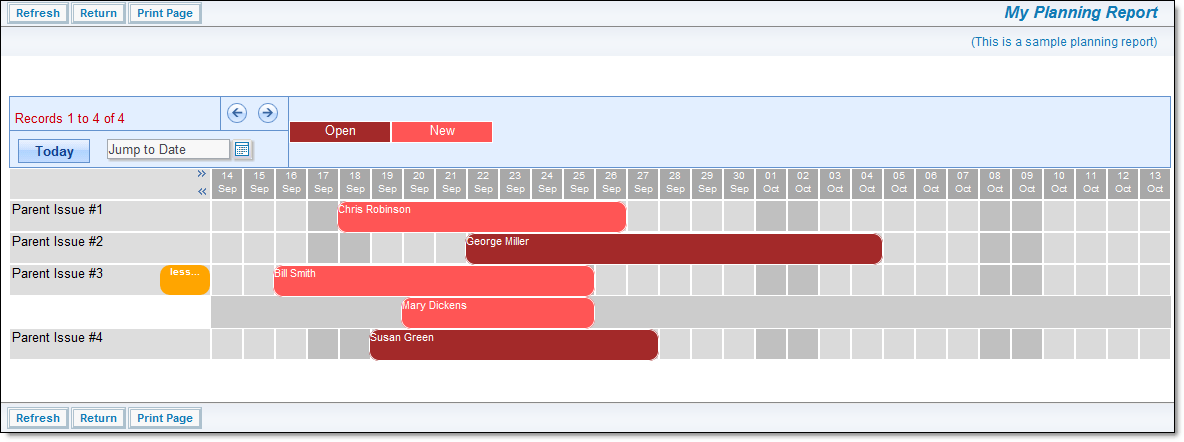
Planning report output
The user interaction on the report allows the "grabbing" with the mouse, of a task, or the edge of a task. When the user moves the mouse, the entire event, or the start or end date will move. When the user releases the mouse button, the task is reset to the new time period. If the user clicks on a date within the grid and drags the mouse to another date, a window will popup, allowing the user to enter a new task for that time span. To set up a new planning report, the screen looks similar to this:
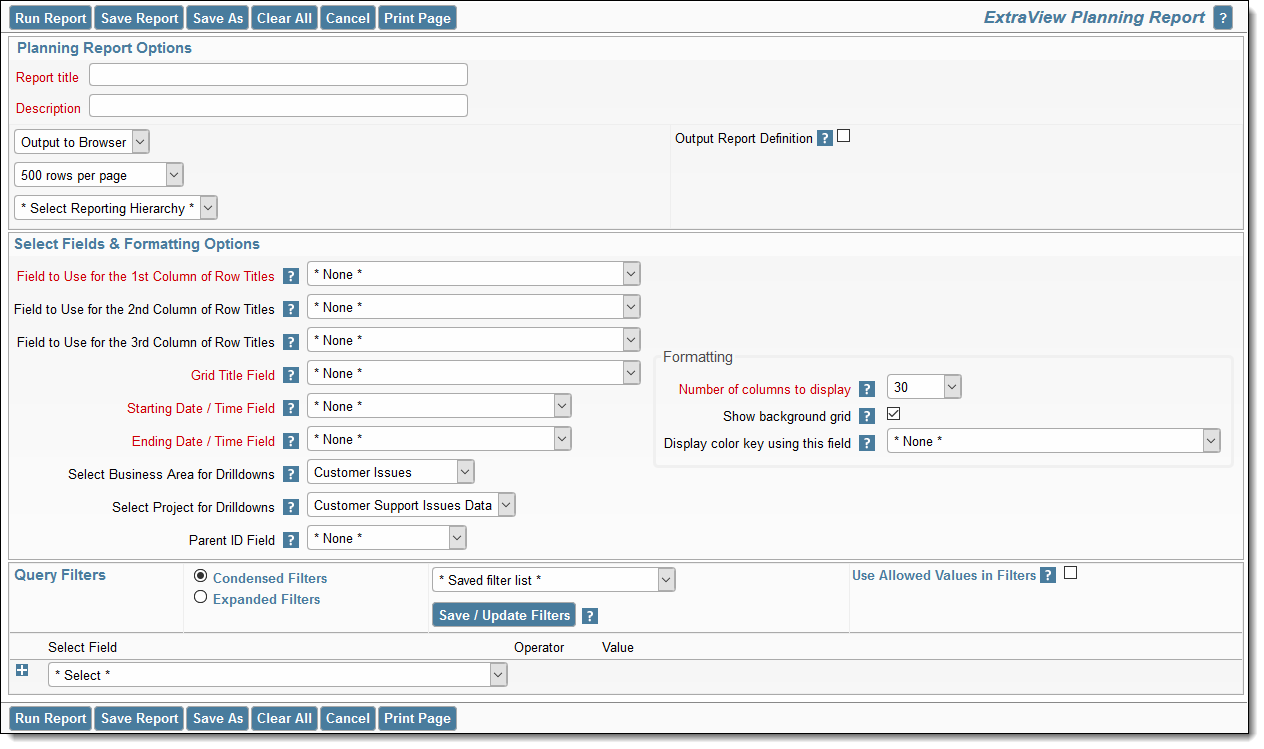
Planning report setup
-
Use reporting hierarchy - You must choose a reporting hierarchy for a planning report. This will have been created by the administrator
-
Fields to Use for Row Titles - These are the fields on the parent issue that you will use for the titles to each row on the output
-
Grid Title Field - This field is used to provide the title that is displayed on each child issue
-
Starting Date / Time Field - This is the field on the child record that contains the starting time of the event
-
Ending Date / Time Field - This is the field on the child record that contains the ending time of the event
-
Select Area for Drilldowns - When the user double clicks on a child record, this is the Business Area that is selected in which to start the add issue operation
-
Select Project for Drilldowns - When the user double clicks on a child record, this is the Project that is selected in which to start the add issue operation
-
Parent ID Field - This is the name of the field in the child record that contains the pointer to the parent issue
-
Number of columns to display - The default is that the report will display 30 days worth of information. You may alter this to display between one and sixty days of information
-
Show background grid - Turns the background grid to the report off and on
-
Display color key using this field - As you can see in the above screenshot, there are two colors of blocks. These represent different values of the STATUS field inthe different child records. The color key is shown above the grid.